Advice on building a MFT top sysport

orsomagno

Member
Joined
Nov 11, 2020
Messages
13
Hi all, I need (more than one) advice on realizing a tailor made version of a MFT+sysport cart for my needs.

First of all, I need to realize it in precise and small dimensions, as per the available place to store it: a mere 50 by 80 cm roughishly.

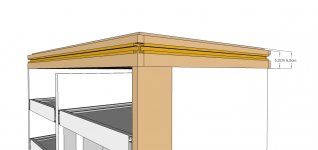
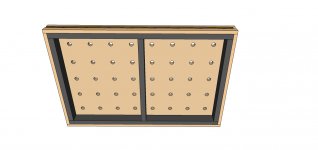
And then i need a robust and FLAT (the kind of flat that always stay flat) top, so I'm thinking on a torsion box style top with two layers of 19 mm MDF and an apron between the two.

So, in your opinion, what's the minimum distance, and so the minimum height of the apron to guarantee a flat top? I'll be using some 25 mm poplar plywood ripped in stripes.

Some sketck following asap

PS no native speaker, so forgive my grammar errors please  ;D
 
Apart from being rigid enough to keep the surface flat, the aprons should be tall enough to provide room for clamps to be put through the dog holes - and, perhaps, tall enough that you can make cut-outs in them so that you can retrieve any small items that drop through the holes (but leaving enough material for strength)(.
 
sounds correct. So it could be a doable way to have a top glued to an apron and without being close in the lower part?
 
Be careful of making your top MFT too thick, the ratchet clamps won't be able to turn the 90* bend if you do.
 
so, no more than 19 mm is the way, perfect. I draw a sketch of the project, in order to show what I have in mind

And a draw of the possibly-to-be apron, shown bottom up
 

Attachments

  • mftc-sketchup1.jpg
    mftc-sketchup1.jpg
    113.8 KB · Views: 375
  • mftc-sketchup2.jpg
    mftc-sketchup2.jpg
    110.2 KB · Views: 292
  • mftc-sketchup3.jpg
    mftc-sketchup3.jpg
    150.3 KB · Views: 331
  • mftc-sketchup4.jpg
    mftc-sketchup4.jpg
    129.2 KB · Views: 308
Keep in mind that the new systainer3 will have an accessory plastic rail for mobile racking. You won’t need to build shelves... I’m guessing it will worn off of 32mm hole spacing. So I would future proof your design to allow for the new systainers, otherwise you will need to add blocking to shim out the sides?
 
I didn't know this new fixture. The design of my sysport is pretty much determined by the space available, so to speak I'm forced to have a row of systainer to be opened frontally as usual, and a row stored showing the side, to use the maximum possible storage.

So the feature of the new sys3 can wait, for now; we'll see at the next buy
 
mkasdin said:
Anything much over 3/4” you may need to chamfer the hole from the underside
Yes, I did this a few years ago with a piece of 1 1/8" MDF. Then I had to run a 45 degree chamfer bit around all of those holes. Sadly that top was destroyed in a fire about a year ago. So I remade my new top with 3/4" MDF. I liked the stiffness/sturdiness of the thicker top, but I was in quite a hurry to get the new one drilled and ready to work.
 
Thank you, i'll stick definitely with a 19 mm top.

I'm in a middle of a brainstorming with myself, just letting the idea of a paulk workbench enter.

Someone can explain why he's using plywood for the sides and carving out that rounded parts instead of constructing the sides from pieces of ply or wood in order to minimize the waste?
 
orsomagno said:
Someone can explain why he's using plywood for the sides and carving out that rounded parts instead of constructing the sides from pieces of ply or wood in order to minimize the waste?

I built a large, 4x8 Paulk workbench earlier this year.  I did do those round cuts as Mr. Paulk has done.  But, I would not do it again.  Just make the cut-outs rectangular.  Much easier to do and better access to underneath.  I did learn to do plunge cuts with my TS55 for this, so that was a plus.
 
Rick Herrick said:
orsomagno said:
Someone can explain why he's using plywood for the sides and carving out that rounded parts instead of constructing the sides from pieces of ply or wood in order to minimize the waste?

I built a large, 4x8 Paulk workbench earlier this year.  I did do those round cuts as Mr. Paulk has done.  But, I would not do it again.  Just make the cut-outs rectangular.  Much easier to do and better access to underneath.  I did learn to do plunge cuts with my TS55 for this, so that was a plus.

The cutouts serve 2 purposes.  Ron is/was a mobile carpenter so reducing the weight of the bench was important, but also that area below allows you the ability to keep your worktop clear of all your tools.  I built one 4x8 split down the middle so that I can move it by myself and I love it.  Also, use the Parf Mark II to drill the holes, you will not be disappointed.
 

Attachments

  • 2013-11-05 19.39.18.jpg
    2013-11-05 19.39.18.jpg
    166.7 KB · Views: 339
The Paulk bench is a kind of torsion box.
Like a truss, the farther apart the cords are the stiffer the truss.
A lot of volume would be wasted if the sides were closed.

Rectangular cutouts would allow more stuff to be stored inside but would weaken the bench.
It’s a compromise the builder has to make.

 
yep, my fault, I'm not so skilled saying what I would say.

I clearly understand the idea of the torsion box (having made some by  myself) and the reason of the holes into the frame.

I asked if someone tried to make an alternative use of plywood NOT cutting away materiale but assembling stripes of wood to make the same truss shape. And obviously someone did it, on this forum:https://www.festoolownersgroup.com/...ut-regarding-guide-rails/msg364125/#msg364125

Now it's only to me, to understand if justify such a construction for a mini tabletop like mine or if it's overkill.
And maybe a simpler apron could offer the same stiffness at a fraction of the space used
 
The minimum separation between the top and bottom of an MFT styled and purposed table top will be the minimum that allows the clamp to be used. About 2-1/2”.

It would also be useful if you can fit your hand in between to fasten knobs so that might require a little more clearance.

You can certainly use strips of wood to build the apron but solid is better than ply.

To keep the top really flat will require regularly space supports which will rule out some clamp positions. Probably not a big loss. You can use posts as supports/spacers to preserve clamping options but posts have to be perfectly installed to keep the panels parallel. A little lean and you make a high spot in the surface.
 
so a mere 6.35mm, thanks, using solidwood instead of ply for the apron. I'll provide a central support, even if with these tiny dimensions would be probably overkill.

So, on with the wood now!
thanks

 
Back
Top