Another 1/2" ply and 4 mm bit question

snichols

Member
Joined
May 14, 2008
Messages
24
The dresser saga continues... If you want background, it's here: http://whilethegluedries.wordpress.com/2013/08/27/this-dresser-she-mocks-me/

If not, it's not necessary to answer my question.

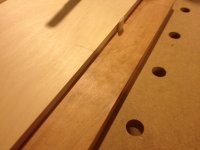
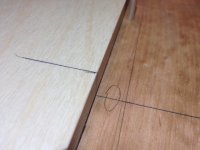
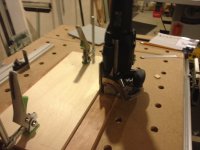
Basically, I'm trying to make "I-Beams" to help support my web frames. The material is 1/2" ply and I want to plunge into the center of a board. I'm using the domino manual and trying to get the 4 mm holes to line up and keep the boards between the lines (see pictures).

Is there an offset difference from the bottom of the domino when using the 4mm? If so, what is it?

Also, I'm wondering if there is an easy way to accomplish this task without measuring for and offset and then resetting my guide board. The method for bookcase shelves from the manual seems to be the closest application I can use as a reference.

Please take a look at the pictures and let me know if there is another way to do this.

Thanks in advance.

-Shawn


Attachments

  • photo 1.JPG
    photo 1.JPG
    571 KB · Views: 298
  • photo 2.JPG
    photo 2.JPG
    567.1 KB · Views: 296
  • photo 3.JPG
    photo 3.JPG
    590.9 KB · Views: 327
Center line of cutter to base of  Domino is 10 mm no matter which cutter is in the machine.

Tom
 
Yes there is a centre line on the base and the height of the metal steps on each side also marks the vertical centre namely 10mm.
 
Shawn,

1/2" ply is closer to 15/32 which is 11.9 mm. The numbers you need to know through the entire process are 6 and 16.

Here is a video of what you need to do to make the layout work for you.

I hope this helps you get to where you want to be.


Tom
 
Holy cow tom! Thanks so much. I can't believe you made that video for little ole me. I definitely owe you one. This is exactly what I needed. I'll be working on this when I get some time in the shop. My time is sporadic with two girls and a day job.

I'll keep you posted on my results and give you an update. The FOG rules!

-Shawn
 
You're welcome, glad it worked out.

To address the glue up, note how you disassemble the unit. What can be glue into modules do so. Just seeing pictures it is hard to determine how to do the glue up. You'll get it.

Tom
 
Tom,
  I like your little domino-holding-block.  Good explanation of the tool markings.

Shawn,
Make note of Tom's use of the right hand when plunging into the face of the ply. This is to steady the tool on the X axis.  It will slide off of your mark, if you don't support the tool.
 
Shawn,
Thanks go to Tom and others for showing you >>> ME >>> and others with less experience just how it should be done.
My special thanks goes to you.  Your questions and your results from plunging ahead with less experience and unforeseen results are as informative as are the results shown from perfection.  I have checked your website and you are, i assure you, among friends who can definitely relate to your problems.  I also like your sense of humor in relating.
Tinker
 
Sorry for the confusion on the fence setting. I had forgot to include any mention of it in the video, so I went back and shot a short segment. Seeing I'm such a master at making videos, I went and edited out the part about the fence scale starting at 5mm [oops]. This is the raw video of how the scale works. As you can see I included the step block, forgot the most important part.

As NYC pointed out I used my right hand to steady the Domino. I'm left handed so the right hand is used on the base to steady and the left hand is used to plunge. It may be more comfortable for a righty to do the opposite.

After a few battered fingers I figured there had to be an easier way to hold the Dominos. It was one of those dohhhh moments.

Another thing I learn, never use the iPhone video camera in the portrait mode.

Tom

 
Back
Top