This is an old post but some reason the images were lost on 2010. I've edited it to repost the photos.
Update:
9 years later still glad to have made it. I haven't seen the back in ages but I've just made another that supports my MFT and can accommodate my growing collection. I used the same process and critical measurements. I'll post the results when I have finished it.
[attachimg=6][attachimg=7][attachimg=8][attachimg=9][attachimg=10][attachimg=11]Tired of the Tetris game that I played every day with my systainers trying to get to the tool I wanted it dawned on me that I really need a shelving unit for my modest collection.
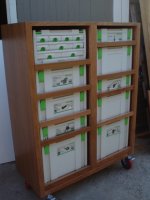
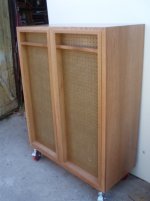
[attachimg=1]I think Systainers are great for organizing and on-site efficiency but in a small shop you need a system that keeps them handy. I read Neil's post and saw Brice's sketch up and thought it would be worth my time to build one. It's tall and narrow because I need to move it around to get to my lumber, but the dimensions were also dictated by available materials.[attachimg=2]
I had a few sheets of 3/4" Cherry shop ply left over from a recent job. They were already cut into 48"X16" pieces. I scrounged some solid cherry and peg board from my off-cut pile, the casters were also due to change-orders, the finish is Target Coatings garnet shellac and lacquer also left over from that job. All I had to buy was a box of ten 14"drawer glides for $58.
It was also an opportunity to try a few different techniques in construction because of Festools. I still use face frames and attach them to the carcasse with splines, but I used dominoes instead of dadoes or sliding dovetails to join various panels. Another first was mitering the top to the sides. I have tended to avoid miter joints unless they have some interlocking feature feature because they lack strength. The MFT3 with TS55 lets me cut accurate and square miters. The Domino makes them strong. The fence stop kept the sides the same length and the domino aligned everything quickly.
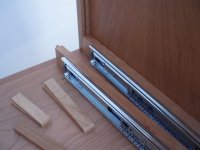
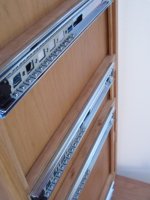
I milled cherry runners for the slides with tongues at each end to mate with slots cut in the back of the face frames. These were not glued in but rest on spacers made out of spline material. Re-arrange the spacers or cut new ones to adjust the shelf configeration. This saves time in planning and assembly. The width of the runners was 1 3/4" so screwing the slides to them required no measuring to get them on center.[attachimg=5]
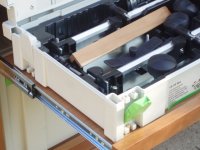
Thanks Neil for the idea of dowels to locate the systainers on their shelves.[attachimg=3]
The 2" deep back is because I had two extra inches of depth to use up. The cross shelf there is to hang clamps and the peg board can be used to hang other stuff like jigs I've made.[attachimg=4]
Update:
9 years later still glad to have made it. I haven't seen the back in ages but I've just made another that supports my MFT and can accommodate my growing collection. I used the same process and critical measurements. I'll post the results when I have finished it.
[attachimg=6][attachimg=7][attachimg=8][attachimg=9][attachimg=10][attachimg=11]Tired of the Tetris game that I played every day with my systainers trying to get to the tool I wanted it dawned on me that I really need a shelving unit for my modest collection.
[attachimg=1]I think Systainers are great for organizing and on-site efficiency but in a small shop you need a system that keeps them handy. I read Neil's post and saw Brice's sketch up and thought it would be worth my time to build one. It's tall and narrow because I need to move it around to get to my lumber, but the dimensions were also dictated by available materials.[attachimg=2]
I had a few sheets of 3/4" Cherry shop ply left over from a recent job. They were already cut into 48"X16" pieces. I scrounged some solid cherry and peg board from my off-cut pile, the casters were also due to change-orders, the finish is Target Coatings garnet shellac and lacquer also left over from that job. All I had to buy was a box of ten 14"drawer glides for $58.
It was also an opportunity to try a few different techniques in construction because of Festools. I still use face frames and attach them to the carcasse with splines, but I used dominoes instead of dadoes or sliding dovetails to join various panels. Another first was mitering the top to the sides. I have tended to avoid miter joints unless they have some interlocking feature feature because they lack strength. The MFT3 with TS55 lets me cut accurate and square miters. The Domino makes them strong. The fence stop kept the sides the same length and the domino aligned everything quickly.
I milled cherry runners for the slides with tongues at each end to mate with slots cut in the back of the face frames. These were not glued in but rest on spacers made out of spline material. Re-arrange the spacers or cut new ones to adjust the shelf configeration. This saves time in planning and assembly. The width of the runners was 1 3/4" so screwing the slides to them required no measuring to get them on center.[attachimg=5]
Thanks Neil for the idea of dowels to locate the systainers on their shelves.[attachimg=3]
The 2" deep back is because I had two extra inches of depth to use up. The cross shelf there is to hang clamps and the peg board can be used to hang other stuff like jigs I've made.[attachimg=4]