Any tips on scribing?

eddomak

Member
Joined
Dec 13, 2013
Messages
307
My recent project has called for me to scribe quite long distances (around 2 meters) of 18mm birch plywood to the wall. The wall is painted plastered brick.

I find that if I do not scribe, then the gaps between the panel and the wall can be quite large 2mm-4mm). When I scribe (using a Fastcap Accuscribe and cutting using a Festool Carvex) I get a better fit, but still have gaps of 1mm -2mm, which tempts me to just throw some filler at it and run my finger down (which sort of defeat the point of scribing).

Are there any hints that people have on how to get better fit, apart from more practice?

Thanks!

 
Is the brick plastered completely or are the mud joints still present?  If mud joints are still present, your results are pretty good.  You could take a piece of thin plywood or Masonite and make a template, then once satisfied you can transfer the scribe to the finished piece.

As far as tools, I am not a fan of the Fast Cap scribe. I think it is too complicated and bulky.  I have been searching for years for the "perfect" scribing tool.  I still resort to my old trusty engineer's compass.

In the end, remember that the material your are scribing will move. Regardless of what results you achieve today will not be the same tomorrow.  Because the brick moves at significantly lesser amounts, you will have to rely on some type of product to bridge any gaps now or future.

Good luck.
 
Masking tape along edge of piece to be scribed, utility knife blade taped to a shim the thickness of the largest gap, place edge where it needs to be, run shim along wall, remove wall side of cut tape, cut/and to tape line left in place, test fit, adjust, install.

The cut/sanded edge should be back beveled.

(I have a Razor Scribe now instead off using a shim, use minimal pressure with either)

Tom
 
  On brick you have lots of little ins and outs. Unless it is plastered smooth and even (not sure exactly what the plastering is like).  I think you will get closer by using a scribing tool that does not register on a wide flat surface. Shim, Accuscribe, etc all reference on a 1" plus wide part of the surface. That will not follow all the small variations in the wall surface very well. Something narrower compass, dividers or the like will get into more of the surface variations.

  Are you cutting to the line with the jigsaw? I find I can be more accurate on a detailed scribe by removing the bulk of the material with a jigsaw and then sanding to the line. If there is a lot of detail then I think you will need to fine tune using hand tools ...... files , rasps and such.

  Pictures can help.

Seth
 
I would try to scrape away a bit of the plaster, that would give you some extra room for a flush look (it's called cheating).
 
The most accurate way to get a good tight scribe is to make a 5 mm/1/4" hard board template and then trace and fit that before cutting the final piece. Scribing brick and stone is difficult because it is hard to accurately mark the reference of the horizontal cuts to the vertical cuts. Obviously experience counts but even those very experienced will cut templates first for scribing to bricks.
Hope that helps.
Tim
 
Thankyou all for your tips and experience - I will definitely try some out in the coming phases of the project.

Fortunately in the end, it is just a home improvement project for my daughter's room so it is not absolutely critical, but I like to learn new things and up my game each project I do. As always, I am so thankful for the FOG that you all take time to help out a beginner like me.

It is brick that has been plastered completely, and painted. I find with the Accuscribe Pro it is definitely hard to register exactly on the line of the surface being mated due to the thick and high plastic surface that runs along the wall. I was suspecting that I would be better with a traditional compass/dividers in the particular instance. I even tried scribing once, then re-scribing to get closer (fortunately I was in the position where the opposite edge could be cut to size later.

Tom - I really like the ideas around the masking tape and razor blade & shim, as it makes it a lot easier to see than the pencil line.

I also like the idea around getting it right with a strip of hardboard for the template - I think I might try to combine this idea with the one above. This also probably would have been useful for a corner of the room, which I had been wondering before about, as when I scribe to one wall, then it would then render the scribe for the the other wall inaccurate? I think I got it right in the end by offsetting the scribe lines.

I don't think I can back bevel easily with the Carvex 420 as I don't have the tilting base, but did try to sand a bevel into the final edge.

I'll post some pictures of the completed project soon (as I don't tend to do "in progress" posts).

Thanks again!
 
eddomak said:
This also probably would have been useful for a corner of the room, which I had been wondering before about, as when I scribe to one wall, then it would then render the scribe for the the other wall inaccurate?

The use of a ticking stick is the quickest way to scribe to a corner or three walls. Alternatively, a glue gun and 2 inch thick strips the length of the part you are fitting and glued together to form a template also works.

eddomak said:
I think I got it right in the end by offsetting the scribe lines.
Risky, but akin to trial and error which gets you there albeit with some frustration.
Tim
 
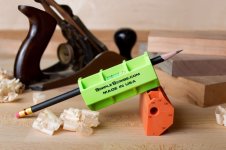
Accuscribes are okay but simpler is better for me and SimpleScribe works best  because there's no moving parts
to adjust and or lose.

View attachment 1
 

Attachments

  • iu.jpeg
    iu.jpeg
    127.5 KB · Views: 476
Tim Raleigh said:
eddomak said:
This also probably would have been useful for a corner of the room, which I had been wondering before about, as when I scribe to one wall, then it would then render the scribe for the the other wall inaccurate?
The use of a ticking stick is the quickest way to scribe to a corner or three walls.

Wow - you got me Googling and YouTubing that one. I'll give it a go next time I have something similar.

For those who might want to know how it works, here it is:

 
waho6o9 said:
Accuscribes are okay but simpler is better for me and SimpleScribe works best  because there's no moving parts
to adjust and or lose.

I agree, these are great tools for scribing to walls, but if you are scribing around brick or stone, a (cheap) compass wins every time. I have bought many scribing tools, and a inexpensive pencil compass works best. I like the Lee Valley pencil compasses made in France, but like you state, if you loose the knurled tightening screw it is fairly useless.
Tim
 
" and a inexpensive pencil compass works best"

That's exactly what I learned to scribe with!

Good advice Tim.
 
I've scribed hundreds if not thousands of panels on site...many of them in 3 different directions.
The $2 American Engineering compass is my go to tool. I find that bending the tip a bit gives me the most accurate scribe. BTW....any scribing tool that uses round washers or expensive round router bases gives APPROXIMATE scribes and inaccurate ones for sure...(easily provable)
 
All the earlier comments are valid and good, so I do not say my method is best - at the end of the day you work out what works for you.

I have tried many different methods, pair of compasses, a spacer and pencil, a washer and pencil (where you run the pencil on the inside of the washer which rolls along the wall edge) etc.

I bought an Easy Scribe a couple of years ago and have not used anything else sincehttp://www.axminster.co.uk/easyscribe-504045
It really is a joy to use, with very fine adjustment.  I don't know whether it is available in NA, but I see it is now branded by Trend.

Use of a template is often a good idea, of course, as it is easier to offer up a 6mm piece of mdf or whatever than the whole workpiece, then you can rout the workpiece edge using the template as the guide (although you still need to get it at the right angle to the wall).

Cheers
 
Well, today I got a chance to try it out again. Same material, same wall.

I tried out using blue masking tape, and razor and an 18mm block that was slightly thicker than the gap at the largest (15mm) because I couldn't be bothered trying to shave it down to 15mm.

The scribe line was certainly more precise than my previous attempts and I liked how I could just pull the masking tape off and it would break along the line, which was VERY easy to follow with the jigsaw.

The final result was a significantly closer than before but still not perfect, but I didn't have enough time to make a template first. Maybe next time - in around a fortnight.

Thanks again!
 
I find my the point on the wall that's furthest away from the wall and mark it. I use a cardboard shim and add orange painters tape to shim it out so it slides underneath barely. Then I mark where the board is hitting the wall. I use the same cardboard temp shim to scribe the board. Then I use a straight edge to connect the high and low. I usually use a jigsaw or hand plane or a block of sand paper and leave the line showing.  And make several passes getting closer each time. This works fairly well on baseboard and I've done this on cabinet sides with thin plywood.

The last time I did it was a cabinet. Two months ago the homeowner gave me a walkthrough of the house and showed me his brown cabinets. He literally got brown spray paint and defaced my work. I told him it looked really good. Haha. I spent a lot of time matching stains and mixing stains with three coats of polyurethane and a perfect scribe job. At the end it didn't matter anyway.
 
Back
Top