Anyone use the Kreg Beaded Faceframe Jig System?

3PedalMINI

Member
Joined
Nov 30, 2012
Messages
492
I’m about to embark on my living room cabinets and want todo beaded face frames. I’m so torn on the jig or just using the bits and some exact measurements. I have a Jessem router lift/top/fence. I can make the kreg system work but it will take some modification!

Wondering if it’s worth modifying and splurging on the jig system or just using measurements and tape on the table!

Thoughts?
 
Nice system. The one I used is owned by someone else. Easy to set up and "figure out".

Tom
 
I’ve had the Kreg jig for several years and own most of the different bits.  I’ve made quite a bit of beaded face frame cabinets.  The jig makes it extremely easy.  It’s fast and accurate, especially for repeated cuts.  Let me know if you have any questions.  BTW, I’m just a hobbiest and an engineer, so I enjoy jigs  [big grin]. Professionals might have a different opinion of the jig.
 
I bought their router bits but decided to make my own version of their jig using a short piece of 80/20 extrusion.  It's pretty easy and functions the same as theirs.  It helped having an accurate router table (Incra system), but overall I saved probably $200-250 compared to buying their jig, which I thought was a bit overpriced for what it does (pushes a workpiece forward and backward a few inches reliably). 
 
tjbnwi said:
Nice system. The one I used is owned by someone else. Easy to set up and "figure out".

Tom

Thanks!

NVA_WW said:
I’ve had the Kreg jig for several years and own most of the different bits.  I’ve made quite a bit of beaded face frame cabinets.  The jig makes it extremely easy.  It’s fast and accurate, especially for repeated cuts.  Let me know if you have any questions.  BTW, I’m just a hobbiest and an engineer, so I enjoy jigs  [big grin]. Professionals might have a different opinion of the jig.

I don’t mind spending the money on it, but I have a hard time believing it’s what the pros use! I also can’t believe the pros would mark lines on the routers and do it that way. Then again if that’s the case I can certainly understand why they cost so much. There’s a lot of beaded cabinets in my future. Starting with my living room and will eventually finish with the kitchen! I’ve always loved and appreciated the beaded look and I finally have a chance to give it a go! Do you have any complaints with it at all?

Peter Halle said:
If you decide to just use bits, here is a write up and video that [member=1146]Brice Burrell[/member] did.  It shows how to do it on a Festool CMS, but the technique could be used on other router tables.  The sliding table on the CMS is sweet for this one but could be replaced by a groove and square on a router table.

http://greenanddarkblue.blogspot.com/2012/08/beaded-face-frames-jack-miters-with.html

Peter

Hey Pete! Thanks! Hope all is well with you!

live4ever said:
I bought their router bits but decided to make my own version of their jig using a short piece of 80/20 extrusion.  It's pretty easy and functions the same as theirs.  It helped having an accurate router table (Incra system), but overall I saved probably $200-250 compared to buying their jig, which I thought was a bit overpriced for what it does (pushes a workpiece forward and backward a few inches reliably). 

If you wouldn’t mind do you have pictures of the setup? How are you doing the sliding action? My table is super accurate so that’s why I’ve been reluctant todo the jig since I feel I have almost every thing to accurately do this!

Thanks!
 
3PedalMINI said:
If you wouldn’t mind do you have pictures of the setup? How are you doing the sliding action? My table is super accurate so that’s why I’ve been reluctant todo the jig since I feel I have almost every thing to accurately do this!

Thanks!

I'm awful about taking pictures of things, but I can definitely pull it out and snap some for you later today.  The 80/20 arm just slides in some very precisely milled dados in wood.  I also milled a wide T-slot in the fence to allow the use of their face clamp in the fence for quick-clamping, which I thought was one of the niftiest features of their jig.  Also made the fence incremental with a 10-32 threaded rod, which allows me to use an Incra stop on it. 
 
[member=17435]3PedalMINI[/member]
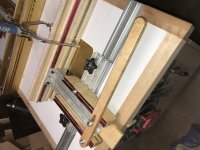
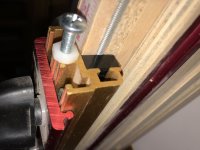
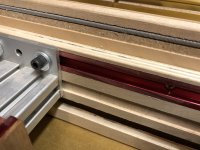
Here you go.  This looks more complicated than it actually is simply because I was using various odds and ends I had laying around.  You could build the whole thing out of wood and it would be robust enough for non-production work.

Works just like the Kreg jig.  Secured to my T-track slot in the table.
View attachment 1

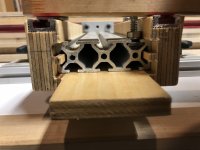
The 80/20 arm just rides in some dados.  I added a piece of wood under the arm to support it - the sidewalls just eliminate side to side play of the arm.
View attachment 2

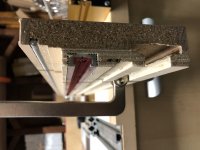
Cross section of the fence.  The bottom T slot accepts Kreg face clamps.  Near the top of the fence I’ve embedded 10-32 rod so I can use my Incra stops and have 1/32 repeatability.  The middle shallow dado is just relief for screws into the arm that are not fully countersunk.
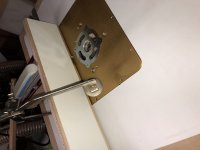
View attachment 3

View attachment 4

View attachment 5

View attachment 6

The manual for the Kreg jig is very helpful if you want to make your own.


Attachments

  • 4CECDB49-14FA-4286-9675-E5D85AF545F2.jpeg
    4CECDB49-14FA-4286-9675-E5D85AF545F2.jpeg
    3.1 MB · Views: 1,148
  • CC8DE781-8ECF-43A7-ACFD-0F642B815617.jpeg
    CC8DE781-8ECF-43A7-ACFD-0F642B815617.jpeg
    2.4 MB · Views: 1,210
  • 25507471-4E7A-47C9-BA60-AFBE3BFF0377.jpeg
    25507471-4E7A-47C9-BA60-AFBE3BFF0377.jpeg
    2.8 MB · Views: 641
  • B52DD5D4-1169-46BE-BA8B-4548810D285A.jpeg
    B52DD5D4-1169-46BE-BA8B-4548810D285A.jpeg
    1.9 MB · Views: 439
  • 2CFA0574-6FE6-4ACA-BDD8-798B0E5E77C2.jpeg
    2CFA0574-6FE6-4ACA-BDD8-798B0E5E77C2.jpeg
    2.3 MB · Views: 498
  • B2108E13-D819-4F02-9B43-67286D079845.jpeg
    B2108E13-D819-4F02-9B43-67286D079845.jpeg
    2.6 MB · Views: 456
[member=13462]live4ever[/member]

Whoa! that is so cool! thanks for setting it up and taking pics of it! between your pics and the manual I think I'll give it a try! thanks again! if you could do it over is there anything you would change?
 
3PedalMINI said:
[member=13462]live4ever[/member]

Whoa! that is so cool! thanks for setting it up and taking pics of it! between your pics and the manual I think I'll give it a try! thanks again! if you could do it over is there anything you would change?

[member=17435]3PedalMINI[/member]

Nothing really.  I was prototyping and it worked well enough that I didn't yet feel the need to go through and replace nuts and bolts with fancier parts (e.g. nylon washers in the right places, stacks of washers w proper standoff, etc.).  I put together a small test beaded face frame and it worked perfectly through the whole process.  I have several rooms worth of beaded face frame cabs coming up so that will be the real test.  Only point of failure that I see could be the T-slot that tightly holds the face clamp since I used crappy particle board and plywood I had laying around for the fence.  If I get too crazy with that clamp I bet I could crack the fence in that location.  But for now the fence is nice and flat and works fine.

Before you buy your bits think about what bead size and face frame width you're going to use.  That was another reason I made the jig - the 1/4" beading and notching bits that come with it aren't the ones I had in mind.

 
Back
Top