You are using an out of date browser. It may not display this or other websites correctly.
You should upgrade or use an alternative browser.
You should upgrade or use an alternative browser.
Anyone who's awake and handy with skirting?
- Thread starter Wuffles
- Start date
jonny round boy
Member
- Joined
- Jul 21, 2007
- Messages
- 3,227
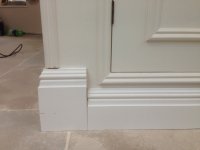
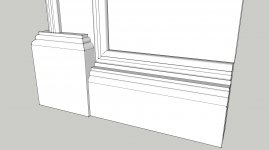
Only way I could think to go would be to put in a plinth block, like this:
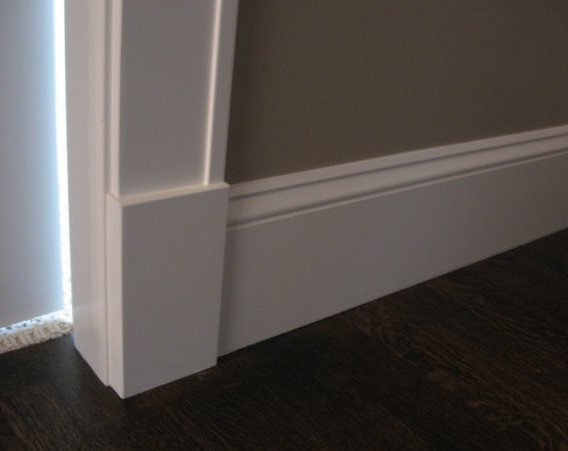
Then do a skirting return onto the side of the plinth block at the LHS, and just butt the reduced-height up to it on the left.
Then do a skirting return onto the side of the plinth block at the LHS, and just butt the reduced-height up to it on the left.
Kev
Member
- Joined
- Nov 7, 2011
- Messages
- 7,698
This is one of those "no win" corners. Personally I'd take the lower skirt coming from the right all the way to the corner and cut it at 45 degrees. Then cut the left higher piece at the opposite 45 to align above the start of the lower skirt's mitre. Then you'll just need to cut a small piece to bring the profile pattern down vertically (a small triangular shaped piece with the profile on the left).
If I'd had a little less wine to drink I'd sketch it [sad]
If I'd had a little less wine to drink I'd sketch it [sad]

jonny round boy said:Only way I could think to go would be to put in a plinth block, like this:
Then do a skirting return onto the side of the plinth block at the LHS, and just butt the reduced-height up to it on the left.
Nice. If all else fails.
Locks14 said:What about tying it together with two bullseye corner blocks on each side of the corner and use the smaller skirt the whole way round?
Has to be the taller unfortunately, this is a cupboard hiding the underfloor heating manifold (and it's my fault it's so low). But the block idea is similar to his nib's one above - I like that idea.
Kev said:This is one of those "no win" corners. Personally I'd take the lower skirt coming from the right all the way to the corner and cut it at 45 degrees. Then cut the left higher piece at the opposite 45 to align above the start of the lower skirt's mitre. Then you'll just need to cut a small piece to bring the profile pattern down vertically (a small triangular shaped piece with the profile on the left).
If I'd had a little less wine to drink I'd sketch it [sad]
I reckon you're writing a story about the picture here (and thanks):
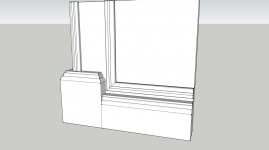
G3Trim said:This is the best looking way of doing what your stuck with. You'll need to rip off the top profile from a piece of base miter it and glue it onto the side coming down. I included a rough drawing, hope it helps.[attachthumb=1]
That's what I was trying to imagine. I'll see if I can get it to fit in there, failing that, the blocks might work really well as it'll tie in the moulding coming down too.
Thanks all, as you were.
Had a similar situation a few weeks ago, skirting coming over a step that was higher than the skirting level in the adjoinging room. I got over it by returning the skirting, a little fiddly; but some mitre mate solved the problem.
A quick and dirty sketch to show what I mean.
Kieran[attachimg=1]
A quick and dirty sketch to show what I mean.
Kieran[attachimg=1]
Attachments
kieran62 said:Had a similar situation a few weeks ago, skirting coming over a step that was higher than the skirting level in the adjoinging room. I got over it by returning the skirting, a little fiddly; but some mitre mate solved the problem.
A quick and dirty sketch to show what I mean.
Kieran[attachimg=1]
Oh hello. Like that. Not sure my fingers would like that being so close to my unruly mitre saw.
")

GarryMartin
Member
- Joined
- Jun 11, 2011
- Messages
- 1,975
Wuffles said:That's why I hang around here, every day is a school day and people can be so helpful.
Couldn't agree more.
I think that will look great filled, sanded and painted. Good choice of solution.
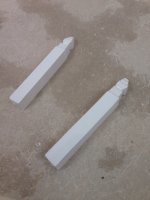
kieran62 said:Sorry to butt in again [smile], I think you're right, looks like a design feature when recessed.[attachimg=1]
You could have offered to 3D print that and post it to me really. When I say people are helpful, not all of them clearly.
I should have said, I'm sleeping with the boss on this job, so it's all a bit awkward.
jonny round boy
Member
- Joined
- Jul 21, 2007
- Messages
- 3,227
By the way, I meant to ask earlier, but forgot [embarassed]
What's the name of that skirting profile? I've not seen it before, and just curious.
What's the name of that skirting profile? I've not seen it before, and just curious.
Holzhacker
Member
- Joined
- Mar 31, 2009
- Messages
- 1,192
I love plinth blocks. Some sort of modified or fattened up plinth block is always a great way to deal with odd ball corners or trim thicknesses.
jonny round boy said:By the way, I meant to ask earlier, but forgot [embarassed]
What's the name of that skirting profile? I've not seen it before, and just curious.
Its romantic name is Type 37A (dresser mouldings).
I call it "thank you darling for choosing something different for the extension, so tall it won't fit in my chop saw vertically and therefore making my life difficult compared to the rest of the house. Oh, it comes un-primed, I look forward to standing on the driveway with only a bus shelter for cover painting it for days on end."
I've also bought Type 37B too, oooh posh! That's for around the base of the kitchen units - like she's seen in some magazine.
http://www.dressermouldings.com/store/timber-skirtings/type-37a-timber-skirting.html
Similar threads
- Replies
- 2
- Views
- 729