Apothecary chest

Awesome creativity, awesome result.

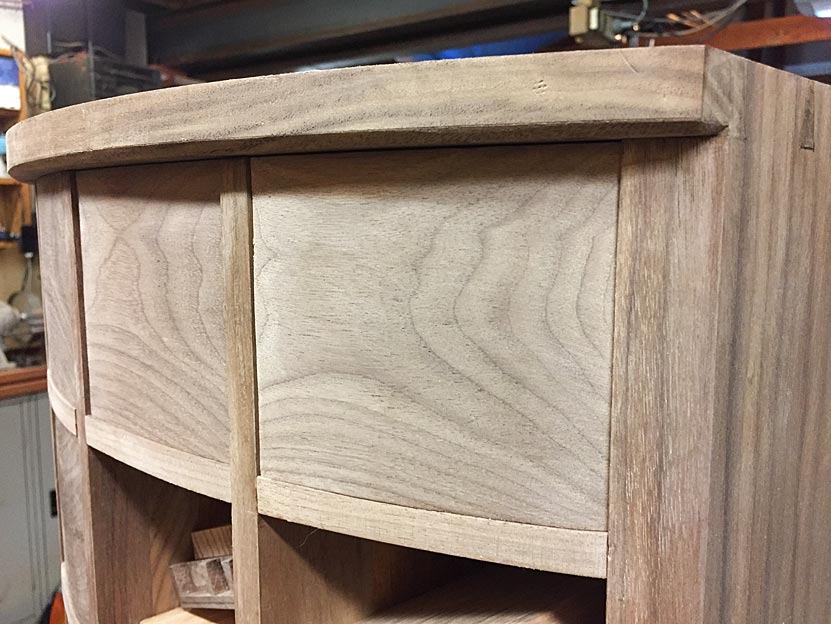
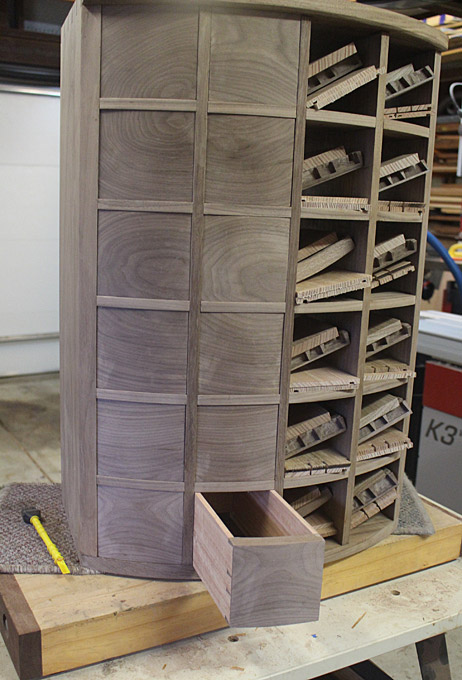
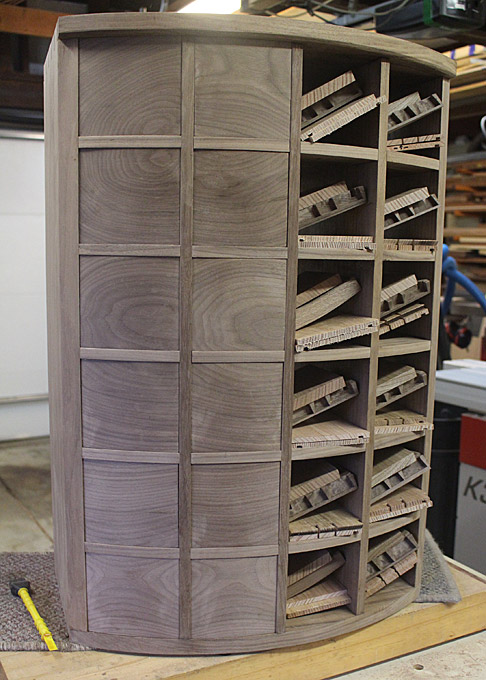
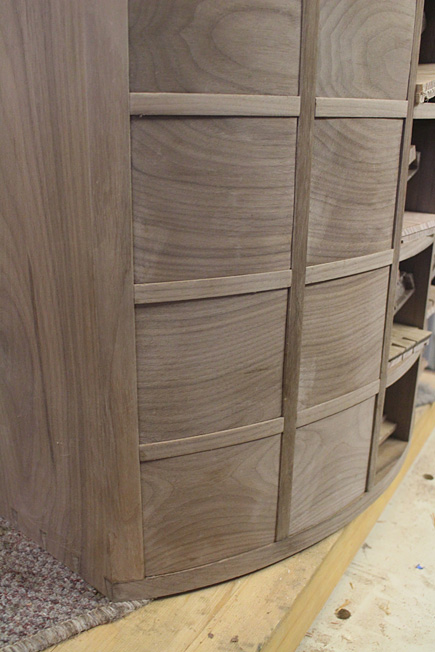
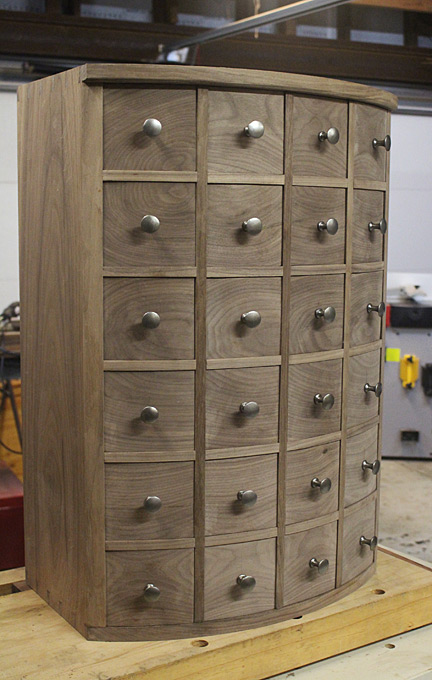
The way that the grain matches from curving the drawer fronts is a pretty unique look.  I was wondering what it would look like when you got it done, with the mix of grain match and curved fronts from solid wood.

I have to say, I don't think I've ever seen anything quite like it before.  Since you were taking away the same depth of wood on both sides of all the drawers, I expected the grain to match across a row (as it does), but the scalloped effect on the grain is very interesting.  The matching between the rows is also cool - I did not realize that was part of the plan.  I particularly like the bottom two rows.  Every woodworker who sees the cabinet is going to spend way too much time trying to figure out how you got that look!

You've inspired me - now that I see it, I want to build something that uses the basic technique, but with a solid panel look instead of the multiple drawers.  Perhaps a curved style panel.  Should be easy to glue up with dominoes, and with a panel I would avoid all of the dovetails :).

Thanks for sharing the process and the result.
 
Great job, Derek.  Agree with Harvey that the grain is almost mesmerizing the way it flows.

A finish will really pop it I'm sure.

 
Shaping the curved faces of the drawers was a lot of work, and I was very pleased to see it done. Dusty and dirty.Not fun. Now the inside faces need to be done, and this will complete the the third stage of building the drawers (the first stage was to fit parallelogram-shaped drawer fronts into their recesses, and the second stage was dovetailing the fronts).

The drawer front shaped on the outside only ...

image.jpg


Blue tape (what else! :) ) is added to upper and lower edges ...

image.jpg


The inside curve is scribed ...

image.jpg


image.jpg


Pulled apart, the rear of the drawer front is chamfered with a round bottomed spokeshave to prevent spelching ...

image.jpg


The waste is removed with rasps - this is an Auriou 10 grain ...

image.jpg


Three rasps in all are used to remove and smooth, ending with this 15 grain ..

image.jpg


The surface is refined and finished with a scraper ..

image.jpg


Final shots of the completed drawer front ...

image.jpg


10a.jpg


Regards from Perth

Derek
 
Adding that inside radius to the drawer front really makes a difference.  [jawdrop]  I initially thought it would be a lot of work for little payback but I'm way wrong on that assumption. That inside radius is a finishing touch.

I also rather like the way the grain has an almost continuous flow across the front. With the drawer blades being relatively wide, if the drawer fronts were flat and the grain was continuous, I think the drawer blades would become more noticeable because they'd chop up the horizontal grain flow. This way the front just looks smoother.  [big grin]
 
Agree with Cheese and really appreciate you posting your project here.

I have a follow up question about the keying chisel. I’m puzzled even after following your link. With it’s blunt square edge how does it function as a chisel? Seems like it’s rather an extremely narrow scraper. How do you actually use it?
 
Hi Michael

I gather than you are referring to the kerfing chisel. It is only called a "chisel" as it looks like one and is held like one. It is essentially a scraper blade with a handle. The square edge is necessary to prevent splitting/cleaving the wood, which is would do if the end was a bevel. Instead, it compresses and cuts, extending the saw kerf deeper, without the cleaving action.

Article here:http://www.inthewoodshop.com/ShopMadeTools/KerfChisel.html

Regards from Perth

Derek
 
Yes, kerfing chisel. Need to keep a closer eye on the spellchecker.

Since it is a scraper, working like a narrow hoe in a trench, would it be better to grind a tiny hook in the corner? Or do you roll a burr on that tiny edge like on a regular scraper?
 
Michael, it does not act or work like a scraper. Some use a scraper blade, but also not to scrape. It is just a thin, parallel sided, square ended blade. Just for chopping.

Regards from Perth

Derek
 
Such beautiful work and photos.  I was curious as to what sort of drawer pulls you’re thinking of using?
 
The smallest one here. These are 22mm across. (The drawers are 100 x 100mm).

F85.jpg


Regards from Perth

Derek

 
This is a long post, and so feel free to skim through it. Who needs another dovetailing documentary?

This one is specific to the back of a drawer, and so is different from the through dovetails which one might use on boxes. Also, I have a few techniques to share, ones that I do not see mentioned much, if at all.

The drawer is one in the Apothecary chest. What has been shown before was the dovetailing hijinks needed for the curved fronts. This affects the drawer sides as well, since they are not equal in length. In fact, the length for the sides need to be measured individually.

Here is a drawer front with sides ...

image.jpg


It is fitted in the recess and positioned carefully (top right hand drawer) ...

image.jpg


At the rear of the chest, the drawer sides are clamped to avoid any movement ...

image.jpg


Now the drawer side length can be marked. The final length is 10mm in from the back of the recess.

We are ready to begin joining the rear of the drawer. A drawer back has been added to the parts ...

image.jpg


"Drop" (the gauge) for the width of the drawer back and transfer it to the ends of the drawer sides ...

image.jpg


Now do the same for the drawer sides and transfer this to the drawer back ...

image.jpg


With 24 drawers, it was quicker and easier to make up a template for positioning the tails ...

image.jpg


Note that the tail alongside the groove (for the drawer bottom) is not a triangle, but one side is vertical (flanking the groove) ...

image.jpg


Saw both drawer sides ...

image.jpg


Time to remove the waste from the tails. First, create a chisel wall for all the tails ...

10a.jpg


Fretsaw the waste to 1-2mm from the line ...

11a.jpg


Remove the waste in thin layers for the cleanest finish. Note that the Tasmanian Oak is too thin (6.5m) to confidently pare half way by hand (better to use a hammer for precision). By taking very fine layers it is possible to push through the board without spelching the other side ...

12-1a.jpg


Blue tape on everything!! The drawer sides have blue tape ala the #140 trick (I wrote this up recently on my website). There are 4 layers. The drawer back has tape to aid in transferring marks (don't knock it if your eyesight is better than mine).

14a.jpg


Transfer the tails to the pin board ...

15a.jpg


The great thing about the blue tape method is that you only need one knife stroke to cut through. No sawing away to make an impression in the end grain. Saw against the tape. Go for it!

16a.jpg


Now remove the waste with a fretsaw. Again, aim for about 1mm above the line. For control, hold the saw handle very gently, and saw as lightly as you can - do not force the cut. Let the saw do the work. You will be rewarded with a straight line ...

17a.jpg


I saw away the ends about 1mm above the line ...

18a.jpg


In years past, I used to saw to the line. I now see more value in paring to the line. What you will notice is the chisel wall around the section. I am reminded of David Charlesworth's method of removing end waste. He calls his process "tenting". In this he pares upward, reducing the waste all the time. In my method, this is unnecessary since the chisel wall protects the sides and you can see when you are getting close to level ...

19a.jpg


Of all the aspects in through dovetailing, I think that removing the waste between the pins is the hardest. This is again where I was reminded of David's tenting method (but which he does not use in this section, only at the ends).

Again the chisel wall aides in enabling the chisel to register against the line without any danger of going over it. The chisel here is PM HSS, and very tough (and sharp!). The blade is driven at an angle away from the sides ...

20a.jpg


Turning the board over, and repeating the manoeuvre, the result is a tent ...

21a.jpg


I have two methods for removing the remaining waste. The first is to pare the tent, slowly reducing the angle. Since you are paring upwards, there is now danger to spelching the opposite side of the board ...

22a.jpg


The second is a side-to-side sweep, which slices away the waste ...

23a.jpg


24a.jpg


Finished ...

25a.jpg


The parts are now assembled. From the top ....

27a.jpg


... and the bottom ...

26a.jpg


Fitting the drawer ...

28a.jpg


29a.jpg


My plan is to set the drawers back a mm or two ...

30a.jpg


Any thoughts about this?

Regards from Perth

Derek
 
We are getting close. The drawers are done. There is still the base to be built, but the I feel that the hard yards are won. The following was completed this weekend ...

One of the joys with hand tools is simply planing. Nothing special, just planing wood and creating wonderful shavings. This was the final dimensioning of the drawer sides prior to glue up ...

1a.jpg


More planing - this time the panels for the drawer bottoms. These are 6mm thick. With drawers this small and narrow (100mm wide and 100mm high), one probably could run a drawer bottom along the length. I decided to plan for expansion along the length, so the grain runs side-to-side. The panels are Tasmanian Oak ...

4a.jpg


The panels are ripped on the table saw, and one endt is shaped to the drawer front using the template for that row ...

5a.jpg


Here is a glued up drawer ready for the drawer bottom ...

6a.jpg


Extra long at this stage ...

9a.jpg


... and trimmed to size (the extra "tongue" is to aid in removal, if needed) ...

10a.jpg


There is some expansion that can take place into the drawer front, as the groove there is deep enough (5mm at the front and 3mm at the sides). Some expansion can also take place to the rear. What I have done is drill an over size screw hole ...

15a.jpg


The screw needs to sit flush with the underside, as will become apparent in a while ...

17a.jpg


I am very happy with the drawers. They are tight and crisp, and all slide in-and-out their recess smoothly.

I am also very pleased with an idea I came up with for the drawer stops. Drawer stops are very important in this chest as the drawers are inset by 3mm, and a stop at the front, behind the drawer front, will enable this gap to be maintained through the year.

These stops are a little different. I searched the Internet to see if anything like these have been made, sold or used before. Nada, zip. I am amazed. The concept is so simple, and so easy to install. Please make and use them. I think that you will like the idea. Adjustable drawer stops ...

I planed down some scrap Black Walnut. These strips ended up 20mm wide ...

11a.jpg


40mm lengths were marked off, and the piece attached to my router-morticing jig ...

12a.jpg


Here's the complete set up. It was used to rout out 10mm long mortices ...

13a.jpg


Sawing away two strips, you are left with this. It was planed to a thickness of 3mm ...

18a.jpg


These were cut up and the fronts rounded. The reason for the round section is that it will butt up against the rear of the drawer front, which is curved ...

19a.jpg


These are screwed into the drawer recess. They can be fine-adjusted with the screw. All pretty obvious, really. The low profile allows the drawer to slide in without obstruction.

20a.jpg


With the drawers done, the knobs were attached. These are cast iron and small (just 22mm across). Yet they seen ginormous after looking at bare drawer fronts for so long.

I was thinking of blacking the cast iron, but I now quite like the grey. I think that it adds to the modern feel of this chest. Your thoughts?

24a.jpg


The boards have been cut for the back board and the base. Next time.

Regards from Perth

Derek
 
Cool drawer stop technique.  I'll borrow that idea for sure!

What finish are you doing?  I like the grey personally unless you go really dark with the finish.  Then possibly black.

 
Hi Neil

I will use Livos oil on the outside, whixh is like a Danish oil. This will not darken the wood much. Inside I use Renaissance wax.

Regards from Perth

Derek
 
Excellent documentation of the process and your commentary contains so much useful information it’s hard to imagine anyone typing outdoing this series of posts. Should be an internet treasure for many decades.

I’ve got to pay more attention to the spellcheck.
 
Very cool - nice details.

Have you considered trying to photoshop the pulls to black to compare?  I think either would look good.

 
derekcohen said:
These are screwed into the drawer recess. They can be fine-adjusted with the screw. All pretty obvious, really. The low profile allows the drawer to slide in without obstruction.

Nice idea on those stops. I think those drawer fronts look great!

derekcohen said:
I was thinking of blacking the cast iron, but I now quite like the grey. I think that it adds to the modern feel of this chest. Your thoughts?

Black is trendy but can be distracting, I like the grey cast iron and should look even better when you get the finish on. Thanks for posting.
Tim
 
I am not 100% sold on the knobs. I know that they look larger than they really are because they are a new introduction. In reality, they are small. Originally, I searched all over for small, ebony knobs. Every one I found was physically larger than these. I searched every nook and cranny of the Internet, in Oz and overseas. I will make some if I have time, but everything must be completed by the end of the coming weekend. I have a couple of hours after work to work on the base. I will be going all out this week, and hope there is time. Let me know if you can source similar knobs with a cross section under 20mm (as mentioned, these are 22mm), preferably around 15mm.

Regards from Perth

Derek
 
What, you're not "smithing your own iron knobs? Great feed, some great new ideas and insights for all to consider. She's gonna love it, I'm sure.
 
What a beautifull project.... but I agree with you that the knobs don’t do it justice.
Those small details are always the biggest worry. I guess I would prefer a pull made of wood that would also have some curve. Or even rout a pull in the front itself.
 
Back
Top