clark_fork
Member
- Joined
- Apr 7, 2015
- Messages
- 255
In most finish work and some assembly work, I run into the “Goldilocks Paradox” the floor is too low and the bench is too high. But what height is “just right”? With some inspiration from an old issue of Shop Notes,121-7 I set out to create an assembly table with several features, the primary requirement, a work surface that could be tucked away to conserve shop space. Settling height on two choices, I created two set of legs that could be set at either 18 inches (441.0 mm) or 24 inches (588mm) The MFT/3 is 35 high (869.75mm. Using the MFT/3 and 1040 Router guide made short work of slicing the leg slots.
The result shows the potential for Peter Parfitt’s/Axminster’s PGS. With the table surface 18mm Baltic Ply, the PGS made short work of producing a MFT work surface. I added a mitered T-Slot border edge that allows for mounting add-ons such as the combination work-tray and storage cart. I added a two prong remote electrical switch since I use a non-motorized sanding block connected to a vacuum hose. The wood border edge allows fixing the boom to keep vacuum hoses and electrical cords out of the way.
The bonus feature is that by drilling 32mm centered holes (using PGS rules) in one set of legs, I easily have a bench mounted table that fits perfectly on the MFT/3 and provides a comfortable work surface for a dovetail jig or similar type device.
The storage compartment lid makes a convenient sacrificial top if I am stripping or gluing where I want to protect the MFT top. A couple of 20mm holes and some dogs keep the lid in place. When storing, the lid is held in place with T-Nuts run into the center storage compartment partition that is also cut with a T-track slot
Outside dimensions 26 ½ x 39 inches-649.25 mm X 955.50mm are which allows the top to fit onto the MFT/3 surface.
What I learned:
The Rockler T-Slot Bit does not cut deep enough for Festool clamps. Best use T-Slot bit from Lee Valley or make second pass with the Rockler bit to deepen the opening.
I had tear out with the Baltic Birch. I need to be more careful at the end of the cut and use backer board. I am also purchasing the new and improved 20 mm bit
I can miter the corners of the T-track border and just remove the inside end of the track to allow the nuts to slide onto the track.
I was not satisfied with my 20mm hole layout. I should have taken Peter’s advice which is “always have a scheme.” Pre-planning not only where the holes should be but where they dont need is an essential step. Next time, I intend to start with a larger piece of sheet goods and when I have the 20 hole layout, trim the top to final dimensions so the look Is more even. I also intend to plan better because I obviously don’t need holes at every 96 mm.
The MFT/3 table and Router guide combination makes slot making a snap. I used an 18mm router bit.
I was very pleased with the PGS. I created a “shoe” to hold the vac hose when cutting the holes. My next project is a bench top work surface with a Moxon vise. The PGS is perfect for this small work surface.
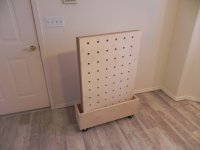
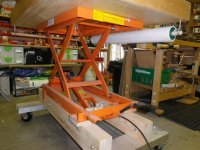
[attachimg=1]
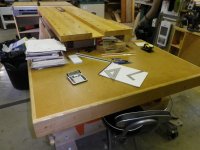
Stow-away table on wheel-away cart
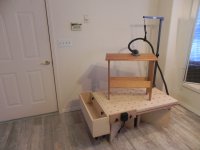
[attachimg=2]
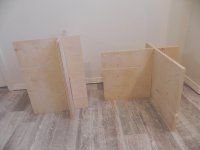
Two Height Choices
[attachimg=3]
Feet stored away in compartment
[attachimg=4]
Adapted for MFT/3 bench top work surface
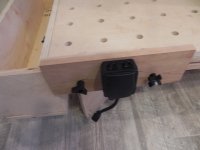
[attachimg=5]
The T-track allows for add-ons such as a two prong remote control plug
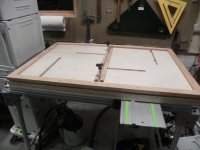
[attachimg=6]
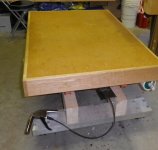
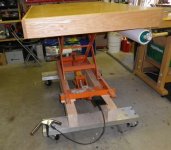
Set up at the 18 inch height for finishing with boom, work tray and remote control plug.
The result shows the potential for Peter Parfitt’s/Axminster’s PGS. With the table surface 18mm Baltic Ply, the PGS made short work of producing a MFT work surface. I added a mitered T-Slot border edge that allows for mounting add-ons such as the combination work-tray and storage cart. I added a two prong remote electrical switch since I use a non-motorized sanding block connected to a vacuum hose. The wood border edge allows fixing the boom to keep vacuum hoses and electrical cords out of the way.
The bonus feature is that by drilling 32mm centered holes (using PGS rules) in one set of legs, I easily have a bench mounted table that fits perfectly on the MFT/3 and provides a comfortable work surface for a dovetail jig or similar type device.
The storage compartment lid makes a convenient sacrificial top if I am stripping or gluing where I want to protect the MFT top. A couple of 20mm holes and some dogs keep the lid in place. When storing, the lid is held in place with T-Nuts run into the center storage compartment partition that is also cut with a T-track slot
Outside dimensions 26 ½ x 39 inches-649.25 mm X 955.50mm are which allows the top to fit onto the MFT/3 surface.
What I learned:
The Rockler T-Slot Bit does not cut deep enough for Festool clamps. Best use T-Slot bit from Lee Valley or make second pass with the Rockler bit to deepen the opening.
I had tear out with the Baltic Birch. I need to be more careful at the end of the cut and use backer board. I am also purchasing the new and improved 20 mm bit
I can miter the corners of the T-track border and just remove the inside end of the track to allow the nuts to slide onto the track.
I was not satisfied with my 20mm hole layout. I should have taken Peter’s advice which is “always have a scheme.” Pre-planning not only where the holes should be but where they dont need is an essential step. Next time, I intend to start with a larger piece of sheet goods and when I have the 20 hole layout, trim the top to final dimensions so the look Is more even. I also intend to plan better because I obviously don’t need holes at every 96 mm.
The MFT/3 table and Router guide combination makes slot making a snap. I used an 18mm router bit.
I was very pleased with the PGS. I created a “shoe” to hold the vac hose when cutting the holes. My next project is a bench top work surface with a Moxon vise. The PGS is perfect for this small work surface.
[attachimg=1]
Stow-away table on wheel-away cart
[attachimg=2]
Two Height Choices
[attachimg=3]
Feet stored away in compartment
[attachimg=4]
Adapted for MFT/3 bench top work surface
[attachimg=5]
The T-track allows for add-ons such as a two prong remote control plug
[attachimg=6]
Set up at the 18 inch height for finishing with boom, work tray and remote control plug.