At the small end of Shaper Origin

Joined
Jan 23, 2007
Messages
7,096
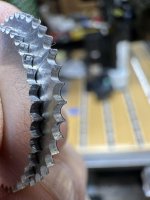
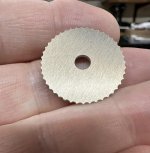
Making some small gears for a professional gilder.
He has to reproduce the decorative dot dash pattern on an antique frame.
I’ll replace the wheels in a window screen spline installation tool with these wheels after a little more modification.

[attachimg=1]

Diameter is one inch. Tooth pitch is .072. Aluminum is .043” thick.
Used an O flute 1/16” bit to rough it out and finished with a 2 or 3 flute 1/32” bit to get into the valleys.
If the aluminum isn’t durable enough I’ll redo it in brass.

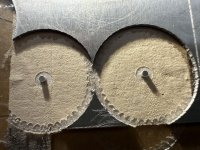
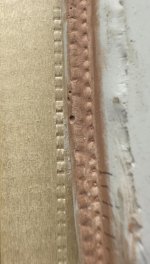
In this pic the rougher result on the left was done with a used 2 flute bit and the better example on the right with a fresh 3 flute bit. Spindle speed 6 and 5fpm feed. I brush on a waxy lube every 2 laps. After cutting out a bunch of the gears I realized that the waxy stuff kept the little chips from going very far and I could leave the vac turned off and just turn it on after two laps to pull the debris out of the groove, and then brush more lube in.

[attachimg=2]

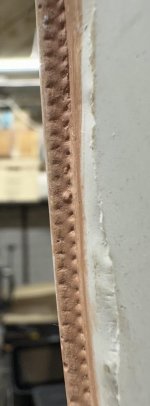
The double stick tape used by the Shaper people works well. The little bit of aluminum is standing after a ring was cut around it.

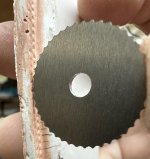
I included this photo to show how the automatic Z touch can get different results with different bits. The O flute bit ended up cutting deeper than the 3 flute bit at the same depth setting. I actually had to cut .002” deeper with the smaller bit just to get all the way through the aluminum.
 

Attachments

  • IMG_0487.jpeg
    IMG_0487.jpeg
    76.9 KB · Views: 286
  • IMG_0488.jpeg
    IMG_0488.jpeg
    286.6 KB · Views: 282
Michael,

Try manual Z-touch on anything small diameter or pointed. Small diameter bits punch into the material .005 to .010 before the Origin recognizes it's hit something. When I'm using the engraving bit, I'll do a manual Z-touch and just keep sneaking it down until I see/feel it drag a tiny bit.

Really nice work on the aluminum gear. Hope it holds up for you.
 
Nice job on the aluminum gear Michael...thanks for posting. That makes me want to kick-start my Shaper usage as my typical use case would also probably be aluminum, copper or brass.
 
jeffinsgf said:
Michael,

Try manual Z-touch on anything small diameter or pointed. Small diameter bits punch into the material .005 to .010 before the Origin recognizes it's hit something. When I'm using the engraving bit, I'll do a manual Z-touch and just keep sneaking it down until I see/feel it drag a tiny bit.

Really nice work on the aluminum gear. Hope it holds up for you.

That’s likely exactly what happened. The O flute bit has a single sharp point that must go into the alums bit before triggering the SO.

At this small scale how flat the workpiece is matters too. I probably didn’t push the stock into the double stick tape evenly because the top side of the gear/wheels took extra depth of cut to be released from the tape.
 
This is a good learning experience for me but the project should have been done on the Carbide 3D Nomad. But I’m so rusty with that machine the re-learning curve is too long to get usable results in time. I couldn’t even figure out how to enter specs for the 1/32” end mill into the software. Maybe Will chime in.

I received a plaster cast of the edge of the frame that has the unusual embossing. We think some kind of wheeled tool was rolled along the edge of the frame. The client initially thought the pattern was a zigzag but it is a row of cross dashed marks along a row of dots that are a half pitch out of sync.

View attachment 1

The impressions in the plaster are pretty vague so it a few iterations to get the pitch close.

View attachment 2
View attachment 4

Impression in basswood.

I’m using some aluminum stock leftover from another project. It’s very stiff for being just 1/32”. Actually it measures .043 with the lacquer coating on the back. Luckily two layers of it with some dogs tick tape between come out to the same width as the track in the plaster. I put the finished side down thinking the tape would stick better. Don’t know if it sticks stronger but the ratio of keeping the stock in place to let time pull it off the tape after milling without bending the stock is just right. I slip a scraper blade under the stock to pry it up.

View attachment 3


Attachments

  • IMG_0489.jpeg
    IMG_0489.jpeg
    36.5 KB · Views: 41
  • IMG_0490.jpeg
    IMG_0490.jpeg
    104.5 KB · Views: 32
  • IMG_0492.jpeg
    IMG_0492.jpeg
    120.9 KB · Views: 44
  • IMG_0491.jpeg
    IMG_0491.jpeg
    62.5 KB · Views: 39
After a lot of testing what works best for me at this small scale, working with a 1/32” cutter, is to use a fresh 3 flute end mill and keep it lubed. I use the waxy Lube-It since it stays put doesn’t seep under the work piece and release/compromise the adhesive mount.

I use the highest speed (23k rpm) for the 1/32” bit and very slow feed rate, 3 fpm ~.6” per second.

After setting/zeroing Z depth I set the cutting depth to .001”. That seems to be the shallowest SO will accept. Setting it to less and the display reverts to .001 anyway.

I wipe some Lube-It on the cutter (it klings even at speed) and cut just a few inches. One lap on these 1” gear shaped pieces. Then stop the spindle and add some more lube to the end of the mill.

When the whole pattern has been traced at the shallow depth the resulting ditch is filled with lube. Now the whole pattern can be cut without stopping. I’m stepping down .01” per pass with the tiny bit.

This is working pretty good for slotting. It will work even better if the piece of roughed with a little offset and then finished with the side of the mill.

 
Michael Kellough said:
This is a good learning experience for me but the project should have been done on the Carbide 3D Nomad. But Im so rusty with that machine the re-learning curve is too long to get usable results in time. I couldn’t even figure out how to enter specs for the 1/32” end mill into the software. Maybe Will chime in.

I’m not as good as Will, but if you’re using Carbide Create instead of Fusion369, then on the toolpaths tab you can choose or edit bits.  I’d just import the Amana library and choose the closest O-flute bit. There are some good video tutorials online that are good refreshers, too.
 
smorgasbord said:
Michael Kellough said:
This is a good learning experience for me but the project should have been done on the Carbide 3D Nomad. But I’m so rusty with that machine the re-learning curve is too long to get usable results in time. I couldn’t even figure out how to enter specs for the 1/32” end mill into the software. Maybe Will chime in.

I’m not as good as Will, but if you’re using Carbide Create instead of Fusion369, then on the toolpaths tab you can choose or edit bits.  I’d just import the Amana library and choose the closest O-flute bit. There are some good video tutorials online that are good refreshers, too.

Maybe you get there with a right click? Or option click? Something I usually fail to think of as a long time Mac user.
 
Back
Top