Attaching Handle and Boom Arrm To Dust Extractor CT 26 E

KevinW

Member
Joined
Apr 29, 2008
Messages
34
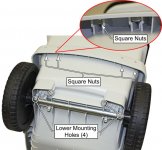
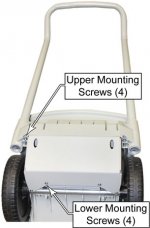
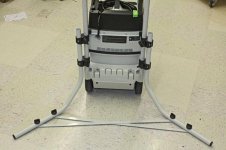
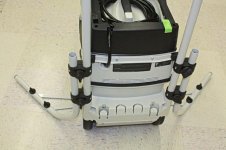
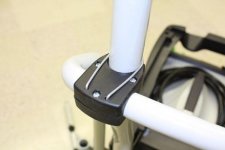
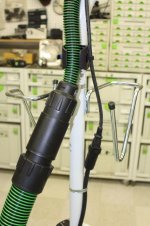
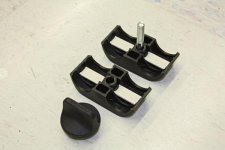
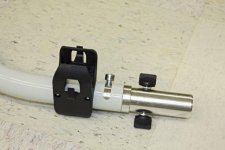
Does any one know of a "how to" or video showing the process for attaching the handle and boom arm.  The instructions are a diagram of the parts.  Not sure if some of the instructions so not even apply to my model.  At this point even a photo of the attachment would be helpful.

I have no complaint about Festool's prices or the quality of their product.  But their manuals and instructions, which is an important part of customer relations, is third rate.

Thanks for any assistance.
 
Forgive the brevity. I'm writing this fairly quickly and just grabbing pictures as I find them.

Remove the motor housing from the collection canister. Tip the collection canister up on its front and insert the 4 square nuts into the slots shown.

[attachimg=1]

Secure the handle to the canister using 4 screws for the square nuts inserted above, and 4 screws into the bottom of the canister.

[attachimg=2]

If the boom arm is going to face away from the vac (toward the rear) install the outriggers like shown below. They should just barely touch the floor so you can wheel the vac around without scraping.

[attachimg=3]

If the boom arm is going to face foward, then install the outriggers like shown below. Note that you can switch from front to rear just by removing the cross braces. Also note the location of the handle support bracket. This replaces the cord reel that came with the vac, and is needed for a front-facing boom arm.

[attachimg=4]

Insert the bottom of the mast into one of the outer round slots in the handle. Install the upper clip onto the handle to support the mast.

[attachimg=5]

You don't need the hose clamp for a CT26/36. It is used only for the older CT models. However, I choose to use it to hold the extension cord. Just don't over tighten the hose clamp on the cord.

[attachimg=6]
 

Attachments

  • CT-26.jpg
    CT-26.jpg
    84 KB · Views: 1,656
  • CT-19.jpg
    CT-19.jpg
    41.9 KB · Views: 1,647
  • Outriggers.jpg
    Outriggers.jpg
    35.9 KB · Views: 1,778
  • Outriggers2.jpg
    Outriggers2.jpg
    34 KB · Views: 1,707
  • MastClip.jpg
    MastClip.jpg
    16.4 KB · Views: 1,606
  • Cord&Hose.jpg
    Cord&Hose.jpg
    58.6 KB · Views: 1,676
Oh, make sure that any/all of the tube clamps have the white foam installed like shown. These help grip the tube when the screws are tightened.

[attachimg=1]
 

Attachments

  • Clamps.jpg
    Clamps.jpg
    20.8 KB · Views: 1,500
To attach the boom to the mast, insert the pivot into the mast and secure it with the double thumbscrews. (Optional tool holder shown.)

[attachimg=1]

Then slide the boom over the pivot, and secure it with the large socket head cap screw. The screw doesn't fully tighten down on the tube. Instead it acts as a rotational limit to prevent the boom from rotating beyond the stable position of the outriggers.

The pivot is shown installed in the boom below only for example. Install the pivot into the mast as shown above.

[attachimg=2]
 

Attachments

  • Pivot.jpg
    Pivot.jpg
    24.7 KB · Views: 1,671
  • Boom.jpg
    Boom.jpg
    22.5 KB · Views: 1,566
Back
Top