Audio Equipment Table.

iamnothim

Member
Joined
Feb 5, 2014
Messages
1,436
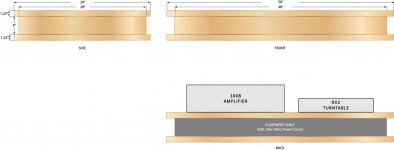
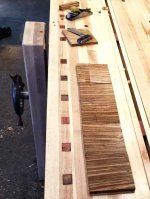
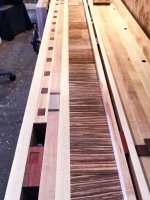
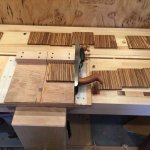
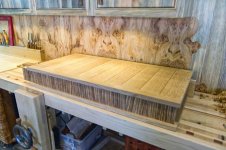
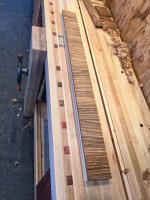
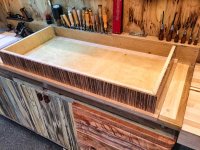
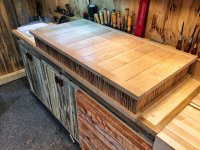
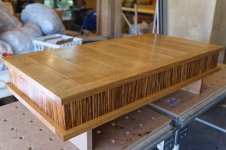
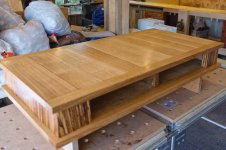
I've talked about building this audio table in another thread, well, I started yesterday.  It will be a quarter sawn white oak top and bottom that sandwiches a band of vertical zebra wood strips.  I am resawing the zebra wood to maximize the expensive wood and book-match sections.

I will finish the oak by dying it with General Finishes ebony dye.  This is the same dye I used to refinish some bedroom furniture and like how it came out.  The top will have a field of cross slats with a 1/16 x 1/16 groove between slats.  The perimeter will be framed and also have a groove on the interior section surrounding the field.  I like this because it is a more casual design than traditional board that run lengthwise.  I will purchase metal hoop legs.  I don't like dealing with legs.

[attachimg=1]

[attachimg=2]

[attachimg=4]

[attachimg=5]


Attachments

  • Inset-Coffee-Table.jpg
    Inset-Coffee-Table.jpg
    60.7 KB · Views: 2,076
  • AudioTable-1-2.jpg
    AudioTable-1-2.jpg
    89.2 KB · Views: 2,037
  • AudioTable-3.jpg
    AudioTable-3.jpg
    155.6 KB · Views: 519
  • NightStand-1.jpg
    NightStand-1.jpg
    96.9 KB · Views: 2,042
I love your posts - you make some of the most interesting projects and like many others do a great job of including us in the process.  Love your choice of woods, design and workmanship.

keep us posted - Kevin
 
Woodn't It Be Neat said:
I love your posts - you make some of the most interesting projects and like many others do a great job of including us in the process.  Love your choice of woods, design and workmanship.

keep us posted - Kevin
Thanks Kevin
 
I cut and ripped the zebra wood then graded them for pattern.  A shooting board is indispensable for making perfect edges on butt joints.  I noticed that the pieces cupped immediately after re-sawing.  Not sure why, the wood is nice and dry.  The zebra wood will be mounted to 3/4 ply.  It looks like I'll have to try the surface planer because the grain on the pieces don't run in the same direction.  I'll give some thought to changing that so I can use a hand plane.  That's my preference.

[attachimg=1]

[attachimg=2]
 

Attachments

  • shoot-2.jpg
    shoot-2.jpg
    93.5 KB · Views: 1,892
  • shoot-1.jpg
    shoot-1.jpg
    90.3 KB · Views: 1,879
Nice looking project.  When you resaw there can still be moisture content difference inside the wood versus outside. This can really happen in the winter, lots of heat no humidity, or if you live in a dry climate.  I will often clamp the boards back down to the bench for a day or so and let the inside settle to the same moisture content as the outside while not allowing the wood to shrink on the moist side and cupping. I actually try and let all my wood settle like this whenever cut.  It is more work and more time but the parts are always stable.  Good luck with the stand.
 
I cannot wait till I retire in 30 years [big grin].

Cool project and a good selection of wood. A little test I did earlier that might interest you is using your Tracksaw for some inlays.


Attachments

  • image.jpg
    image.jpg
    1.2 MB · Views: 423
JJ Wavra said:
Nice looking project.  When you resaw there can still be moisture content difference inside the wood versus outside. This can really happen in the winter, lots of heat no humidity, or if you live in a dry climate.  I will often clamp the boards back down to the bench for a day or so and let the inside settle to the same moisture content as the outside while not allowing the wood to shrink on the moist side and cupping. I actually try and let all my wood settle like this whenever cut.  It is more work and more time but the parts are always stable.  Good luck with the stand.

JJ,
I truly appreciate the suggestions.
I'm in a dry climate.  It might be too late to clamp but I'll give it a try.
What about applying a little moisture to the side with the crown? (Outside)
 
Tayler_mann said:
I cannot wait till I retire in 30 years [big grin].

Cool project and a good selection of wood. A little test I did earlier that might interest you is using your Tracksaw for some inlays.

Nice!
 
iamnothim said:
I noticed that the pieces cupped immediately after re-sawing.

Give 'em 24hrs or so, they may settle back down. Do they have to be that thick? I would resaw them down to an 1/8 or so. You are effectively cross banding so you could use some hammer veneer with hide glue on the thinner pieces.

iamnothim said:
It looks like I'll have to try the surface planer because the grain on the pieces don't run in the same direction. 

Not sure what you mean here, are you talking about flattening them with a surface planer?
I have never worked with Zebra wood, but I have heard it is very brittle. If you are going to run them through a planner make a jig/sled to hold them, other wise they could catch an edge of a blade and basically explode as they go through the planner.
Take care.
Tim
 
iamnothim said:
JJ Wavra said:
Nice looking project.  When you resaw there can still be moisture content difference inside the wood versus outside. This can really happen in the winter, lots of heat no humidity, or if you live in a dry climate.  I will often clamp the boards back down to the bench for a day or so and let the inside settle to the same moisture content as the outside while not allowing the wood to shrink on the moist side and cupping. I actually try and let all my wood settle like this whenever cut.  It is more work and more time but the parts are always stable.  Good luck with the stand.

JJ,
I truly appreciate the suggestions.
I'm in a dry climate.  It might be too late to clamp but I'll give it a try.
What about applying a little moisture to the side with the crown? (Outside)

Sure give it a try. I have never done it but very liberally wipe the cup side then clamp and see if it works. If you try it let us know how it works.
 
Nice looking work, thanks for sharing it with us!

If wiping the pieces and clamping them down does not work, you may like to try sawing a series of relief kerfs in the back of the pieces going with the grain and setting the table saw blade about half the thickness of the pieces or so. I've used this fix on a number of occasions with perfect success.

Best of luck,
Kevin
 
I decided not to try to clamp them flat.  I went old school at went Medieval on them with a plane.  They are nowhere near flat but with the pattern you can't see it.  After laminating the pieces to the plywood I had a momentary thought of using the surface planer.  Then I slapped myself.

I finished today by fitting the sides to the base with dominos.  The top is tomorrow.  I amp very pleased the the miters will be tight and everything lines up with the desired setback.  I don't own a compound miter saw so I used the TS55.  Worked great.

Taylor.
The table is for the amp and turntable.  I'm going to try some steel hoop legs from Etsy.  Two slabs of 5/4 oak is pretty heavy.  At present the turntable is on a credenza of similar weight and it sounds fine.  If there's any spare room in the equipment cavity I can try some additional weight if needed.

[attachimg=1]

[attachimg=2]

[attachimg=3]
 

Attachments

  • table_top-1 3.54.02 PM.jpg
    table_top-1 3.54.02 PM.jpg
    93.5 KB · Views: 1,302
  • table_top-3.jpg
    table_top-3.jpg
    97.9 KB · Views: 1,304
  • untitled-1-12.jpg
    untitled-1-12.jpg
    1.1 MB · Views: 1,314
Forgot the end of the day shots....

[attachimg=1]

[attachimg=2]
 

Attachments

  • table_topA-1.jpg
    table_topA-1.jpg
    151.9 KB · Views: 1,303
  • table_topA-2.jpg
    table_topA-2.jpg
    146.7 KB · Views: 1,290
This is turning out great!  I love the look of the zebra wood with the rustic oak top.  Gives it a bohemian look.
Also Luke, your shop cabinets came out awesome.  Talk about jealous!
 
Pretty much done.  I ordered a set of 14" Iron "Hairpin" legs.  Mid century style.
Should have them in a couple weeks.

[attachimg=1]

[attachimg=2]
 

Attachments

  • ttop-2.jpg
    ttop-2.jpg
    82 KB · Views: 1,053
  • ttop-1.jpg
    ttop-1.jpg
    78.6 KB · Views: 1,042
iamnothim said:
Pretty much done.  I ordered a set of 14" Iron "Hairpin" legs.  Mid century style.
Should have them in a couple weeks.

[attachimg=1]

[attachimg=2]

Looking great as always Luke!  Like the contrast between the species.

cant wait to see your amp, vinyl spinner and other things on it.

cheers.  Bryan
 
iamnothim said:
...
I ordered a set of 14" Iron "Hairpin" legs.  Mid century style.
...

You give me good ideas, and I enjoy seeing your work. [smile]
 
Back
Top