automaxx & seneca woodworking mod MFT table REVISED! parts list & instructions

egsp

Member
Joined
Apr 2, 2014
Messages
9
Note: a revision of this process was done--read on...

being impatient, I modded the male end of a pressure washer quick release probe to attach the dog to the table:

[attachimg=#]

[attachimg=#]

[attachimg=#]

[attachimg=#]
 

Attachments

  • Kreg  601.jpg
    Kreg 601.jpg
    64.8 KB · Views: 2,252
  • Kreg  602.jpg
    Kreg 602.jpg
    61.5 KB · Views: 2,234
  • Kreg  603.jpg
    Kreg 603.jpg
    104.2 KB · Views: 2,294
is the idea to replace the need for threading the dog up from underneath the MFT?
 
Exactly! I just reach underneath and snap the female coupler on. Takes several seconds now.
 
Thanks- it took me about 6-7 hours of work with various plans, plus assorted equipment, so I can't really say it saved me time, but it is so gratifying to use it now.
 
Forgot to put a plug in for the Seneca Woodworking bench dog. A real quality product with excellent customer service! [big grin]

[attachimg=#]

[attachimg=#]

[attachimg=#]


Attachments

  • Kreg  606.jpg
    Kreg 606.jpg
    70.8 KB · Views: 1,974
  • Kreg  605.jpg
    Kreg 605.jpg
    63.5 KB · Views: 1,907
  • Kreg  600.jpg
    Kreg 600.jpg
    110.7 KB · Views: 2,056
egsp,

I too have to add my praise for this mod.  As one who often wanders down the aisle of my adult toy stores (no I meant hardware stores) looking for items that could be repurposed in the workshop I have to bow to a master.  Anyone who has developed a dog of one sort or another for the MFT should be looking closely at this.  It makes all kinds of sense.

Thanks for sharing.

Dick
 
I like it. I had another version all lined up last year to prototype, but alas it never got out of the design stage. :(

I think this thread might light a fire under my butt again to get moving on it. We shall see. ;)
 
Very nice solution, indeed. Now, if you want closer to be Festool green you could consider using a Prevost high flow coupler, at least that one has a green button for the quick release. If you use air tools the Prevost couplers are very nice and worth a look.

 
Thanks- if anyone needs any details, let me know. It can save you a lot of time that I wasted  [embarassed]
 
egsp said:
Thanks- if anyone needs any details, let me know. It can save you a lot of time that I wasted [embarassed]

I say go for it! Do a little write up with a parts list and get yourself on the map here, I am sure that quite a few folks would appreciate this mod and make a run to their nearest Borg to grab the parts.

Thanks for sharing!
 
OK here goes:
Parts list;

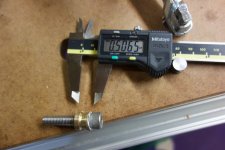
1.   1 -- M8X1.25 x 40 stainless socket cap screw/ bolt
2.   about 3  x 5/16” stainless washers (optional)
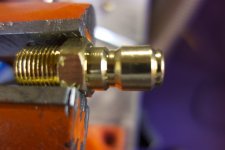
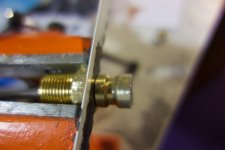
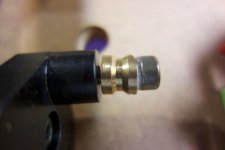
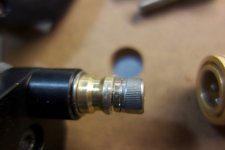
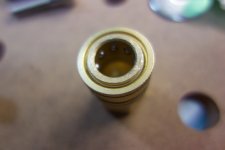
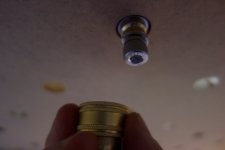
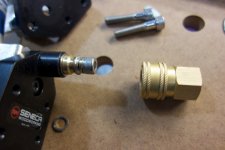
3.  1 x fourney pressure wash coupler (male and female)- I would suggest a few extra male probes to experiment
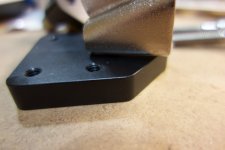
4. Seneca woodworking clamp dog
5.  solder or epoxy- I used Loctite Marine grade

female coupler: from Amazon/MidAtlantic Merchant
Forney 75129 Pressure Washer Accessories, Quick Coupler Female Socket, 3/8-Inch Female NPT, 4,200 PSI,( the female ones I ordered from Amazon/ Industrial Supplies and Parts were not identical to the ones sold by MidAtlantic and did not fit as well)

Male coupler: Forney 75136 Pressure Washer Accessories, Quick Coupler Plug, 3/8-Inch Male NPT, 4,200 PSI
 Sold by Industrial Supplies and Parts

tools:
hacksaw
vise
file and/or dremel
2 or 3 choice curse words (if it doesn’t fit)
6mm hex wrench-
 
Goal: Cut the male probe so you get a section that is  0.50"
1. cut the tip off the probe  –I cut a piece 00.3"  off the end--keep the tip!
2. cut the probe off as close as you can to the hex fitting/base- so that you get the longest probe possible
3. insert  your probe fitting onto the M8x1.25 hex bolt, reversing the fitting so that the end that was the tip of the probe is now going to be the closest to the dog
4.     epoxy (or solder) the probe fitting to the cap end of the screw
5. screw it onto the bench dog,, but back it off a few turns  and then try to attach the female coupler (not on the table yet)
.
6. If  that goes well, pat yourself on the back, pull the coupling apart and then try attaching it to the MFT. Ideally, you want the snuggest fit possible, and this involves pushing the female coupler up into the table, while pushing down on the dog.  After it engages, twist tighten the last few turns (twist the female coupler) until snug. Congratulate yourself on your superb mechanical skills.

[attachimg=#]

[attachimg=#]

[attachimg=#]

[attachimg=#]

look-no spacers!
 

Attachments

  • coupler  607.jpg
    coupler 607.jpg
    90.4 KB · Views: 1,451
  • coupler  608.jpg
    coupler 608.jpg
    91.2 KB · Views: 1,505
  • DSC03206.jpg
    DSC03206.jpg
    62.2 KB · Views: 1,023
  • DSC03205.jpg
    DSC03205.jpg
    138.2 KB · Views: 1,072
6. If you don’t get it right, you can just cut yourself another probe (easier) or fine tune if needed. You will be adjusting 2 parameters- “A”  the depth to which the probe is inserted into the female, and “B” the distance from the dog to the female coupler-- which is how snug the coupler is going to attach to the table,. You may have to cut a few thin rings off the probe to get “A” right (or even add one back on--hence the curse words). A file or dremel will get you the last 1/100” clearance. You may even end up reversing the probe section. "B" should take care of itself by tightening the coupler.

A- The male probe should seat as far in as possible, just allowing enough clearance for the male and female connectors to snap together. This is key to the coupler working properly—otherwise you get too much play after the fitting is attached. This is another reason to use this particular fitting . Having a long narrow fitting helps prevent wobbling.

I tried various garden hose fittings, none of which worked as well. The simple brass fittings will work-sort of—but there is more play and the coupling mechanisms are not very robust.

Happy coupling!
 
OK, I modded my mod and made the changes to the instructions, which results in greatly increased stability as well as makes it easier to make and use.

The "twist mod" involves attaching the probe fitting to the cap end of the bolt with epoxy or solder. You then leave a few turns slack when screwing the bolt onto the dog. After attaching the coupler onto the probe on the table, then tighten the last few turns using the female coupler. The friction in the coupler is enough to grab the bolt.

 
Back
Top