Barn wood desk

Crazyraceguy

Member
Joined
Oct 16, 2015
Messages
4,917
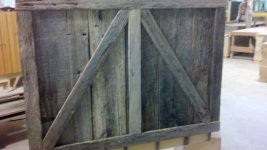
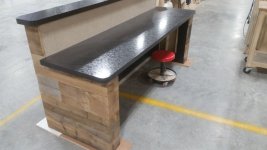
I deviated from the drawing slightly on this one. It was drawn to have butt joints on the outside corners and have them covered by a metal corner cap. I don't really know why? IMHO, that would really take away from the look. So I mitered all of them and they can cover it up in the field at the time of install, if someone insists on it being done that way. This gives them the option to leave it though, if they were unaware that it could be done like this. It gets a tack-board surface on the inside above the countertop, but it wasn't in place when I had the time to take a few pics.
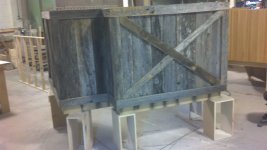
This one is a bit more refined than the last time I worked with this weathered wood. The material was supplied by the client already skip-planed on the back and rabbited for ship lap. This made it easy to work with, but not quite as crude/used looking as previous projects.
 

Attachments

  • MWdesk.jpg
    MWdesk.jpg
    204 KB · Views: 382
  • MWdesk3.jpg
    MWdesk3.jpg
    190.8 KB · Views: 409
Client should like it as is :) I have been wanting to recycle some cedar barn wood into picture frames.

What is the countertop made from? Curious also what you did to the wood surface, like use a Planner, wire brush (Brush cleaner tool), sander, or? Plus what sealer you used?

They might want a better office chair, as I know mine is not very comfortable ;)
 
I fully agree. These mitred corner edges look much better than caps would have. Good choice!  [thumbs up]
 
Peter_C said:
Client should like it as is :) I have been wanting to recycle some cedar barn wood into picture frames.

What is the countertop made from? Curious also what you did to the wood surface, like use a Planner, wire brush (Brush cleaner tool), sander, or? Plus what sealer you used?

They might want a better office chair, as I know mine is not very comfortable ;)

The counter top is just plastic laminate. It's a two toned color that doesn't show from any distance at all. The main thing you see is the texture, which is called crystal.
It was planed on the back to even out the thickness, nothing done to the front. There is no finish at all and as far as I know it's going to stay that way. It would be very hard to do anyway. The black you see in the wider board part way up the right side is creosote. If you rub it too hard it will come off on your hand. Since it is basically oil, it would repel most finishes.

These pics are from another job a few years ago. This stuff was kiln dried to kill insects, but otherwise straight off the barn. It was far more worn looking in the first place and they wanted to keep it like that. In places where a narrow board was needed (or a specific width I didn't have) I actually cut some out of the middle and glued the edge back on the keep the roughness. There were no exposed cut edges and the ends were "stained" with a vinegar/steel wool solution.
 

Attachments

  • mellow3.jpg
    mellow3.jpg
    152.2 KB · Views: 267
  • mellow2.jpg
    mellow2.jpg
    218.2 KB · Views: 265
Back
Top