Bathroom Sink Cabinet

shanegrilah

Member
Joined
Jan 3, 2009
Messages
55
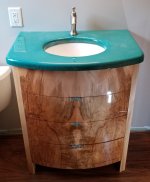
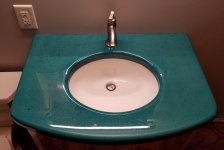
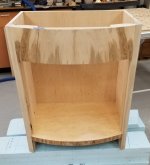
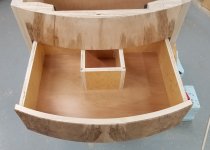
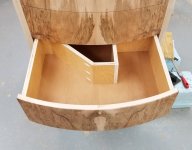
Finally finished my bathroom sink cabinet. Book matched curved front made from soft maple burl. Natural voids filled with copper shavings. Drawer pulls made from brass plate then patina added and over coated with clear epoxy. Top is concrete then stained and coated with epoxy.

It's nice to have a sink and faucet in the bathroom again but I could write a book about what not to do from this project.

Regards,
Shane
 

Attachments

  • Vanity_Front.JPG
    Vanity_Front.JPG
    451.5 KB · Views: 411
  • Vanity_Top.JPG
    Vanity_Top.JPG
    724.3 KB · Views: 253
Wow, that's lavish looking! 

Do you have more photos and construction details?  How did you curve the drawers and what did you use for the sides?

Thanks for sharing.

Mike A.
 
Well done sir!  The concrete top and book matched drawer fronts look stunning!

From the looks of it the book on what went RIGHT should be MUCH, MUCH longer than what went wrong. [big grin]
 
Very tidy work  [big grin].  I'm interested in how the drawers clear the plumbing.
 
Mistakes build character and teach you what to do different next time. At least it turned out well. It looks great. Some more details would be nice. Pics of the drawers open?
 
Gentlemen,

Thank you for the compliments.

The cabinet sides and back are ¾” maple veneer plywood. Front corner posts are solid maple. Dark strip on the side in photo is a thin strip of the burl wood to conceal the glue joint. Top stationary curved rail is built up laminations of plywood then cut on the band saw. Veneer glued on the curves then assembled with sides.

To cut the curves, I used the miter slot in the router table and a pivot pin.
 

Attachments

  • cabinet_inside.jpg
    cabinet_inside.jpg
    372.6 KB · Views: 251
  • vanity_side.jpg
    vanity_side.jpg
    525.8 KB · Views: 237
  • bandsaw.jpg
    bandsaw.jpg
    722 KB · Views: 245
The drawer fronts were an odyssey of their own. The first two attempts were made with maple veneer laminations. First was with six layers of 1/8” thick. Second was with about 3/32” thick. Both attempts failed because they not only sprung back off the caul, which I was expecting, but they also developed a warp. I could have worked with the spring back but I don’t have the equipment to deal with the warp.

The final fronts were made with a MDF core. Kerf cut so it was bendable. Veneered front and back. Solid wood on the ends, top and bottom as support for the drawer sides, bottom and screws for the pulls.

Another challenge was getting the top and bottom edges parallel to each other and the sides perpendicular to the top and bottom. While being parallel and perpendicular to the imaginary central axis of the curve. Top and bottom done with jointer and table saw. For the sides, I made a jig to use a track saw. Burl veneer glued on after all cutting was done.

Top and middle drawers are notched around the drain. Bottom drawer is normal except for a small scallop in the back to clear the bottom of the p-trap.
 

Attachments

  • drawer_6.jpg
    drawer_6.jpg
    530.3 KB · Views: 242
  • drawer_5.jpg
    drawer_5.jpg
    598.6 KB · Views: 239
  • drawer_4.jpg
    drawer_4.jpg
    735.5 KB · Views: 265
  • drawer_3.jpg
    drawer_3.jpg
    836.9 KB · Views: 231
  • drawer_2.jpg
    drawer_2.jpg
    564.5 KB · Views: 254
  • drawer_1.jpg
    drawer_1.jpg
    711.7 KB · Views: 239
  • drawer_7.jpg
    drawer_7.jpg
    581.7 KB · Views: 252
Awesome!  Thanks for the details.  I especially like the fixture for your track saw.
 
Back
Top