Before & After 1...From butcher block to a white oak slab

Cheese

Member
Joined
Jan 16, 2015
Messages
12,503
This project started 3 years ago by taking the east wall in the kitchen and tearing it down to the studs. The existing cabinets were repurposed, 2 pocket doors were eliminated, with one of the openings being enlarged from 30" to 62", while all 120v & 240v wiring, plumbing and gas lines inside the east wall were updated/modified. A chimney was also eliminated at the same time to provide additional room for a refrigerator and a new 3/4" oak floor was woven into the existing floor to cover the area occupied by the old chimney.

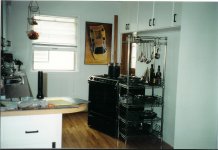
Photo 1: The old white cabinets and the chimney area covered in drywall.

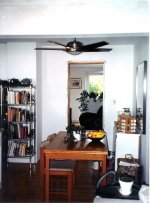
Photo 2: The 30" pocket door and the chimney are still in place.

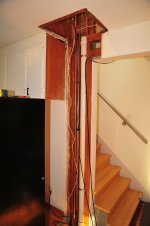
Photo 3: The chimney has been removed and the 30" pocket door opening is now 62".

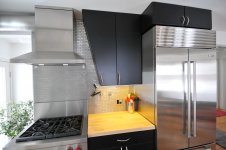
Photo 4: The east wall finished and opened up into the stairway.

Photo 5: Another shot of the finished wall with the subject of this thread in clear view...the butcher block counter top. This birch butcher block was never meant to be the final solution, however at the time we needed something and this became the temporary solution.
 

Attachments

  • scan0020.jpg
    scan0020.jpg
    431.6 KB · Views: 598
  • scan0033.jpg
    scan0033.jpg
    658.6 KB · Views: 599
  • 301_4678.JPG
    301_4678.JPG
    2 MB · Views: 645
  • 0798.JPG
    0798.JPG
    1.8 MB · Views: 560
  • 301_8855.JPG
    301_8855.JPG
    1.7 MB · Views: 676
So it took me almost 3 years to find what I really wanted. Something with a large split to allow lighting with LEDs and some colorful grain. I really wanted it to be a single piece but I was willing to cut & paste if that's what was needed.

Photo 1: The slab when I first encountered it. This slab was 34" x 38" x 2" thick. It came from a BRANCH of a local white oak tree that was estimated to be in excess of 200 years old. It was starting to rot and a lot of the surface had grain that was powdered wood and was easily removed by your fingernail. Being a branch gave  the slab its unusual grain pattern.

Photo 2: The slab when I got it home.

Photo 3: The slab had a fairly wide split and it extended quite far into the slab. I just kept hoping that it wouldn't break during the transportation process.

Photo 4: A worm hole that I managed to save when the slab was cut to size. The worm was still in the hole...yuk [huh]

Photo 5: Some of the spalting
 

Attachments

  • 5OO_4092 S.JPG
    5OO_4092 S.JPG
    804 KB · Views: 498
  • 5OO_4091.JPG
    5OO_4091.JPG
    4.7 MB · Views: 594
  • 5OO_4102 S.JPG
    5OO_4102 S.JPG
    4.4 MB · Views: 563
  • 5OO_4090 S.JPG
    5OO_4090 S.JPG
    827.1 KB · Views: 497
  • 5108.JPG
    5108.JPG
    2.5 MB · Views: 539
Photo 1: Here's a shot after the slab was cut to size. This slab was cut with a TSC 55 on a rail using the standard saw blade. Note the the worm hole on the front edge.

Photo 2: This was the first time I placed LEDs into the split. I was interested in seeing how much light would be transmitted and the colors of the wood. There was no epoxy in place at this time.

Photo 3: This is the slab with epoxy in place to stabilize the split and 3 coats of General Finishes clear water base poly. The clear poly was used because from prior testing, I found the epoxy would soak into the oak and darken it considerably. I wanted to keep the surface as light as possible. 

Photo 4: A shot after the first pour of epoxy over the entire surface. The first pour was 1mm thick. I found out through experimentation that West 105/206 has a yellowing effect so I used the West 105/207 combo instead.

More to come...just ran out of battery power. [crying]
 

Attachments

  • 5292.JPG
    5292.JPG
    2.5 MB · Views: 613
  • 5231.JPG
    5231.JPG
    2.8 MB · Views: 479
  • 5227.jpg
    5227.jpg
    2.8 MB · Views: 563
  • 5191.jpg
    5191.jpg
    2.6 MB · Views: 534
I believe I saw the kitchen picture in a different thread?
I like those cabinets, I;m curious about how you setup the shelves on the cabinet near the stove.

That's one slab you have there. Have you started the prep yet?

Mario
 
That's killer man! The LEDs are a nice touch and helluva finish, almost looks like stone.
 
Mario Turcot said:
I like those cabinets, I;m curious about how you setup the shelves on the cabinet near the stove.

That's one slab you have there. Have you started the prep yet?

Hey Mario, I'll take a photo and post it later on.  [smile]

The prep has been more than started...it's finished. Keep reading  [big grin]
 
dupe said:
That's killer man! The LEDs are a nice touch and helluva finish, almost looks like stone.

Thanks...when you look real close there are parts that you'd swear were granite. It's a pretty wild look for wood.
 
Sparktrician said:
Very clever, Cheeser!!!  [thumbs up]  Well done!!!

Thanks Sparky...but the main coarse for you...the details...is coming right up.
 
This series of photos will give details on the LEDs and the way they're mounted to the slab.

Photo 1: The LEDs I chose are Ultra Blaze by Diode LED. They aren't cheap but they are reliable, extremely bright and will last a lifetime. They're mounted to a 1' x 1/8" aluminum flat that functions as a heat sink. You can also see the recess that was routed in the bottom of the slab that will house the LED assembly.

Photo 2: This shows how the LED tape needs to follow the curve of the split to optimize the light output. The dark curve on the wood is actually the split in the slab after it's filled with epoxy.

Photo 3: This shows the LED assembly installed into the slab.

Photo 4: The same photo but with the LEDs turned on.
 

Attachments

  • 5232.JPG
    5232.JPG
    2.6 MB · Views: 509
  • 5248.JPG
    5248.JPG
    2.4 MB · Views: 506
  • 5244.jpg
    5244.jpg
    2.4 MB · Views: 486
  • 5242.jpg
    5242.jpg
    2.4 MB · Views: 517
This will detail the routing of the LED cable. Because this slab is directly above an opening drawer, I wanted the LED cable to be flush with the bottom surface and most importantly, remain flush with the surface. The last thing I needed was to have a tongs or spatula pop up when the drawer is being opened and snag on the LED cable. That would not be good.  [crying]

Photo 1: Basic layout of a routed groove to guide the cable to the rear of the cabinet.

Photo 2: Close up of the cable groove and the 10mm x 24mm x 3mm domino.

Photo 3: These spacers were placed on a DF 500 to limit the Domino depth to 2.5mm.

Photo 4: The spacers are sold by Traxxas. They come in assorted mm thicknesses, which makes getting the proper Domino depth easy.  [big grin]
https://traxxas.com/products/parts/3769
 

Attachments

  • 5239.jpg
    5239.jpg
    2.9 MB · Views: 471
  • 5241.JPG
    5241.JPG
    2.4 MB · Views: 502
  • 5245.JPG
    5245.JPG
    1.9 MB · Views: 488
  • 5246.JPG
    5246.JPG
    1.9 MB · Views: 492
Cheese said:
Sparktrician said:
Very clever, Cheeser!!!  [thumbs up]  Well done!!!

Thanks Sparky...but the main coarse for you...the details...is coming right up.

I like the way you did that, Cheeser!!!  I especially like how you used dominoes to hold the cable in its groove.  [thumbs up]  Thanks for the details. 
 
[member=44099]Cheese[/member]  That is really slick!  Thanks for the details!  You seem to always come up with clever solutions.

Mike A.
 
Cheese said:
The prep has been more than started...it's finished. Keep reading  [big grin]

OMG I'm such a dork... I haven't even seen/notice the led work you did on post #2.

Now I did, wow  [eek] [eek] [eek] and double wow on the use of dominos to hold the cable  [big grin]

Mario
 
Cheese
Nice job on the kitchen and the slab.  You’re inspiring me to get after the kitchen we’ve always wanted.  I love the fact that it took 3 years to complete.  Life gets in the way, believe I know.  Friends always accuse me of working on our house but I never seem to be finished. 

Couple of questions for you.  The counter depth refrigerator, do you guys like it?  We recently were at a home show and started looking at them after a women just started talking to us about hers. I asked the about larger things and she said she doesn’t worry because she has a normal fridge in the nearby garage and so do we.  So now I’m considering one

Question two concerns the materials used in the cabinet construction. Is that Wenge Veneer or another Wood dyed to look dark?  Veneer I assume?

Love the spacers.  I’ve been using them for a few years when needed.  Someone way back posted the idea and a link, maybe it was you and I now use them when need.

Always enjoy your posts and info you contribute

Take care
 
mike_aa said:
[member=44099]Cheese[/member]  That is really slick!  Thanks for the details!  You seem to always come up with clever solutions.

Thanks Mike, I appreciate your support. I decided about a year ago that I was going make a greater effort to showcase some of the projects I’ve completed over the years. However, detailing these projects on the FOG is not easy. You really gotta wanna or else you just give up and decide to enter into another Kapex bashing session.  [eek]    Which Festool seriously, needs to address by the way.  [poke] [poke]

I hate to pitch a bbitch but it’s long overdue. The days of 900 x 600 pixel photos was over probably 10 years ago. Any decent phone now captures images in the 3000 x 2000 range while a decent camera is in the 5000 x 4000 pixel range. So take 10-15 photos with a phone or a camera and you’ll be spending the next 20-30 minutes trying to downsize the photos so they fit within the FOG format.

Then add in the issue that photos entered from the computer appear properly oriented, while photos entered from the iPhone or iPad appear rotated 90º.  This means I need to send every photo to the computer first so that they become oriented properly.

This relatively short thread that I’ve produced has already consumed well over 4 hours and I’m still not finished. Each photo was entered one at a time and then the thread saved. Adding 2 photos at a time, crashed the system and I would lose everything I'd written.
And then they wonder why we chat rather than why we showcase. I’m retired, so I have some time, but to expect a working guy to showcase his projects on an ongoing basis with this antiquated system is pure German madness. Rant over...

Thanks again Mike as I’ll be trying to showcase my latest project, custom sized Kerdi board shower niches if the German internet gods permit it within my life time...  [big grin]
 
Mario Turcot said:
I like those cabinets, I;m curious about how you setup the shelves on the cabinet near the stove.

Mario, here’s the photo I promised. Pretty straightforward...it’s just a PITA if you need to move a shelf.  [crying]

If you need to move a shelf, you need to make a shelf.  [crying]    [crying]  However, I would rather live with that negative aspect than live without the angled design feature.

EDIT: I had to repost this photo today so that it would be oriented correctly because last night I posted the original photo from my phone thinking I was going to save some time. Hah... [dead horse]
 

Attachments

  • 5413.JPG
    5413.JPG
    2.1 MB · Views: 443
Cheese, first rate job, mate!  Since you brought it up I will say..... I really hate thumbnails.  You should upload to a free photo hosting service (like Flickr) then link the address like so:

41884184061_9abe825155_c.jpg


If you need help, I'm glad to help as I'm sure many others are too.
 
Cheese said:
So take 10 photos with a phone or a camera and you’ll be spending the next 20-30 minutes trying to downsize the photos so they fit within the FOG format.

Hey Cheeser, if you use Darktable (a free, open-source, and VERY competent Lightroom replacement) to edit your photos, you can set up a workflow such that when you export edited photos, they're automagically downsized to whatever size you need them to be.  Example: most MLS providers require that photos be in a 4:3 ratio, and no larger than 2048 x 1536.  My camera of choice defaults to 4:3, but I need to reduce finished photos to 2048 x 1536.  My workflow does that as part of exporting the finished photos.  PM me if you want more info. 
 
magellan said:
1. Friends always accuse me of working on our house but I never seem to be finished. 

2. Couple of questions for you.  The counter depth refrigerator, do you guys like it? 

3. Is that Wenge Veneer or another Wood dyed to look dark?  Veneer I assume?

4. Love the spacers.  I’ve been using them for a few years when needed.  Someone way back posted the idea and a link, maybe it was you and I now use them when need.

Hey Magellan thanks for the compliments.  [big grin]

1. Let me put your first statement into perspective, if you really enjoy performing home improvements...you'll never be finished. [big grin] [big grin] [big grin] When we purchased this last house, I declared loudly and proudly to my wife "This will be a 10 year project".  [jawdrop] Well, 28 years later I'm still updating kitchens and bathrooms.  [jawdrop]

2. The counter depth fridge is sweet. Especially in a narrow galley style kitchen it makes a huge difference during food prep and it just generally provides a more open feeling kitchen. The French doors also help considerably because they're only half the width of a regular sized door. A number of years ago when we first started looking for counter depth refrigerators, there were only 2 available. The Liebherr and the Subzero, we went with the Sub because it's made in the USA. Now I believe there are 5 or 6 companies that offer a counter depth fridge and they are substantially cheaper.

3. The doors are MDF painted black while the carcass is maple ply.

4. Ya those spacers weren't my idea, I pirated it from someone on the FOG I believe. If I knew where I got the info I'd gladly give credit where credit is due. The spacers are pretty slick.  [cool]
 
Back
Top