You are using an out of date browser. It may not display this or other websites correctly.
You should upgrade or use an alternative browser.
You should upgrade or use an alternative browser.
Beginners, you don't know what you don't know!
- Thread starter ChuckS
- Start date
Be forewarned: Those bright yellow plastic push sticks are risky. The can catch on the tip of the blade, bend and then explode when the plastic exceeds the modulus of elasticity (engineer speak for “can’t bend anymore bro—gonna explode..”
- Joined
- Oct 16, 2015
- Messages
- 5,791
One has to assume that plastics are used for push sticks because they are not only cheap to make, they have the perceived advantage of not harming the blade, if touched. While that part is true, they are ignoring everything else that could get damaged, including the user. (which ironically is the original point)Plastics can store energy, either to release it as it explodes into pieces, or when it returns to its original shape. Just not an ideal material for a push-stick or push block.
I use the long hold-down style, like the ones pictured.
"Kick-ups" are generally the result of cutting a piece that is too short, for table saw cutting. They should be done on a bandsaw or held by some kind of sled/fixture.
Kick-backs are a result of the part being trapped between the blade and fence. The rotation forces it to go the way itis spinning. Some folks try to overcome this by raising the blade way too high, thinking it pushes the wood downward. While that is somewhat true, it is not a solution. It exposes more of the blade to the wood in the first place, which gives it better contact/more power, when it does kick. Plus, it exposes more blade to your fingers.
Without even watching, I can tell what happened to JayBates. If he tried to resaw that piece, as the intro shows, it is simple. That little "handle" is in the back, biggest mistake. The blade wasn't sharp enough to cut as fast as has was pushing, so the part catches and spins. When that handle comes around, it hits the moving blade, catches and throws the whole thing back, as it rolls under. Though I'm not saying it is smart, the better way would have been, handle first. That would prevent the rotation from ever happening.
The plumber one is just stupid. Everyone who ever touches a table saw, should know better. That piece is not only too "short" for a table saw cut (without a sled) it is wider than it is long. All of the wrongs are here at once.....got those glasses and ear muffs though......
"Without even watching, I can tell what happened to JayBates. If he tried to resaw that piece, as the intro shows, it is simple. That little "handle" is in the back, biggest mistake. The blade wasn't sharp enough to cut as fast as has was pushing, so the part catches and spins. When that handle comes around, it hits the moving blade, catches and throws the whole thing back, as it rolls under. Though I'm not saying it is smart, the better way would have been, handle first. That would prevent the rotation from ever happening."One has to assume that plastics are used for push sticks because they are not only cheap to make, they have the perceived advantage of not harming the blade, if touched. While that part is true, they are ignoring everything else that could get damaged, including the user. (which ironically is the original point)
I use the long hold-down style, like the ones pictured.
"Kick-ups" are generally the result of cutting a piece that is too short, for table saw cutting. They should be done on a bandsaw or held by some kind of sled/fixture.
Kick-backs are a result of the part being trapped between the blade and fence. The rotation forces it to go the way itis spinning. Some folks try to overcome this by raising the blade way too high, thinking it pushes the wood downward. While that is somewhat true, it is not a solution. It exposes more of the blade to the wood in the first place, which gives it better contact/more power, when it does kick. Plus, it exposes more blade to your fingers.
Without even watching, I can tell what happened to JayBates. If he tried to resaw that piece, as the intro shows, it is simple. That little "handle" is in the back, biggest mistake. The blade wasn't sharp enough to cut as fast as has was pushing, so the part catches and spins. When that handle comes around, it hits the moving blade, catches and throws the whole thing back, as it rolls under. Though I'm not saying it is smart, the better way would have been, handle first. That would prevent the rotation from ever happening.
The plumber one is just stupid. Everyone who ever touches a table saw, should know better. That piece is not only too "short" for a table saw cut (without a sled) it is wider than it is long. All of the wrongs are here at once.....got those glasses and ear muffs though......
Spot-on.
Packard
Member
To use the miter gauge and the fence together, clamp a stop block to the fence. Since having the JessEm stock guides, I now position and use one of the guides as the stop block.
Edit: She was lucky.
Click continue on web to watch
For beginners, who can’t visualize how this is dangerous, I will try to explain.
If the small piece did not remain exactly square, one corner would press tightly against the blade and kick back/up. A piece of 2” x 4” the size shown, kicked back could easily take out an eye, or knock the person out.
In any case, don’t do this.
And while a blade guard is important, most people perceive the danger of a spinning blade on a saw and will attempt to keep clear of it.
It is the dangers that we don’t see or understand that really unnerve me. Even worse, when I point out the risk and they think, “Really? That’s not gonna happen.” That unnerves me even more.
Last edited:
onocoffee
Member
I didn't have "kickback" on a tablesaw, per se. However, last week I did have a great reason to be wearing safety glasses.
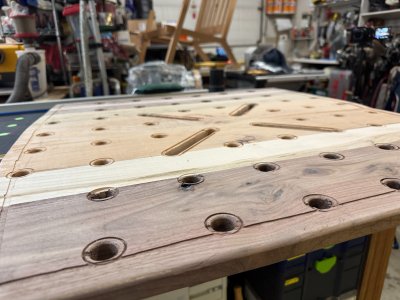
Was working on this outdoor workbench with 20mm dog holes and heard that drip edges prevent water from pooling on the underside. So, in addition to the drip edge around the edge of the top, I cut a 1.25" diameter groove around each dog hole and went to use a roundover to smoothen the edges. Turns out that 20mm dogs centered around a 1.25" groove is just a bit too small a gap so the wood in-between is pretty weak. Some already had tear out but as I was going around one dog with the roundover bit, a piece broke up and flew directly into my face, hitting squarely in the center of the lens covering the right eye.
Good thing I was wearing the safety glasses. Thank you, Norm Abram.
Attachments
- Joined
- Oct 16, 2015
- Messages
- 5,791
It might have worked out ok, in the reverse order? The round-over is a much more brutal cut, banging every half-rotation. If that was already done, the little groove would have been fine. The one around the perimeter seems too far from the edge? The point of the groove it so that the water stops, rather than clinging by surface tension. The water needs to build-up enough to drip.
Packard
Member
And don't leave offcuts like that....His clothing blunted the shot.
Click Continue on web to view
I saw the piece flying, but the image was too small on my screen to see exactly what the cut looked like.
In any case, those unexpected mishaps are the scariest as they play over and over in my head.
I accidentally cut the tip of my finger off (not the bone). The doctor stuck it back on.
I was cutting a piece of mat board and my finger slipped to the wrong side of the cut.
I bought safety straight edge after that. If you do any of that kind of work, well-recommended. Mine, and the one illustrated below, have a stainless steel rod set into the cutting side. That protects the aluminum from damage from an errant blade. Cheaper ones do not have that feature. It is worthwhile to get one with the steel edge.
Mini Me
Member
On my Hammer slider I removed the rip fence altogether and installed a short 300mm length of fence on the sliding rip head. That get used as a measured bump stop and if needed the rip fence can be re-installed at any time but that is about twice a year in all the years I have owned the saw. 99% of ripping is done using the sliding table and I have digital readouts on both fences which are calibrated to each other and the tapes and rules I use which is the really important part a lot forget.
Last edited:
onocoffee
Member
That could be. However, I have not done such a thing before, so my "solution" was to plot the grid on the underside (I do it by hand), use an awl to mark the centers. And since I didn't know how to actually cut a circular groove around the 20mm hole, I first drilled a small hole through the worktop so I could locate the centers on the topside. Then, on the underside, I used a Lenox 1.25" hole saw to cut the groove around where the hole would be. Back on the topside, I used the MB-40/T18 with a Fisch 20mm bit to bore the doghole through. In retrospect, I probably should have bored a little of the doghole first from the underside because doing it my way created some tearout as the bit came through. It was only after all of that was done did I cut the roundovers.It might have worked out ok, in the reverse order? The round-over is a much more brutal cut, banging every half-rotation. If that was already done, the little groove would have been fine. The one around the perimeter seems too far from the edge? The point of the groove it so that the water stops, rather than clinging by surface tension. The water needs to build-up enough to drip.
And thanks for the clarification on the drip edge. I only learned of it from a Jon Peters video and he didn't go into much detail about it or what it's supposed to do.
Michael Kellough
Member
With the amount of roundover you used an 1-1/8” dia hole saw would have left an ideal drip edge. And as CRG says, if the hole saw went second, tearout would be much less. Do know how you could do that practically. Maybe use a template to guide the hole saw and clamp it in place for each hole.That could be. However, I have not done such a thing before, so my "solution" was to plot the grid on the underside (I do it by hand), use an awl to mark the centers. And since I didn't know how to actually cut a circular groove around the 20mm hole, I first drilled a small hole through the worktop so I could locate the centers on the topside. Then, on the underside, I used a Lenox 1.25" hole saw to cut the groove around where the hole would be. Back on the topside, I used the MB-40/T18 with a Fisch 20mm bit to bore the doghole through. In retrospect, I probably should have bored a little of the doghole first from the underside because doing it my way created some tearout as the bit came through. It was only after all of that was done did I cut the roundovers.
And thanks for the clarification on the drip edge. I only learned of it from a Jon Peters video and he didn't go into much detail about it or what it's supposed to do.
MacBoy
Member
When I rip narrow pieces, I slide the fence back towards me so that leading end of the fence is lined up with the first tooth of the blade. That way the fence cannot trap the material, and it provides enough support to make the cut. I always worry that the very end of the cut will be unsupported, but it never seems to be an isssue.
That’s the part that worries me, “the very end of the cut is not supported”.
That portion of the wood still has to be pushed unsupported through the entire exposed portion of the blade.
What keeps that last segment of wood from wandering off the fence line

I’m not (yet) assured by the millions of Euro woodworkers who have done this on an every day basis.
The laws of physics seem to be in play on this situation.
I have the Festool CSC SYS 50 table saw. The option is there. Should I slide the fence back towards me for all rips
The laws of physics seem to be in play on this situation.
Well. If you’re ripping hardwood with internal stresses, the offcut might indeed wander off the fence line. The released tension might cause the offcut to bow away. Intentionally allowing it to wander prevents pinching the blade, which otherwise can lead to binding and kickback.
When you’re ripping, you‘re pushing the work piece forward, down and slightly towards the fence so that it stays in contact with the fence.
The pressure towards the fence should only be applied before the workpiece hits the blade, so there really isn’t a reason why you would need the fence all that much after that point. Think about where you would mount a feather board. That would never be after the front edge of the blade (I hope).
Pulling the fence all the way forward before the blade is a specific setting not for rips but for using the fence as a stop for crosscuts.
The standard method that is taught to apprentices is usually this: imagine a line at a 45° angle from the front edge of the blade towards the fence. Where this line hits the fence is where the fence should end. The narrower the rip, the more forward the fence position would be.
On the CSC SYS, for pieces wider than about 5½ inches, the fence would support the cut all the way through already (depending also on the blade height setting of course).
Last edited:
- Joined
- Oct 16, 2015
- Messages
- 5,791
Oh, don't get me wrong, I wasn't criticizing, more like forensic review.That could be. However, I have not done such a thing before, so my "solution" was to plot the grid on the underside (I do it by hand), use an awl to mark the centers. And since I didn't know how to actually cut a circular groove around the 20mm hole, I first drilled a small hole through the worktop so I could locate the centers on the topside. Then, on the underside, I used a Lenox 1.25" hole saw to cut the groove around where the hole would be. Back on the topside, I used the MB-40/T18 with a Fisch 20mm bit to bore the doghole through. In retrospect, I probably should have bored a little of the doghole first from the underside because doing it my way created some tearout as the bit came through. It was only after all of that was done did I cut the roundovers.
And thanks for the clarification on the drip edge. I only learned of it from a Jon Peters video and he didn't go into much detail about it or what it's supposed to do.
A learning experience is far better with a "why," rather than just a "what."
From the initial post, the process for making the groove wasn't readily apparent.
If I were to do this, assuming the same tools. Drill the 20mm holes first. Route the round-overs next. Make a 20mm "plug," with a 1/4" center hole, to be used as an arbor, for the holesaw. This will keep the holesaw centered without having to make a template. They aren't the greatest way to contain a holesaw anyway.
As an alternative, with more/different tools, I would not use the holesaw, substituting a router with a bushing and a template. Absolute concentricity is not overly important, eyeballing is good enough.
Packard
Member
As a drip edge, I think a chamfer bit would be more effective. Surface tension of the water will allow it to follow the contour of the radius. So a drip, but spaced a bit further from the center point. A chamfer will accomplish much the same but the water will move quicker.I didn't have "kickback" on a tablesaw, per se. However, last week I did have a great reason to be wearing safety glasses.
Was working on this outdoor workbench with 20mm dog holes and heard that drip edges prevent water from pooling on the underside. So, in addition to the drip edge around the edge of the top, I cut a 1.25" diameter groove around each dog hole and went to use a roundover to smoothen the edges. Turns out that 20mm dogs centered around a 1.25" groove is just a bit too small a gap so the wood in-between is pretty weak. Some already had tear out but as I was going around one dog with the roundover bit, a piece broke up and flew directly into my face, hitting squarely in the center of the lens covering the right eye.
Good thing I was wearing the safety glasses. Thank you, Norm Abram.
All the above based on on an experiment conducted entirely in my mind. An actual experiment will prove me right or wrong.
(And why is there a groove around each of the radiused holes?)
onocoffee
Member
I thought about a chamfer. However, based on the information from a different Jon Peters video - one where he went to see how his outdoor table had fared after a year or two. In his experience (he used Total Boat Spar Varnish), the tables that had sharp edges did not weather as well as the tables with rounded edges. That point where the planes meet is a weak adhesion point for finishes and starts to penetrate and peel at that point. The rounded edges are smooth transitions and do not break.As a drip edge, I think a chamfer bit would be more effective. Surface tension of the water will allow it to follow the contour of the radius. So a drip, but spaced a bit further from the center point. A chamfer will accomplish much the same but the water will move quicker.
All the above based on on an experiment conducted entirely in my mind. An actual experiment will prove me right or wrong.
(And why is there a groove around each of the radiused holes?)
In this case, I figured the rounded edges would hold an advantage for the finish in this application. On my workbenches, the dogholes do have chamfered rims.
The groove is intended to be a drip edge to prevent water from pooling on the underside of the worktop.
onocoffee
Member
Oh no, don't get me wrong as well: I did not interpret your comments as criticism.Oh, don't get me wrong, I wasn't criticizing, more like forensic review.
A learning experience is far better with a "why," rather than just a "what."
From the initial post, the process for making the groove wasn't readily apparent.
If I were to do this, assuming the same tools. Drill the 20mm holes first. Route the round-overs next. Make a 20mm "plug," with a 1/4" center hole, to be used as an arbor, for the holesaw. This will keep the holesaw centered without having to make a template. They aren't the greatest way to contain a holesaw anyway.
As an alternative, with more/different tools, I would not use the holesaw, substituting a router with a bushing and a template. Absolute concentricity is not overly important, eyeballing is good enough.
As I said, I don't have any experience with any of these techniques - which is a big reason I'm posting about them: to gain feedback from the group.
And remember, I'm working in a state of myopy. I can only see what I know and what I know is not much! I went at it with what little experience I have, but I'm happy to learn of alternative techniques, like a center hole for the holesaw - and the router bushing/template (which never even occurred to me!).
Thanks!
Michael Kellough
Member
Ideally all edges/corners will have a minimum radius of 2mm, but that includes the edges of the ditch cut by the holesaw. Not an enticing project.I thought about a chamfer. However, based on the information from a different Jon Peters video - one where he went to see how his outdoor table had fared after a year or two. In his experience (he used Total Boat Spar Varnish), the tables that had sharp edges did not weather as well as the tables with rounded edges. That point where the planes meet is a weak adhesion point for finishes and starts to penetrate and peel at that point. The rounded edges are smooth transitions and do not break.
In this case, I figured the rounded edges would hold an advantage for the finish in this application. On my workbenches, the dogholes do have chamfered rims.
The groove is intended to be a drip edge to prevent water from pooling on the underside of the worktop.
The best I can think of is to use a chamfer bit to enlarge the dog hole then make a circle around it with a V bit in router. Maybe CRG can explain how to make the circle. I can only imagine a template with a large hole and a V bit inside a bushing. Then just soften the tops of the V’s cut in the wood by hand with abrasives. Also, keep the thing/project in the position that works with gravity to keep water running/dripping the right direction.
- Joined
- Oct 16, 2015
- Messages
- 5,791
Twenty years' worth of 20/20 hindsight will teach a guy a thing(or 5) about order of operations.And remember, I'm working in a state of myopy. I can only see what I know and what I know is not much! I went at it with what little experience I have, but I'm happy to learn of alternative techniques, like a center hole for the holesaw - and the router bushing/template (which never even occurred to me!).
That is indeed, one of the most important things about the big jobs I used to do. It becomes such a thing, that it is where I start with most trainees.
Some techniques are dependent on the tools one has. The experience they gain with those tools plays a part, and a few times getting out over your skis, does the rest.
Part of my challenge, with the new kid, was backtracking my technique. It would do him no good, to learn my Festool way, since he didn't have the tools for it.
I also spent a lot of time with the engineering guys, shaping the way the produced the shop drawings. They had a tendency to overdo some details and leave some out. Pulling dimensions from crazy places, for example. You can't measure to a place that is not there yet....
Similar threads
- Replies
- 10
- Views
- 518
- Replies
- 21
- Views
- 912
- Replies
- 14
- Views
- 754
- Replies
- 0
- Views
- 194
- Replies
- 10
- Views
- 1K