motorhead9999
Member
- Joined
- Nov 10, 2022
- Messages
- 5
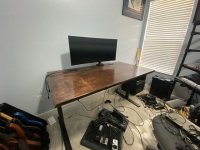
Behold, my first "major" woodworking project. For the past few years, I had been wanting to make a desk to hold my synthesizers/keyboards, but between trying to sell my house, moving, and other renovation projects, it never came to be. In fact, I had bought several of my Festool tools just for the purpose of building this desk, and they sat either in storage, or my garage for 2 years. But I used them all on this project! While moving my old desk around, the welds on the leg frame gave out, so that was my sign/excuse to get started on it.
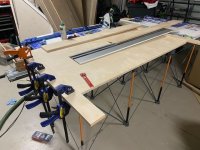
This is a (relatively) big desk. 38ish " deep by close to 60" wide. I bought a Progressive standing desk frame to use as the support for the desktop. The desktop itself is made out of 3/4" cabinet grade maple plywood sheets, with solid maple pieces around the edge.
Basic construction method:
1) Cut desktop sheet to size
2) Cut bottom outer edge support strips, glue and clamp, and then rout to flush edges
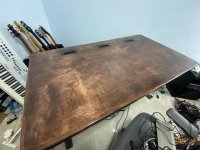
3) Route cable management holes
4) Figure out layout of desk support on desktop, and drill holes and install threaded inserts for standing desk attachment points.
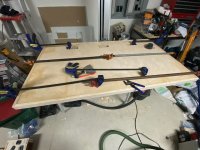
5) Cut maple edge strips, attach to plywood edges with dominoes, and then flush them to the desktop surface
6) Make a botched keyboard tray system that you spend a lot of time on, only to find out it doesn't really work, and then try and figure out how to get around it, while trying to banish the fear that you botched the entire damn project and are going to have to buy new sheets and start over from scratch, all the while questioning why you didn't just buy an already manufactured project and be done with it.
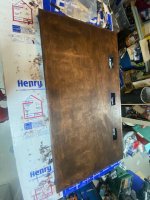
7)Sand, stain, and finish. I used General Finishes Java Gel stain, along with their gel top coat sealer.
8) After installing the desktop on the standing desk frame, I installed some Ikea cable/wire management trays underneath to route wires through the holes on the top, which I installed some cable grommets on.
Tools/equipment used (that I can remember)
TS55 Tracksaw
Domino 500
OF 1400 router w/ Festool Edging plate system
Rotex 150 sander
MFT/3 and clamps w/ TSO benchdogs
TSO parallel edge guide system
Festool CT36
Things I learned during this project:
1) There's a reason why decent looking furniture is expensive
2) This took way longer than I expected it to. Also, proper glue up strategy is important if you're trying to be efficient with drying time.
3) Routers aren't nearly as easy to use as videos make it out to be. Most mistakes that I made were from this tool, and this was the closest I came to hurting/killing myself (see the next item).
4) Sedge was 100% right that the edging plate system really isn't suited for the OF1400, even though it's advertised as compatible. Just really unstable/unreliable, and I felt like the main characters in Evil Dead or Dead Alive in just being doused and pelted by sawdust/wood shavings. 0/10 would not recommend or use again. I'd probably just buy the MK700 in the end.
5) God is the Rotex an amazing sander. I was really terrified about sanding through the veneer with it, but the sander was rock solid, and easily controlled and got the job done super quickly.
6) Finishing/Sealing takes forever, and rushing the job just makes it worse.
7) While I don't do projects like this often, just the act of buying sheets of plywood, and having to lug/move them around made me (and I'm still contemplating it) consider buying the Festool Mobile Saw table. I used a Bora Caterpillar as my cutting/work bench, and while it did the job, lugging the sheets to it, and getting them on top of it was not fun. I'm a relatively small guy, so it was a challenge for me. I am also sorely tempted now to make a 4x8 outfield table out of 8020 material just so that I can a) have a workbench to deal with larger projects with more stability and b) have a place to store all my systainers.
8) When looking at buying tools my whole adult life, I always wondered why the heck Dewalt, Milwaukee and others bothered to sell a radio. Now I understand. You need some good tunes to listen to while working in the garage.
9) Festool dust extraction works fantastically, as long as you remember to hook the vacuum tube to your tool BEFORE you start using it.
10) While certainly cheaper than solid wood, plywood is super easy to damage.I'm not sure I would do a project like this again with plywood, even though the outcome looked really nice.
All in all, this was a fun project. Definitely a learning experience. Probably the biggest things I learned was to keep your workspace organized. While making a run to Rockler to pick up some sandpaper, I broke down and bought a Pack Rack so that I had a place to put my clamps. I can't tell you how many times I damn near killed myself by tripping over clamps that I placed on the ground (and had no place for). The other thing was that just as soon as you feel comfortable using a tool, that's exactly when you'll make a mistake. While doing my domino joints for the edging, there were a few times when I got in a confident groove and either forgot to change my domino depth for what I was doing, or accidentally changed my height.
I still have to make the keyboard tray, but I'm really thrilled at how this desk will work out for me. I started loading it up with my ultra wide and my peripherals, and it's night and day compared to what my old desk was, as well as what's available out there.
This is a (relatively) big desk. 38ish " deep by close to 60" wide. I bought a Progressive standing desk frame to use as the support for the desktop. The desktop itself is made out of 3/4" cabinet grade maple plywood sheets, with solid maple pieces around the edge.
Basic construction method:
1) Cut desktop sheet to size
2) Cut bottom outer edge support strips, glue and clamp, and then rout to flush edges
3) Route cable management holes
4) Figure out layout of desk support on desktop, and drill holes and install threaded inserts for standing desk attachment points.
5) Cut maple edge strips, attach to plywood edges with dominoes, and then flush them to the desktop surface
6) Make a botched keyboard tray system that you spend a lot of time on, only to find out it doesn't really work, and then try and figure out how to get around it, while trying to banish the fear that you botched the entire damn project and are going to have to buy new sheets and start over from scratch, all the while questioning why you didn't just buy an already manufactured project and be done with it.
7)Sand, stain, and finish. I used General Finishes Java Gel stain, along with their gel top coat sealer.
8) After installing the desktop on the standing desk frame, I installed some Ikea cable/wire management trays underneath to route wires through the holes on the top, which I installed some cable grommets on.
Tools/equipment used (that I can remember)
TS55 Tracksaw
Domino 500
OF 1400 router w/ Festool Edging plate system
Rotex 150 sander
MFT/3 and clamps w/ TSO benchdogs
TSO parallel edge guide system
Festool CT36
Things I learned during this project:
1) There's a reason why decent looking furniture is expensive
2) This took way longer than I expected it to. Also, proper glue up strategy is important if you're trying to be efficient with drying time.
3) Routers aren't nearly as easy to use as videos make it out to be. Most mistakes that I made were from this tool, and this was the closest I came to hurting/killing myself (see the next item).
4) Sedge was 100% right that the edging plate system really isn't suited for the OF1400, even though it's advertised as compatible. Just really unstable/unreliable, and I felt like the main characters in Evil Dead or Dead Alive in just being doused and pelted by sawdust/wood shavings. 0/10 would not recommend or use again. I'd probably just buy the MK700 in the end.
5) God is the Rotex an amazing sander. I was really terrified about sanding through the veneer with it, but the sander was rock solid, and easily controlled and got the job done super quickly.
6) Finishing/Sealing takes forever, and rushing the job just makes it worse.
7) While I don't do projects like this often, just the act of buying sheets of plywood, and having to lug/move them around made me (and I'm still contemplating it) consider buying the Festool Mobile Saw table. I used a Bora Caterpillar as my cutting/work bench, and while it did the job, lugging the sheets to it, and getting them on top of it was not fun. I'm a relatively small guy, so it was a challenge for me. I am also sorely tempted now to make a 4x8 outfield table out of 8020 material just so that I can a) have a workbench to deal with larger projects with more stability and b) have a place to store all my systainers.
8) When looking at buying tools my whole adult life, I always wondered why the heck Dewalt, Milwaukee and others bothered to sell a radio. Now I understand. You need some good tunes to listen to while working in the garage.
9) Festool dust extraction works fantastically, as long as you remember to hook the vacuum tube to your tool BEFORE you start using it.
10) While certainly cheaper than solid wood, plywood is super easy to damage.I'm not sure I would do a project like this again with plywood, even though the outcome looked really nice.
All in all, this was a fun project. Definitely a learning experience. Probably the biggest things I learned was to keep your workspace organized. While making a run to Rockler to pick up some sandpaper, I broke down and bought a Pack Rack so that I had a place to put my clamps. I can't tell you how many times I damn near killed myself by tripping over clamps that I placed on the ground (and had no place for). The other thing was that just as soon as you feel comfortable using a tool, that's exactly when you'll make a mistake. While doing my domino joints for the edging, there were a few times when I got in a confident groove and either forgot to change my domino depth for what I was doing, or accidentally changed my height.
I still have to make the keyboard tray, but I'm really thrilled at how this desk will work out for me. I started loading it up with my ultra wide and my peripherals, and it's night and day compared to what my old desk was, as well as what's available out there.