Best way to connect an awkward shelf inside a confined space?

ryanjg117

Member
Joined
May 18, 2015
Messages
329
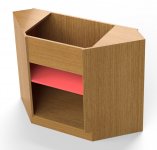
I'm finishing an admittedly awkward corner cabinet for our bathroom remodel, which will feature a single long shelf. The shelf is shaped such that it cannot be inserted once the cabinet is completed. I was originally thinking I would insert the shelf into the cabinet and finish assembly in the field, but I'd like to finish it in the shop instead. Which means I'm going to need to alter the shelf to make it insertable once the cabinet is installed. Here's the corner cabinet design:
[attachimg=1]

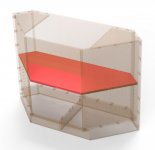
And a view of the shelf with the carcass faded out:
[attachimg=2]

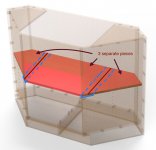
I'm thinking a single thin rip down the middle of the shelf would be best, and using concealable connectors to pull the two pieces together:
[attachimg=3]

I have a Domino DF 500 connector set, which I would love an excuse to use, but I don't see any good tutorials of using this to connect panels edge-to-edge. Also, it looks like these connectors would require a lot of working space to insert the male into female end, and I'm going to be limited to maybe 1/4" of space around the entire shelf once its inside the cabinet.

The Lamello Clamex connectors would be a great solution, but sadly I don't own one.

Maybe I'm overthinking this and something as simple as a WoodRiver Small Joint Connector would be the best way to do this? I could place 3 or so on the underside of the shelf and nobody would be the wiser.

Any other creative ideas?
 

Attachments

  • corner-cabinet1.jpg
    corner-cabinet1.jpg
    181.8 KB · Views: 10,915
  • corner-cabinet2.jpg
    corner-cabinet2.jpg
    130.4 KB · Views: 10,911
  • corner-cabinet3.jpg
    corner-cabinet3.jpg
    36.6 KB · Views: 10,894
No Dominos in the top side wings (stretchers). Cleats under the side wings, screw side wings to cleat with screws from the top.

You can have the side wings on until after the install. Remove side wings, install shelf, reinstall side wings.

Tom
 
My bathroom vanity features two drawers.  If I wanted to use your current footprint, I would make a center section that had two drawers, and have the two “wings” represented by open shelving.

I guarantee that the drawer arrangement, even without the storage on the shelves, will provide more usable storage than any similar sized vanity that only had shelves.

I’ll post a photo later on.
 
I would never split a shelf in that direction. No amount of fasteners would ever be adequate enough to prevent a sag.
Using the rendering that you showed...I would take out one of those upper corner blocks, buy whatever means necessary, and make a new one. That way the shelf could be tilted in from the top, after finishing, then reinstall the new corner piece. It could be pocket-screwed back in place, from the top, before installing.
I have dealt with a whole lot of corner cabinets over the years, many of them completely filled to a square back corner.
I always think it's a little silly, because things got lost back there, but people just hate to "waste" that space.
 
FfBv6jq.jpg


3vWlrIR.jpg


QtKiqWC.jpg


This represents the only storage in the bathroom besides the medicine cabinet.  The cutouts in the drawers are to clear the plumbing.

It is about 18 years old.  A plumbing leak necessitated the replacement of the bottom drawer.  The melamine drawer was a mistake. 

The bottom drawer has dovetail joints.  For reasons that escape me, I made the drawer fronts with full bridle joints.

The vanity I replaced this with covered half of the five foot long baseboard heat.  The tallish legs were to allow all of the baseboard to be open.  The interior of the old vanity was very warm, while the bathroom was typically cold.  The vanity on tall legs solved both of those issues.

 
Will the top stretchers be visible? If not, you can assemble them first, insert the shelf, then use pocket screw them. Alternatively, you might be able to slide the shelf from above through the middle opening if you make it a tad less in size.

Finally, do you really need an adjustable shelf in that cabinet? Considering the difficulty of putting it in, it might be too much trouble to adjust in the future.
 
I would permanently install the side angle ends
Make the middle section removable or slide out with drawer slides
The corners are probably going to get storage stuff that you won't see again until you move out and are cleaning the house. The middle section is probably the only useful area
 
If nothings butting up to the sides why not just make the left and right panels doors, then you get all the storage space usable, and can easily slide the shelf in from either end, or even just make the centre section drawers in this case?
 
Thinking out of the box.

Problem:
Do not want to have the shelf inside the cabinet before/during the install => so it does not "rattle around".

Solution:
Temporarily "fix" *) the shelf in place by some off-cuts below/above it before install. Once the cabinet is installed, remove the off-cuts and place the shelf at the proper height in the proper way.

[smile]

*) By "fix" I mean e.g. pieces of MDF cut exactly + 0.001" and press-fit both below and above the shelf to make it not move vis-a-vis the bottom and top of the carcass. Leave some screws in those MDF pieces so they can be easily "pulled out" once the cabinet is secured in place. Voila!
 
If you mortised the dominos into the left or right stretcher then drop the cutter and plunge again on all mortises until you have an open mortise on the bottom, then you could drop it in place on top of the dominos and screw it in from the top. Just remove the screws after install and install the shelf on adjustable shelf supports and put the stretcher back with glue this time.

I hope that make sense.
 
I must be missing something on this.
Why not use a piece of stainless steel piano hinge across the back of the shelf? Put some support blocks inside the cabinet under the front edge. Transport the cabinet with shelf folded up.
Is it do-able my way?
 
I must be missing something but if it were me, I would assemble the entire cabinet with the loose shelf inside of all the parts, then once the entire carcass is assembled and got it to the destination, lift the shelf into place and insert the shelf-pins to hold it in place.
 
Two other possibilities:

1.  Make as large a shelf as can be installed after assembly.  Use K & V-style standards to support that shelf.  It will likely end up being a slightly modified rectangle.

Add a 2” or 3” tall barrier to prevent items from falling off the shelf into the void.  Since the “wing” storage will likely end up being largely inaccessible, this does not represent much of a loss of utility.

33779-01-1000.jpg


2.  This second option requires the same shelf as described above, but with a metal tab attached underneath that the small “wing” shelves will rest on.  Two additional K & V-style shelf standards would support the other side of these wings. 

Of the two, I prefer the option #1.  I don’t think you will lose much utility, and it makes for a simpler project.  However, I believe that both options will work.
 
Another option is to split the shelf in 3 with two support bars underneath, which the shelves screw into from below.
[attachimg=1]

If you don’t want the join to be visible from above, then you could cover the whole shelf with something you can roll into the cabinet and glue to the shelf — maybe some of the modern linoleum products that are designed for furniture, or a thin laminate etc.

Another option is that the centre shelf slides into the others with some sort of tongue and groove. Or even make a feature of it, so it’s a central slide-out drawer, with lips on the internal angle shelves to stop things falling. 

Another thing: what’s the shelf/ shelves going to be storing? A pull-out central basket might be appropriate for towels, for example, but not for heavy shampoo bottles. Also if the corner cubbyholes (or in my suggested layout, the 2 corner shelves) are going to be storing toilet paper, or spare supplies, then if they are separated from the centre part by a lip that covers the join, that might even be useful functionally.

Not fully thought this out, but it’s food for thought (I hope).

p.s. Are you sure that the shelf can’t be put in afterwards? To me it looks like it might fit.
 

Attachments

  • IMG_9451.jpeg
    IMG_9451.jpeg
    716.9 KB · Views: 8,964
I'm with [member=16696]riffin-rich[/member] on this one.  Slip the shelf in as everything goes together, then use a suction cup or even a plunger to lift the shelf up enough to slip the pins into place.  [smile]
 
Sparktrician said:
I'm with [member=16696]riffin-rich[/member] on this one.  Slip the shelf in as everything goes together, then use a suction cup or even a plunger to lift the shelf up enough to slip the pins into place.  [smile]

You would not even need a suction cup.  Use anything handy as a spacer between the bottom panel and the shelf.  As long as the spacer left you sufficient room to get your hands under the shelf, you are fine.

I would visit a party favors store and get some balloons. Inflate four to about 6” diameter and use them as spacers.  Pop the balloons to get them out of the way.

I’ve used party balloons as packing materials when shipping glass items. Never had any breakage.
 
Back
Top