shed9
Member
- Joined
- Mar 22, 2014
- Messages
- 497
Stuck this up on UKW yesterday but know there are a few Incra users here as well so thought I would repost in the hope this can help others in a similar position. This is basically a cut and paste so apologies for those that frequent UKW and are reading for a second time.
I finally got my Incra working on my K3 table saw over the Easter break in a way that makes sense so I thought I would share.
Excuse the state of my workshop, the floor has been a nightmare from day one, I've fitted a subfloor already but it had to come up because of the recent flooding.
Some of you may remember I had embarked on a major refit of my saw some time ago using alloy extrusion that basically outfitted a huge assembly table to the right which supported a standard Incra TS setup. The bench had provision for a router lift to take advantage of the Incra fence to use for routing as well. I did actually finish the bench with an MFT style top and ran the whole setup for some time (apologies I should have updated the thread and if I find the pics of it finished I will post them up for anyone interested).
Despite the setup working well it was cumbersome and took far too much room, especially when the Incra fence was extended out beyond the bench itself. To add to this, I found the bench top too tempting as a surface to place any crap I need to find a place for and the benefit of the entire setup did not outweigh the space it took up. I knew the Incra system is space hungry but my workshop is not that big and I wanted my space back more than the convenience.
Long story short, I pulled it all apart, reassigned the alloy extrusion to a purpose built CNC router, put the original K3 fence back on and shelved the Incra whilst deciding what to do with it. I already have another router table with an Incra system so I still had what I need. Anyhow I had a brainwave over the last week and came up withwhat I think is a more sensible use of an Incra system on a table saw.
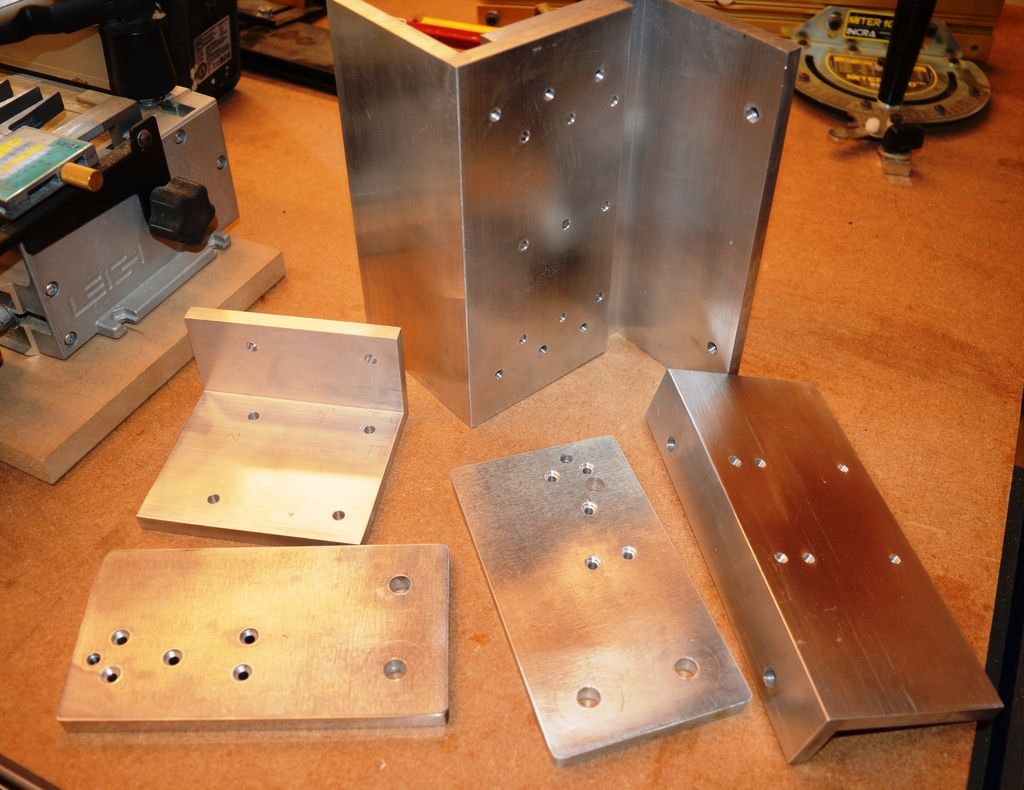
I bought some 10mm alloy angle from Ebay and machined it up to this;
I then cut a length of 45x90 extrusion (from the original bench) and fitted it all together on my K3;

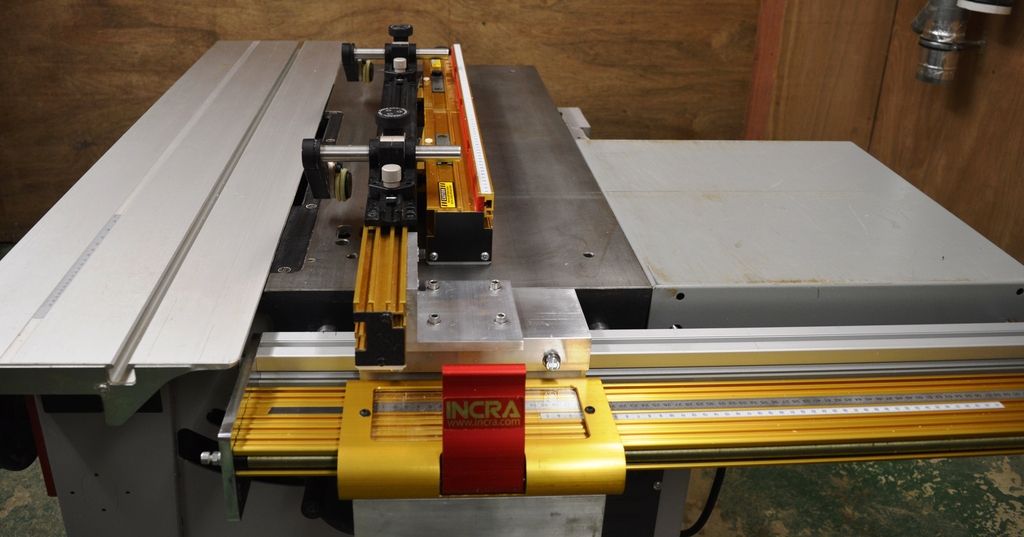
This allows the Incra wonder fence to bolt on the back and I intend to fit a right hand extension table for my original router lift (a UJK model), this is the setup complete with Incra saw fence, wonder fence and some Jessem TS guides;
I stuck some 3mm UHMW plastic under the fences and the whole thing slides quite nicely. I've done a few test cuts and it works incredibly well. I may redo the adapter that fixes the Incra fence to my adapter just to strengthen the fence but all it works as it should. I wll get the alloy anodised over the next week and refit the fasteners with socket caps for convenience.
To me this makes more sense as I get the Incra precision without the dead grey space issue everyone has with Incra. I know it seems like it sticks out front a fair bit but this really isn't an issue and does not impede operation or reach in any way. The plate angled below the positioner is to fit an extra stop/start setup so the switch is more accessible and follows the fence.
Any other Incra users see the sense in this?
I finally got my Incra working on my K3 table saw over the Easter break in a way that makes sense so I thought I would share.
Excuse the state of my workshop, the floor has been a nightmare from day one, I've fitted a subfloor already but it had to come up because of the recent flooding.
Some of you may remember I had embarked on a major refit of my saw some time ago using alloy extrusion that basically outfitted a huge assembly table to the right which supported a standard Incra TS setup. The bench had provision for a router lift to take advantage of the Incra fence to use for routing as well. I did actually finish the bench with an MFT style top and ran the whole setup for some time (apologies I should have updated the thread and if I find the pics of it finished I will post them up for anyone interested).
Despite the setup working well it was cumbersome and took far too much room, especially when the Incra fence was extended out beyond the bench itself. To add to this, I found the bench top too tempting as a surface to place any crap I need to find a place for and the benefit of the entire setup did not outweigh the space it took up. I knew the Incra system is space hungry but my workshop is not that big and I wanted my space back more than the convenience.
Long story short, I pulled it all apart, reassigned the alloy extrusion to a purpose built CNC router, put the original K3 fence back on and shelved the Incra whilst deciding what to do with it. I already have another router table with an Incra system so I still had what I need. Anyhow I had a brainwave over the last week and came up withwhat I think is a more sensible use of an Incra system on a table saw.
I bought some 10mm alloy angle from Ebay and machined it up to this;

I then cut a length of 45x90 extrusion (from the original bench) and fitted it all together on my K3;

This allows the Incra wonder fence to bolt on the back and I intend to fit a right hand extension table for my original router lift (a UJK model), this is the setup complete with Incra saw fence, wonder fence and some Jessem TS guides;

I stuck some 3mm UHMW plastic under the fences and the whole thing slides quite nicely. I've done a few test cuts and it works incredibly well. I may redo the adapter that fixes the Incra fence to my adapter just to strengthen the fence but all it works as it should. I wll get the alloy anodised over the next week and refit the fasteners with socket caps for convenience.
To me this makes more sense as I get the Incra precision without the dead grey space issue everyone has with Incra. I know it seems like it sticks out front a fair bit but this really isn't an issue and does not impede operation or reach in any way. The plate angled below the positioner is to fit an extra stop/start setup so the switch is more accessible and follows the fence.
Any other Incra users see the sense in this?