- Joined
- Oct 16, 2015
- Messages
- 5,791
Finally getting around to assembling a job I started over a month ago. The parts were cut, sanded, and sent to the finish department.....when the screw-up happened. Apparently, the drawing made it to the shop without the final update. Dimensionally, nothing changed, so the parts were the correct sizes. The change was to the finish. 30 of the 48 vertical members already had been clear lacquered, before anyone realized it. They were supposed to get a very dark stain first. This meant a lot of stripping and sanding. Being veneered parts, this was a huge hassle. The finish guy and his helper spent a lot of time and effort to get this corrected.
This is the ultimate use-case for the DF500. I don't see any other way to do this at even close to the speed this can be done with the Domino. Sure a router/jig, dowels, even a panto-router could do it, but the set-up would take a lot more time.
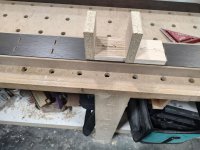
The dowel method would be a real pain, because of the off-set. The vertical members are 1/4" narrower than the border parts.
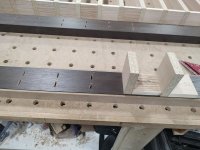
All it took for the DF500 was a couple of off-cuts(with Dominos in them) and some spacers, leapfrogging each other after the cut.
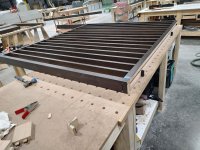
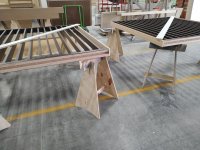
There a three sections of this, two of them joining in the field. One is 96" wide, with the pair at 78" each.
The groove in the bottom is there to cleat it to the floor and the vertical posts penetrate a drop ceiling, attaching above it.
This is the ultimate use-case for the DF500. I don't see any other way to do this at even close to the speed this can be done with the Domino. Sure a router/jig, dowels, even a panto-router could do it, but the set-up would take a lot more time.
The dowel method would be a real pain, because of the off-set. The vertical members are 1/4" narrower than the border parts.
All it took for the DF500 was a couple of off-cuts(with Dominos in them) and some spacers, leapfrogging each other after the cut.
There a three sections of this, two of them joining in the field. One is 96" wide, with the pair at 78" each.
The groove in the bottom is there to cleat it to the floor and the vertical posts penetrate a drop ceiling, attaching above it.