blatant rip-off of 4nthony's design.

Crazyraceguy

Member
Joined
Oct 16, 2015
Messages
4,901
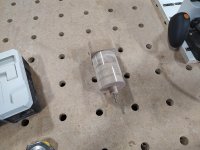
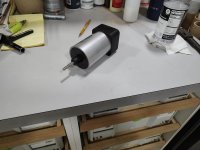
[member=75283]4nthony[/member] after the acrylic tube came the other day, I got started on the griding spindle.
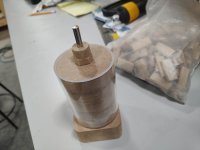
I chose 3/4" MDF, just because it was handy, and will take paint well. I cut some of the pieces with on-boarding design Thursday morning, before work started, and added the square tops yesterday.
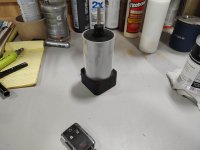
Then I thought about making somewhat of a copy of the collet nut for the lowest support, but you cannot cut a hex with on-board, circles and rectangles only. For now it's just a 20mm round, but today I'll give it a go in Studio.
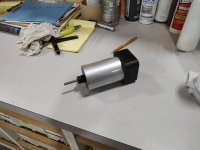
I stayed with 1/4" for the probe, just because it was what I had, plus it's kind of the accepted standard.
Thanks for the inspiration.
 

Attachments

  • Shaper spindle.jpg
    Shaper spindle.jpg
    469.1 KB · Views: 448
  • Shaper spindle4.jpg
    Shaper spindle4.jpg
    256 KB · Views: 417
Looks great! How close to 70mm was your tubing?

Now, maybe we can get [member=7266]jeffinsgf[/member] to mill a couple aluminum prototypes for us [wink]

I was thinking it could have threaded probes in different sizes to swap out or to more easily replace if damaged. The top could unscrew to expose a hollow body for additional bit and probe storage.

It would definitely be an overpriced novelty tool but would feel good in the hand and have a nice, solid heft to it.

On second thought, maybe simple wood is better [cool]
 
Svar said:
What is the purpose of this?

It's a drop in spindle for doing a grid operation with the Shaper Origin. It eliminates having to do a couple bit changes when you want to create a new grid.

 
[member=75283]4nthony[/member] it was actually very close. Before I did anything with it, the tube actually went right in, until it hit the pins. I cut a stack of circles with the center hole and made a little jig to hold the cylinder while routing the pin groove. I fully expected it to either collapse or spread open when it separated, so the jig supported it internally, during the cut.
When I made the first one, it went slightly out of round. It closed up when I removed it from the jig and when I put the core back in it was too big to fit. I thought about taking it home to the lathe and reducing the size until it fit again, but I had more tubing left, since it only took 4". I cut a second piece and re-ran it over the router table, shallower so it wouldn't separate. This worked out fine. My stack of circles was about 1/4" shorter than the tube, so I cut the two squares, one with a groove to accommodate that length difference. I just made the end cap/faux collet nut file, so it will probably happen tomorrow morning.
An aluminum one would be really cool. I'm in as a mini-crowd fund partner, if you can make this happen. Like you said, novelty, but cool, even if it has to be a very limited run.
I'm thinking I might do a Shaper logo on the top of the square, before the final glue-up too.
 
4nthony said:
Svar said:
What is the purpose of this?

It's a drop in spindle for doing a grid operation with the Shaper Origin. It eliminates having to do a couple bit changes when you want to create a new grid.

When you say it eliminates bit changes, I'm assuming the faux spindle was to position the shaper over already drilled pilot holes, and then replace with the spindle to route the hole? Is that what the usage is?
 
The standard operating procedure is to chuck a round rod in the spindle (true .25” or true .125” or true 8mm), tell the machine which it is, and then do the touch edge routine so the machine knows where the stock is in relation to the center of the spindle.

Then you have to take the spindle out of the base and remove the rod and replace it with the actual cutter. Put the spindle back in the base (remembering to tighten) and you’re about ready to cut.

With a facsimile spindle/rod you could avoid one operation of wrenching the chuck.
 
I made the faux collet nut this morning. With a little sanding, sealing, and paint it should look pretty good.

luvmytoolz said:
4nthony said:
Svar said:
What is the purpose of this?

It's a drop in spindle for doing a grid operation with the Shaper Origin. It eliminates having to do a couple bit changes when you want to create a new grid.

When you say it eliminates bit changes, I'm assuming the faux spindle was to position the shaper over already drilled pilot holes, and then replace with the spindle to route the hole? Is that what the usage is?

Swapping this unit into the machine eliminate the need to change out the bit that is already mounted.
It is not advisable to do the gridding procedure with the flutes of the cutter. "Technically" you can, especially if accuracy is not particularly important, but you are taking a chance.
It's a first-world problem, for sure, but it's also a project you can do for the machine, with the machine. Kind of like that top cap in the matching shape, or the collet nut fake, not necessary to the operation, but why not?  [wink]
 

Attachments

  • Shaper spindle nut.jpg
    Shaper spindle nut.jpg
    149.9 KB · Views: 158
Crazyraceguy said:
I made the faux collet nut this morning. With a little sanding, sealing, and paint it should look pretty good.

I was looking for the ER-11 engraving on the side but couldn't see it? ;-)
 
Crazyraceguy said:
I made the faux collet nut this morning. With a little sanding, sealing, and paint it should look pretty good.

That's great, love it! :D
 
My tubing showed up today. Calipered at 69.55+ mm, I haven't tried it in Origin yet, but it sounds like there is some variance in the material.

Scrounging through the boneyard I came up with a chunk of linear rod that is dead on 8mm, so I'll be joining the club shortly. Thanks for sharing the idea.

RMW
 
Richard/RMW said:
My tubing showed up today. Calipered at 69.55+ mm, I haven't tried it in Origin yet, but it sounds like there is some variance in the material.

Scrounging through the boneyard I came up with a chunk of linear rod that is dead on 8mm, so I'll be joining the club shortly. Thanks for sharing the idea.

RMW

Let me know if you want a 3d printed one
 
[member=75283]4nthony[/member]  I finally got around to final paint and assembly this morning.


Attachments

  • Shaperfaux.jpg
    Shaperfaux.jpg
    232.2 KB · Views: 146
  • Shaperfaux2.jpg
    Shaperfaux2.jpg
    193 KB · Views: 117
  • Shaperfaux3.jpg
    Shaperfaux3.jpg
    207.9 KB · Views: 131
Crazyraceguy said:
[member=75283]4nthony[/member]  I finally got around to final paint and assembly this morning.
That’s awesome

Sent from my iPhone using Tapatalk
 
[member=75217]squall_line[/member] the paint is on the MDF core. The acrylic slides over the top of it.
The fit of the rod is so close that it does not need to be glued in, same with the fake nut.
 
That looks so accurate, I'd probably grab the wrong one off the bench and waste a few minutes trying to figure out how to plug it in.
 
The biggest difference is the height of the square head. The width is the same, but I didn't see the point to making the height match too. I thought about it, even considered the round bung for the cord.
I took a pic of it installed today
 

Attachments

  • Shaperfaux4.jpg
    Shaperfaux4.jpg
    341.5 KB · Views: 77
Back
Top