iamnothim
Member
- Joined
- Feb 5, 2014
- Messages
- 1,435
Untidy Shop said:[size=14pt]
Anything look familiar? Just add the sunglasses! [smile]
Hey!
I resemble that remark.
Untidy Shop said:[size=14pt]
Anything look familiar? Just add the sunglasses! [smile]
Jim Kirkpatrick said:I'm late to the game, I just found this thread. I've enjoyed watching your progress. I love the wood! My choice for finish is the first one, au naturale.
You are going to enjoy building your Roubo, don't be intimidated with the giant dovetails as I was. Jameel wrote an an excellent article for Popular Woodworking which very well may be an addendum to his current plans. Please start another thread for your workbench, I know I'm not alone in saying I'd love to see it!
Cheers!
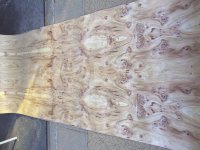
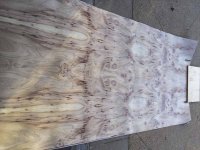
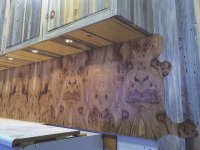
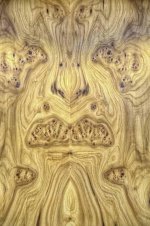
Woodn't It Be Neat said:I'm thinking spit it down the middle lengthwise and then book match it to create one long 2 foot wide piece. If possible you could position the heavily featured section somewhere prominent.
I think I remember Rollin22Petes had some pics of work he did with highly figured material - he might be a good one to comment
link to Rollin22Petes post on a job he did
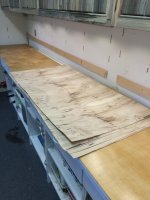
Good thought. I'm going to pre-cut the chunks and lean them up so I can determine the most pleasing order. I wallpapered my way through college so I've go some experience with seams. I would always overlap the paper and double cut them. The PSA presents a problem in that, unlike pasted paper, it will not pull up once put down. So I tried double cutting the seams before pulling the tape. This worked good. Then I noticed that the seams where the veneer was laid up on the PSA aren't the greatest, so it really doesn't have to be "seamless".mike_aa said:How about taking some painter's tape and placing it approximately at where the cuts would be if it were mounted vertically. If you have room, you could even hang it in a vertical orientation. That might give you a better look at how it could go together when it's installed.
Mike A.
Tom Bellemare said:Way Maori...
I love it, Luke!
It's almost too good for a shop
Tom
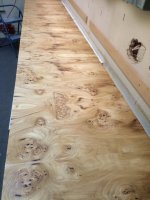
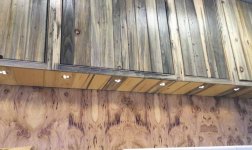
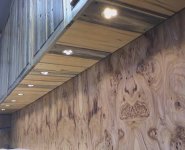
Peter Halle said:I would love to grab a screenshot of that image. Mother nature can be scary at times. Absolutely amazing. And this is your shop? Holy cow Batman. Well done.
Peter
wow said:I love 'braces man' near the end...
[big grin]
")
Why? I use power tools on acid all the time.Iceclimber said:Dam too bad power woodworking equiptment and blotter acid don't mix very well.
This might be a good enough reason to turn in the Festools and big machines for a mess of hand tools
Looking great, really great. Cant wait o see the counter and under cabinets...