Blue Pine Garage Cabinets: Build

iamnothim

Member
Joined
Feb 5, 2014
Messages
1,436
EDIT:  After thinking, which is rare for me, I am going to morph this thread into a build thread.  There should be plenty of challenges and worts.  Feel free to post your 2 cents.  Such as "What are you thinking !"  I truly enjoy your participation.  Luke

I have 340BF of wormy blue pine coming in Tues.  Or as it's called "beetle kill pine".  Dead standing.
No matter I like it.

In fact, I like it so much I'm going to T&G it and panel my half of the garage.  I'm going to build the cabinets with a bead frame.  The doors will be flat with a small chamfer.  The T&G paneling will have a more substantial chamfer.  I don't want everything to be the same.  I want the paneled walls different from the cabinet color.  I will top coat everything with a satin pre-cat urethane.

NOTE:  Here is a site Charles Neil gave me of a fellow in South Dakota that makes Blue Pine Furniture
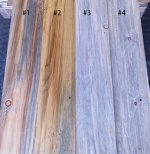
So.  What color?
Here are the candidates:
#1 Natural
#2 Light Ochre Wash
#3 Heavy White Wash
#4 Light White Wash

[attachimg=1]
 

Attachments

  • BluePineNew-1.jpg
    BluePineNew-1.jpg
    394.1 KB · Views: 6,535
Another question.

I bought an Amana Tool 55346 T&G bit set.

Many Many years ago I used a stile/rail set for some doors.  Poplar.  The 55346 has a 2" diameter base.
With this kind of set do I make multiple passes or just one?  Speed setting?
OF1400 in a CMS Table.

Naturally I'll make some test runs, but I thought I'd ask for some pearls of wisdom.

Thanks

Luke

 
[size=14pt]

Well, except for Festool products, we are often very different to NA in our tastes down here!  [smile]

Consequently my vote is for natural.
 
For me:  #4 then #1. 
At first thought #3; but then thought, over time, the constrasty white would
start to 'grate' on my eyes. 
Not at all keen on #2. 
Very personal isn't it? 
(love your posts btw - thanks.)

Richard UK
 
I would personally go with #4 for you walls and Natural for you cabinets.
 
I'd go natural. The wood is beautiful as it is and it highlights hopefully why you made that choice of wood. As a side effect it will also save you time.
 
fuzzy logic said:
For me:  #4 then #1. 
At first thought #3; but then thought, over time, the constrasty white would
start to 'grate' on my eyes. 
Not at all keen on #2. 
Very personal isn't it? 
(love your posts btw - thanks.)

Richard UK

Thanks Richard,  trying to come up with fun stuff.
I've started a bunch of threads and I always wonder if I'm coming off as an annoying Troll.  [eek]

Note:  Thanks everyone for participating.  I enjoy your opinions.  I'm going to retake the photo with natural light.  The Ochre is more yellow than it appears.  I edited the thread name to "build".  I'll post a bunch of progress picks and ask for input.
 
Build input request request.
I am really asking for confirmation that I am on the right track.

Because I like this wood and I want a challenge I am going to make the cabinets frame style.  Mitered, maybe with a 3/16" bead.

The carcasses are 3/4" pre-finished maple ply.  (USA)  I will hang the uppers using 3/4" french cleats.
My plan is to make 1 1/2" wide frames flush to the inside wall of the carcasses.  This means the frame protrudes 3/4" outside the carcass and when the cabinets are hung they will but frame to frame rather than carcass to carcass.  I will fix any alignment problems with a plane.

Is my frame approach correct?

Second build/design question.
In one of my threads a member suggested putting peg board/hangers on both the inside and outside of the doors.  This is brilliant.
However I still want to see the wood.  As such I will build two 40" (1000mm) square uppers with with split doors 20"w by 40"h
I have purchased some 16" by 32" powder coated Wall-Control Peg board Panels

I'm going to mount them on the inside doors and the back of the cabinet with app 8" void for hooks.

Here's the question.  Concerning the weight.
Do I use Blum Euro hinges or Mortise hinges?
 
Hi iamnothim,

Thinking a bit about your project.

Sounds like you are thinking of using a rail and stile set to mill your tongue and groove. Not sure I would want to burn mine up with that amount of lf to run. Either a dedicated T&G set, or, if you have a decent slot cutter you could just run both sides of each piece and just rip some splines. If you're going to use a stain it's easy to stain the splines separately so if you have any shrinkage you won't see white wood in the gaps. (Stain the tongues too for same reason). If you're planning to blind nail thru the tongues rather than face nail then a T&G set will make your life easier.

Beaded face frames are great, but if you bead the doors (paneled) it gets to be a bit much. We think of beads as decorative but they are really there to help make a gap less obvious to the eye.

I don't like mitered face frames as I am a traditionalist. But they are easy to cut as all lengths are full size so less mistakes. Easy to domino or biscuit too. I prefer a jack miter. There are several jigs out there for jack mitering but they are easy to do by hand too and fast once you get the hang of it. You can pocket screw them too.

I use a little cutting guide from scrap with a Japanese saw, and finish with a chisel. You can either split the waste out and pare or use a table saw to get close and finish with a chisel.

If you want to move along Euro hinges would be fine.  You could always use three per door.  Or gain in the butts if you want to show off to all your pals...

Here's a pic or four-

[attachimg=1]
[attachimg=2]
[attachimg=3]
[attachimg=4]

Hope this is helpful.
 

Attachments

  • image.jpg
    image.jpg
    723.9 KB · Views: 6,236
  • image.jpg
    image.jpg
    704.8 KB · Views: 6,210
  • image.jpg
    image.jpg
    725.3 KB · Views: 6,236
  • image.jpg
    image.jpg
    660.7 KB · Views: 6,301
Just saw that you already have a T&G set. Never mind that first part of my last post. I'm a doofus sometimes.

For what it's worth I've always been able to run those bits in one pass without trouble. Resin buildup might be an issue with that much pine though.
 
I am going to do the same for my basement shop.  I'll start by covering one of the two concrete walls, where I intend to add wall cabinets for storage.  I live in Colorado, and we have a LOT of beetle kill pine.  I bought T&G 1X6X96 at Home Depot for a little over $4 each, so that is just $1 per board foot. I originally bought it to make bird houses (T&G is getting cut off), and liked it so much I'll buy more and use it for the shop wall covering.

My son-in-law built a backyard "shed".  He has a construction business, so it has nice door, skylight, and windows.  Maybe it really is his man cave!  The "blue pine" (I'd not heard it called that, but it a good description) looks fantastic.

I am glad to see this wood getting used and being available to the public. It has really devastated a number of forests but at least some good is resulting from it.
 
smartcarpie said:
Hi iamnothim,

Thinking a bit about your project. ....................

Hope this is helpful.

Incredibly helpful.  Thank you!
The bead photos are precisely what I want to do!

First the T&G.  The Beetle Kill is so soft I don't think that bit will know it's cutting anything.  So "V" grove paneling.  I've decided on a light whitewash for the paneled walls and natural cabinets.  (Thanks Everyone!)  Probably a satin GF Pre-Cat water Urethane to coat everything.  Walls included.

I'm going to try to build the fames just as you did probably using a Kreg stile-notch bit.  Fallback will be mitered and dominos.

I plan on using the same T&G set for the door joinery except have the grooves on the inside and a smooth outside.  Then just a small 1/32" or 1/16" chamfer around the edges.  I like shaker but they would take a lot more time and collect dust in the workshop.  So flat fronts.

All-the-best,

Luke

 
iamnothim said:
smartcarpie said:
Hi iamnothim,

Thinking a bit about your project. ....................

Hope this is helpful.

Incredibly helpful.  Thank you!
The bead photos are precisely what I want to do!

First the T&G.  The Beetle Kill is so soft I don't think that bit will know it's cutting anything.  So "V" grove paneling.  I've decided on a light whitewash for the paneled walls and natural cabinets.  (Thanks Everyone!)  Probably a satin GF Pre-Cat water Urethane to coat everything.  Walls included.

I'm going to try to build the fames just as you did probably using a Kreg stile-notch bit.  Fallback will be mitered and dominos.

I plan on using the same T&G set for the door joinery except have the grooves on the inside and a smooth outside.  Then just a small 1/32" or 1/16" chamfer around the edges.  I like shaker but they would take a lot more time and collect dust in the workshop.  So flat fronts.

All-the-best,

Luke

Luke, I wanted to add another vote to the jig like smartcarpie showed in his photos.  It's super simple to use and works great as you saw in his pictures.  I had forgotten until I saw his photos, but I also fabricated one to use to match some existing frame and panel doors in a kitchen remodel I did some years back.  I couldn't find a tongue and groove set to match the old doors, so I ran a dado in the rails and styles to fit a flat panel and then used a small ogee bit I found that came really close to matching the profile of the old doors.  I used the 45 degree jig to miter the ogees where they met on the inside edges of the rails and styles.  Worked great.  Wish I could share some pictures, but we moved out from the house.

Mike A.
 
Iamnothim-

Don't be afraid to tackle the jack miters by hand.  They're really simple once you get going.  And if you ever do any bead and quirk window casing you'll find it a very handy joint that's been around for a few centuries, once again as it allows the joint to stay tight while the material moves with the seasons. 

If you are bound and determined to use a router take a look at garymkatz.com for another jack miter jig, and didn't Brice Burrell do a write up on using an MFS template for that work too?  But unless you are doing production work just dive into the scrap bin, make a jig and have at it. 
 
Back
Top