You are using an out of date browser. It may not display this or other websites correctly.
You should upgrade or use an alternative browser.
You should upgrade or use an alternative browser.
Blue Pine Garage Cabinets: Build
- Thread starter iamnothim
- Start date
iamnothim
Member
- Joined
- Feb 5, 2014
- Messages
- 1,435
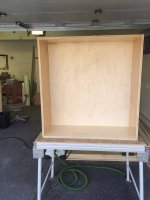
I finished building the peg board cabinet box. There will be 32" x 32" peg board on the back and a 16" x 32" peg panel on each door.
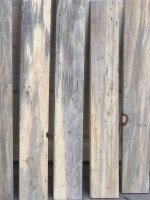
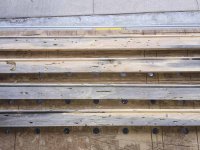
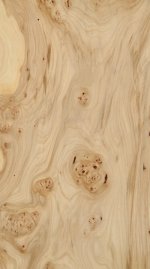
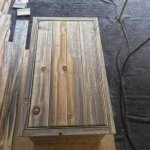
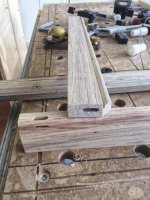
Then I planed the wormy blue pine in preparation for the frame and doors. There's a reason it's called wormy.....
Not to mention the color is all over the place. There are some very nice red streaks in some of the pieces.
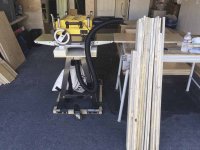
I have a Dewalt DW735 planer. I posted my build of a dust collector bag on this thread. Today I took 2mm off 60 linear feet and received negligible dust. Both photos are after the material was planed
[attachimg=1]
[attachimg=2]
[attachimg=3]
[attachimg=4]
[attachimg=5]
Then I planed the wormy blue pine in preparation for the frame and doors. There's a reason it's called wormy.....
Not to mention the color is all over the place. There are some very nice red streaks in some of the pieces.
I have a Dewalt DW735 planer. I posted my build of a dust collector bag on this thread. Today I took 2mm off 60 linear feet and received negligible dust. Both photos are after the material was planed
[attachimg=1]
[attachimg=2]
[attachimg=3]
[attachimg=4]
[attachimg=5]
Attachments

iamnothim
Member
- Joined
- Feb 5, 2014
- Messages
- 1,435
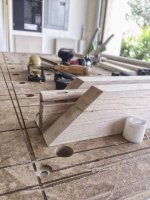
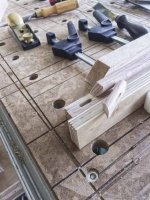
The face frame for the pegboard cabinet is done. I just need to apply it.
Today I will mill the T&T for the doors. I will try to do a better job matching the planks and spacing the grooves.
I also ordered some elm veneer from Certainly Wood.. I'm having it shipped to Superior Veneer to have a PSA backing applied. I will use this for the counter "backsplash".
[attachimg=1]
Attachments
iamnothim
Member
- Joined
- Feb 5, 2014
- Messages
- 1,435
Thanks Mark !!!
Been a long day, mostly because of another of my bone-head moves.
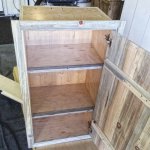
A day or two back I finished what I’ll call my standard upper cabinet and door.
Then I made the carcass for the large two door pegboard cabinet. Yesterday I selected all the planks for both doors milled them and assembled the left door.
All I needed to do today was cut the right door to length and width. After I cut it to length I took a measurement of the door and went to rip the width. It was too narrow. I couldn’t believe it!!! I went back and forth three times and finally resigned myself to ripping out a narrow board from the door T&G’d both sides and the wider plank. Needless to say this took a lot of time to set up the T&G bits again in the CMS.
I got it done. I pulled a tape. The door was too narrow. What???? Turns out I was measuring off the WRONG DOOR. I started with a perfectly fine door, tore it apart, and re-built it for nothing. Welcome to my world. My excuse. I take a lot of meds and have a heck of a time with spacial relationships and memory. Blew up half a day on that one.
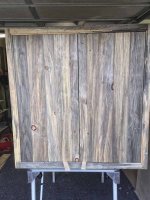
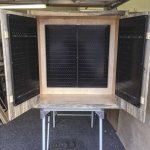
The good news.
The pegboard cabinet looks pretty good. I just need to add a middle hinge on the left door and tweak them. I think the edges of the doors need
a small chamfer to refine them. (If you can refine wormy blue pine.)
How much relief do ya’ll think I should take off, if any? Should I run the doors through the CMS or use the MFK 700?
Lastly:
The Blum 120 deg inset hinges are not playing nicely. I set up for a 2.5mm reveal with a 5mm bore distance 22.5mm center. I used the LR32.
The doors pinch on the hinge side so much I had to go with a 6mm mounting plate plus a 2mm spacer. I didn’t really want to reduce the bore distance because the pine is soft, but one the right door I bored the cups with 3mm bore distance 20.5mm over all. It worked well and I got rid of the spacer.
But I am confused why this hinge does not work with a 0 deg plate.
All-the-best,
Luke
[attachimg=1]
[attachimg=2]
Been a long day, mostly because of another of my bone-head moves.
A day or two back I finished what I’ll call my standard upper cabinet and door.
Then I made the carcass for the large two door pegboard cabinet. Yesterday I selected all the planks for both doors milled them and assembled the left door.
All I needed to do today was cut the right door to length and width. After I cut it to length I took a measurement of the door and went to rip the width. It was too narrow. I couldn’t believe it!!! I went back and forth three times and finally resigned myself to ripping out a narrow board from the door T&G’d both sides and the wider plank. Needless to say this took a lot of time to set up the T&G bits again in the CMS.
I got it done. I pulled a tape. The door was too narrow. What???? Turns out I was measuring off the WRONG DOOR. I started with a perfectly fine door, tore it apart, and re-built it for nothing. Welcome to my world. My excuse. I take a lot of meds and have a heck of a time with spacial relationships and memory. Blew up half a day on that one.
The good news.
The pegboard cabinet looks pretty good. I just need to add a middle hinge on the left door and tweak them. I think the edges of the doors need
a small chamfer to refine them. (If you can refine wormy blue pine.)
How much relief do ya’ll think I should take off, if any? Should I run the doors through the CMS or use the MFK 700?
Lastly:
The Blum 120 deg inset hinges are not playing nicely. I set up for a 2.5mm reveal with a 5mm bore distance 22.5mm center. I used the LR32.
The doors pinch on the hinge side so much I had to go with a 6mm mounting plate plus a 2mm spacer. I didn’t really want to reduce the bore distance because the pine is soft, but one the right door I bored the cups with 3mm bore distance 20.5mm over all. It worked well and I got rid of the spacer.
But I am confused why this hinge does not work with a 0 deg plate.
All-the-best,
Luke
[attachimg=1]
[attachimg=2]
Attachments
iamnothim
Member
- Joined
- Feb 5, 2014
- Messages
- 1,435
smartcarpie said:I use a little cutting guide from scrap with a Japanese saw, and finish with a chisel. You can either split the waste out and pare or use a table saw to get close and finish with a chisel.
[member=12398]smartcarpie[/member]
One last story for today.
I am so stubborn. I convinced myself that using the CMS to notch the stiles and rails would be faster and more accurate. Since the Festool 45deg bit was too small for the bead I am using I followed your directions and notched the first upper frame by hand. Not too bad but again I was convinced the CMS is the way to go.
I see that Kreg makes a large notch bit. Amazon $37. It comes in. I set up the CMS sled and spent hours finally getting the S&R's notched for the peg board cabinet. They were no better that the ones I did by hand an took longer.
The Kreg bit in the 1400/CMS is not precise. Why? Because you are sliding stock without a fence and don't know where the bit is in relation to the stock. I even put some blue tape on the table. Still imprecise. Why? Because the stock is elevated off the table when using the sled and you can really eyeball it to the tape and cutting edge. What's more with the stock elevated it's a chore to get the height of the bit right. It's a crap shoot.
iamnothim
Member
- Joined
- Feb 5, 2014
- Messages
- 1,435
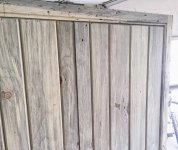
I've milled all the blue pine for the stiles, rails, and doors for the remaining 4 upper cabinets.
I put together one door and chamfered the edges. I like it. I used my TS55 REQ set for 45 deg and cut them on the rail. The rail is 12mm proud of the stock so as to match the T&G profile. This works well for new doors, but I'll need to use the router to retro the ones that already have batons.
[attachimg=1]
Attachments
iamnothim
Member
- Joined
- Feb 5, 2014
- Messages
- 1,435
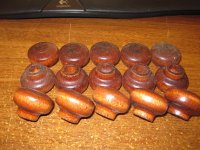
Door Pulls / Knobs
The little copper handles came in and they are just that. Little. Too little. I blew it because the description clearly states 3" and these cabinets are damn big.
Plan "B" Etsy. I found 50, that's fifty, vintage walnut knobs. $5 for the lot. Plus $4.50 shipping They too are smallish at 1" dia. but I think they will work. Can't wait for them to get here.
[attachimg=1]
Attachments
iamnothim
Member
- Joined
- Feb 5, 2014
- Messages
- 1,435
- Joined
- Feb 8, 2007
- Messages
- 1,671
Thanks for sharing. Love that blue pine
iamnothim
Member
- Joined
- Feb 5, 2014
- Messages
- 1,435
honeydokreg said:Thanks for sharing. Love that blue pine
Woah! Like Dude... I meant to post. Your builtin's are way nice.
The blue pine.... I just stumbled into it. I knew nothing about it, but I liked it instantly and bought it. Then Charles Neil gave me some background. I'm not the "greenest" guy on the planet, but it's kinda cool utilizing this blighted wood. I'll share this info that Gary Kernan, developer of Cab32 software, emailed about "blue stain" pine. Gary lives in BC....
"The blue stain in the pine is from the Pine Beetle. Here is BC we lost a lot of pine forests to the Pine Beetle. Winters aren't as cold so the Beetles survive. We need 2 weeks of -30 celsius in mid November to control the bugs. In December the Beetles produce a natural anti freeze and they can withstand -40 through January and February.
BC exported a lot of Blue stained pine to Japan. We have 2 to 3 years to harvest the dead stands before rot sets in."
Heck at $1.50 a BF it's a bargain if you like the look and don't mind a soft wood.
I'm going to use a water based top coat, as I don't like the color from oil based finishes. (But then maybe I'll test some) I like General Finishes products. I have 3 gal. of water based lacquer, which I don't really like for furniture, but I need to use. Or the Pre-Cat water based urethane, which I like a lot but only have in semi-gloss. I could always use up the lacquer on the base coats and finish with the urethane. That's a Charles question. Anyway, since I can't wait, I shoot some test planks then a cabinet to see how she'll look and post the results.
I should also add that due to low light I amped up the contrast in the prior photo to show the chamfered edges. It's still a darn close to the actual look.
iamnothim
Member
- Joined
- Feb 5, 2014
- Messages
- 1,435
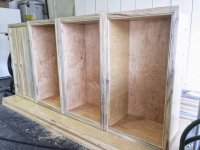
Update:
Finished 3 carcasses. One to go.
Finished all the shelves for the upper cabinets.
Framed one carcass today.
Beveled four doors edges.
The dumpster for the old cabinets will arrive today.
Left:
Assemble 1 Carcass
Assemble and apply 3 Frames
Assemble and bore 3 doors.
Route the edges on some batons.
My Goal:
Demo and hang french cleats Sunday.
Run some Romex for plugs and under cabinet puck lights.
I’m cutting the frame notches by hand, however, I am boring Dominos prior to notching.
I bore a deep (25mm) domino on the end that will get the large notch. When the notch
is complete the Domino depth is perfect.
I scrapped the knobs. I’m going with magnetic push latches.
[attachimg=1]
[attachimg=2]
Attachments
iamnothim
Member
- Joined
- Feb 5, 2014
- Messages
- 1,435

- Joined
- Nov 14, 2013
- Messages
- 3,574
Luke:
Funny - I thought something ike that would require the TS75? I mean, that's what I told my wife...
[wink]
Seriously, those look great. The frames set off the doors nicely without overpowering the character of the wood. And this post will serve as inspiration (and TS purchase justification) for a LOT of people in the future.
I think you did well, my friend!
iamnothim
Member
- Joined
- Feb 5, 2014
- Messages
- 1,435
[member=25476]wow[/member]
Thanks again for the kind words. I have been so close, many, many times to purchasing a Bosch 4100 contractor table saw. Then I circle back to "do I really need one?” The TS is producing great results. Granted the setup time for small stock rips can take a bit more time for a “onesie”. I use a combination of Rail Dogs, stubby dogs, clamping elements, and spacer blocks to align and secure the stock. It’s not problem for repetitive cuts. For me it’s all about saving the space. I’d love to have a real table saw, but that’s even more space. I have enough room to keep my two MFT/3’s setup all the time, but what a great solution for a hobbyists that has even less room. One can fold up the MFT, pack it away in a closet with the track saw and rails, and have 90% of the functionality of a table saw when they need it. Truly remarkable.
I have to thank [member=12398]smartcarpie[/member] again for the instructions on cutting the notches in the frames. I’m getting more proficient with each notch and, as you said, it’s an enjoyable break from power tools. Plus there is no router bit tear out.
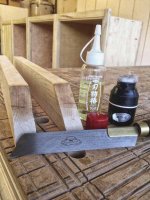
When I learned veneering, I discovered Paul Schurch to learn how. One of the things he does is use camellia oil on various hand tools. Plane beds etc. I decided to oil the mitered maple guide blocks and the hand saw. It made a huge difference. The saw tracks better, doesn’t cut into the blocks, and glides through the stock. Camellia oil isn’t cheep but it lasts a long time, esp when using the applicator bottle.
About my MFT/3 table top. Festool say’s the it’s a sacrificial top. I like to follow directions!
[attachimg=1]
Thanks again for the kind words. I have been so close, many, many times to purchasing a Bosch 4100 contractor table saw. Then I circle back to "do I really need one?” The TS is producing great results. Granted the setup time for small stock rips can take a bit more time for a “onesie”. I use a combination of Rail Dogs, stubby dogs, clamping elements, and spacer blocks to align and secure the stock. It’s not problem for repetitive cuts. For me it’s all about saving the space. I’d love to have a real table saw, but that’s even more space. I have enough room to keep my two MFT/3’s setup all the time, but what a great solution for a hobbyists that has even less room. One can fold up the MFT, pack it away in a closet with the track saw and rails, and have 90% of the functionality of a table saw when they need it. Truly remarkable.
I have to thank [member=12398]smartcarpie[/member] again for the instructions on cutting the notches in the frames. I’m getting more proficient with each notch and, as you said, it’s an enjoyable break from power tools. Plus there is no router bit tear out.
When I learned veneering, I discovered Paul Schurch to learn how. One of the things he does is use camellia oil on various hand tools. Plane beds etc. I decided to oil the mitered maple guide blocks and the hand saw. It made a huge difference. The saw tracks better, doesn’t cut into the blocks, and glides through the stock. Camellia oil isn’t cheep but it lasts a long time, esp when using the applicator bottle.
About my MFT/3 table top. Festool say’s the it’s a sacrificial top. I like to follow directions!
[attachimg=1]
Attachments
Similar threads
- Replies
- 25
- Views
- 4K
- Replies
- 5
- Views
- 2K