I think that you should make your holding jig deeper so that your fingers are not inline with your cutter. When i was much, much, much younger I made a jig simlilar to yours using a milling cutter and my drill press to rout a recess' for hand mirrors. The handles were too close to the cuttter path, the cutter caught the material and jerked my thumb into the cutter. Being much, much younger I still had decent reflexes. That being said, I still have four spiral scars in my thumb to remind me to deep my fingers well away from any spinning cutter of any sort.
You are using an out of date browser. It may not display this or other websites correctly.
You should upgrade or use an alternative browser.
You should upgrade or use an alternative browser.
Blue Pine Garage Cabinets: Build
- Thread starter iamnothim
- Start date
iamnothim
Member
- Joined
- Feb 5, 2014
- Messages
- 1,435
rst said:I think that you should make your holding jig deeper so that your fingers are not inline with your cutter. When i was much, much, much younger I made a jig simlilar to yours using a milling cutter and my drill press to rout a recess' for hand mirrors. The handles were too close to the cuttter path, the cutter caught the material and jerked my thumb into the cutter. Being much, much younger I still had decent reflexes. That being said, I still have four spiral scars in my thumb to remind me to deep my fingers well away from any spinning cutter of any sort.
You are correct. I should have made the base longer.
In fact while I was making it, I thought "you should make the base longer"..... but.... I'm removing so little material ....and I'll use the dust shroud. Made a couple passes before turning on the router... felt safe..... turned on the router.....moved the piece into the bit and...bang! end grain.
I should have made the base longer.
rvieceli
Member
[member=28483]iamnothim[/member] Luke - take your current jig... Grab a long piece of 1x and drill two holes that will fit the spacing of the two holes in the end of your jig. Add some longer screws, slap that sucker on the top of the current jig and now you have an extended jig. Do it to both sides if you want to use both hands.
Ron
Ron
iamnothim
Member
- Joined
- Feb 5, 2014
- Messages
- 1,435
[member=3192]rvieceli[/member]rvieceli said:[member=28483]iamnothim[/member] Luke - take your current jig... Grab a long piece of 1x and drill two holes that will fit the spacing of the two holes in the end of your jig. Add some longer screws, slap that sucker on the top of the current jig and now you have an extended jig. Do it to both sides if you want to use both hands.
Ron
Thanks Ron,
I've 86'd the router idea for now. But yup I could extend it. That sled with knobs is a nice way to go with small pieces. You have a lot of control.
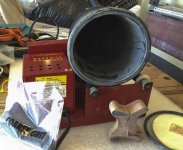
My super bargin, 25 year old Thumblers Tumbler arrived from eBay. Sand from the garden store did not work. Curiously Harbor Freight has a pack of 4 different grits. While I was there I notice I could pick up a new tumbler for $5 less than the one I purchased. Ya think!! Who knew? Looked identical to new Thumlers.
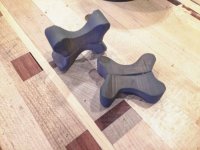
I used ds tape to fix two pulls back to back so the edges of the base don't erode. Dumped in the Coarse and let er tumble.
QUESTION
My darling daughter and her boyfriend will be arriving home after spending a month on the road exploring the western states. She wants to go to Burning Man, but that's another discussion. New grad. BS in Biology. Should be plenty of bugs at the burn to study.
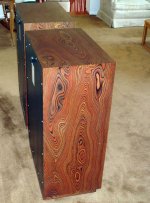
But I digress. She sent me some photos of a couple redwood slabs she picked up. She wants a table and a wall thingy. I haven't googled anything yet but I thought I'd ask if anyone has ever finished a slab. Needless to say the cut is not clean. Can it be hand planned?
Obligatory photo:
[attachimg=1]
Attachments
rvieceli
Member
On the slabs.... of course you can hand plane them. But I'd suggest using a router sled.
Did you ever flatten the top of your Roubo?
Ron
Did you ever flatten the top of your Roubo?
Ron
iamnothim
Member
- Joined
- Feb 5, 2014
- Messages
- 1,435
Still have the slows. Lacking focus, not sure where to start with my projects. I have two more drawer fronts to miter but I don't think I'm on my game enough to cut them. At this stage I do not want to scr** the pooch.[attachthumb=2]
Probably too much information. Sorry
After nearly 48 hours Thumler's Tumbler doesn't look like it's doing anything other than making the pulls black. I'll keep it plugged in.
My daughter came in last night. I'll have a look at the slab today. Should I start a thread for that too? Or do I have too many on the board?
[attachimg=1]
Attachments

Start a new thread with the slabs. It's easier to look up for reference by others in the future. That, and I enjoy build threads (yours particularly due to the detail and craftsmanship), there can never be too many.
As previously mentioned, now you have a couple of projects where a router sled would get put to work. They are not hard to make, but on your bench thread you had found some commercially made options. I would say this justifies either the purchase or the construction.
As previously mentioned, now you have a couple of projects where a router sled would get put to work. They are not hard to make, but on your bench thread you had found some commercially made options. I would say this justifies either the purchase or the construction.
Jim Kirkpatrick said:Luke, I found this on Pinterest. CNC milled plywood. Made me think of your drawer fronts.
[member=28483]iamnothim[/member]

That reminds me of my favorite pair of speakers of all time
Attachments
iamnothim
Member
- Joined
- Feb 5, 2014
- Messages
- 1,435
I'm putting this in all my threads.... so you'll get multiple emails.
Ok Guys n’ Gals, Tool-Home
Let’s see if we can make Tom Bellmare’s phone ring.
Even if it’s to purchase Dust Collector Bags, Saw Blades, or Sandpaper, every order will help. This is business not charity…. that’s the way Tom would like it.
I understand from [member=4105]tjbnwi[/member] (Bader) that he he’s back home from the hospital, and is teaching Veronica, his wife, the business. It wouldn’t surprise me if “Tex” answered your call directly, pain and all. He’s that kinda guy.
I would imagine there’s a business learning process going on with Veronica, so I’m thinking it might take a little longer to ship your order. But then maybe not… So get on the phone and keyboard
Phone: 512-428-9140
iamnothim
Member
- Joined
- Feb 5, 2014
- Messages
- 1,435
Guys,
I apologize in advance for the multiple posts but this is important and it's a great way to get in contact "my loyal followers"
Side Bar: I can't believe this many guys read my threads. I'm humbled. Was it Yogi Berra that said "I wouldn't want to belong to any club that would have me in it"?
[size=14pt]
Back on point. Let's get some Mojo Going.
Order some CT bags or sand paper. You always need those. It's understood that not everybody is in a position to order a machine.
Even if it's a small purchase.
Please post it!
It matters.
Get the Mojo Going!
iamnothim
Member
- Joined
- Feb 5, 2014
- Messages
- 1,435

Tayler_mann
Member
- Joined
- Nov 23, 2014
- Messages
- 410
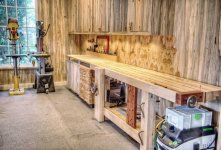
iamnothim said:I finally got around to finishing the garage cabinets. Except for clear coating the new bench it's done. I'm please with how the under counter storage came out.
[attachimg=1]
[attachimg=2]
Very nice build. That's a good looking workspace...better than my living room even. I cannot wait till I get time to make stuff for myself and get to enjoy it.
I wasn't sure if you would post again for awhile there. Hope you have some more projects to post.
bkharman
Member
- Joined
- Jul 1, 2013
- Messages
- 2,019
iamnothim said:I finally got around to finishing the garage cabinets. Except for clear coating the new bench it's done. I'm please with how the under counter storage came out.
[attachimg=1]
[attachimg=2]
Good to see you back Luke! Missed you buddy.
Am also VERY glad that we are seeing a large influx of projects again. I have one (very small one) that I will post in the next day or so.
Cheers my brother! Bryan.
Wooden Skye
Member
- Joined
- Mar 6, 2012
- Messages
- 1,145
Luke
The cabinets look great! Good to see your back here as well!
The cabinets look great! Good to see your back here as well!
Similar threads
- Replies
- 25
- Views
- 4K
- Replies
- 5
- Views
- 2K