Bookshelf construction with Domino and/or pocket holes and/or glue?

jiffff

Member
Joined
Feb 5, 2019
Messages
26
I've got a big floor-to-ceiling/wall-to-wall bookcase to piece together in the coming days. I've designed it in 5 sections that can be attached to one another.

In practice this means that I've got five 2m x 0.75m caracsses to construct - normal 'ladder' format with a 18mm backing.

1 x 18mm MRMDF back
2 x 18mm MRMDF sides
5 x 25mm MRMDF shelves (lipped front and back with hardwood)
2 x 18mm MRMDF tops and bottoms

I'm wondering how much I should be using my domino? I have a pocket hole jig, and 4 1200mm paralell clamps - but being relatively light on clamps and working single handedly, I'm leaning towards using more screws and pocket holes, but wondering how the Domino might help avoid that 'pull' that often occurs as pocket screws gets tightened - which pulls things a milimitre or so out; and also whether adding more glue/dominos is worth the effort, stress and risk of mishap...

I was planning on doing the following, constructing the outer carcass first, then installing the shelves later. I'd be really grateful for any advice as to the merits of my approach:

Carcass
- Construct the outer carcass using pocket holes and a little glue. I'd drill pocket holes along the edges of the two 'sides' and two 'tops/bottoms' to that they can be screwed to each other and the 18mm bookcase 'back'. I'd put a pocket hole every 12" or so

- Against for the outer carcass, I wonder whether pocket holes are enough and whether I should use glue for strength and/or dominos for alignment. I figure that I can clamp the outer carcass pretty well and can even dry fit some of the internal shelves to avoid the pocket holes 'pulling in' as they tighten. I'm worried about this, as I have it happen quite frequently when using pocket holes, but in this case, the carcass really needs to be millimetre perfect. I'm wondering whether using dominos would counteract this 'pull' effectively.

Shelves
- Using glue and dominos for the shelf sides would have needed to have been done when I constructed the carcass. But I think gluing the carcass, shelves, dominos, assembling it all, clamping, dealing with squeeze out etc all is too much for me working on my own (and not very experienced). I also don't want to use pocket holes on the shelves as would like to avoid all the hole filling that would be required.

- I'm wondering whether screws alone (drilled from the outside of the carcass, that will eventually be hidden) into the sides and rear of each shelf will be sufficient? Or should I use dominos/glue across the back edge of the shelf?

- If I just use screws, things seem simple - I'd lie the carcass on its back, make spacers from scrap to define my shelf heights, dry fit the shelves, use my kreg 90 degree clamps to hold them in place, and start adding screws along each side and the rear.

- Alternatively, I could use dominos and glue across the back of the shelf. For this, I figure I'd need to make my spacers from scrap, drill domino holes in the rear carcass and rear edge of the shelf. Apply glue, position shelf, clamp and screw as above. Not sure if the domino/glue along the back of the shelf is necessary - it certainly adds complication and I'd have to carefully think through how I reference with the domino.

I guess the significant thing in this approach is that I'm not trying to glue my shelves in as I construct the main carcass. In my head that 'feels' like a better/higher quality/stronger approach, but I'm not sure I've got the skills to do so much gluing, positioning, clamping, screwing etc without either the glue drying or creating a massive mess.

Thanks
 
Would using shelf pins and having adjustable (not glued in) shelves be viable in your design?

I like building loudspeakers and they often have a lot of internal bracing and boxes inside boxes. One method I’ve used with the Domino is to only glue one side at a time and dry fit the other sides while clamped. Kinda slow, but allows your full attention to the glued joints.  Obviously you need to assemble in proper sequence and you are going to pull some panels off multiple times before you’re done. May or may not be worth it.
 
I will have led strip running under the front lip of each shelf. I guess that doesn't preclude using shelf pins, but together with the fact that I don't have any need to adjust the shelf positions, I had really considered using them. I just wonder whether shelf pins are in any way stronger than, say, 8 screws through the carcass into the shelf body?

I hadn't thought of doing my glue-up with half of the pieces only dry fitted - interesting idea. Again, it would be more complicated - not sure whether it would be worth it over the screws (with maybe dominos and glue at the back edge).
 
On a build like you are doing people often make just the middle shelf fixed to hold everything solid/square and make the rest adjustable.
 
The Domino 500 connectors are actually a great solution for large multi-columned shelving, and they can be done with either fixed or adjustable shelves (or a mix of the two).  That said, I'm not sure how they would perform in MDF vs plywood or pine shelving.  If you're curious how it works, here's the thread for the build I did with the connectors for my office shelving.

 
Hard to beat the Domino for accuracy and ease of assembly. For me it’s my best friend during glue ups as alignment is a done deal and one only needs to deal with keeping things square.  It’s a wonderful tool and this might be chance to explore its capabilities.

If you are building 5 identical units setting up for repetitive mortise cuts would be pretty efficient. Also, Domino plus pocket holes (or screws) can be viable in some awkward to clamp joints.
 
First off LED's don't last forever so I'd definitely make the shelves removable, not adjustable (unless you want them to be) but certainly removable.
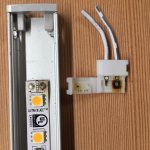
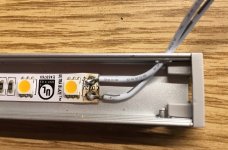
I'd also suggest soldering the electrical leads to the LED strip lighting rather than using the funky white plastic clamp-on connectors that are supplied with the LED's. The supplied connectors only last so long and then they start to arc. Here's a photo of one that gave out after about 9 months. Once it reaches this condition, just installing a new connector won't save it, the only solution will be to solder the wires, so just do it right out of the gate and save yourself the problems. 

[attachimg=1]

[attachimg=2]

If you use metal shelf pins, round or flat, you could use those to bring the 12/24 volts to the LED's.

I'd definitely use the Dominos as a structural element and just rely on the screws as a clamp.

I always do the glue-up in stages, take one side of the cabinet and glue in all the Dominos, then when cured, mate it to the other side. It takes a bit longer but it's less frenetic than the all-at-once method.

Especially if you're building 5 cabinets at the same time, by the time you finish the 5 partial assemblies, the glue will probably have set up in the first one and you can then start the final assembly.
 

Attachments

  • 7574.JPG
    7574.JPG
    785.5 KB · Views: 1,099
  • 7575.jpg
    7575.jpg
    727 KB · Views: 1,086
I love the combo of pocket  hole screws and Dominos.  The screws act as clamps and fasteners. The Dominos line things up and also make it easy to keep the pieces together while putting the screws in. 

Make the pocket holes in the tops and bottoms and drill them on the outside of the carcass. That way there are no holes to fill.  During assembly the Dominos will keep the piece standing vertically while you drive the screws.  Which is also made easy by placing them on the outside. Glue or no glue your choice. It can't hurt though.

It is a little more time consuming making both domino mortises and pocket holes. But the assembly is made so easy by using both.

Seth
 
I like using both for alignment and strength but I find for dry fits that dominoes hold well enough on their own for dry fit to visualize things like ....How much overhang to leave say if the cabinet had a separate top, or when trying to design the type of feet to put on a coffee cabinet I have concerns over repeatedly taking pocket screws in and out but dominos hold well enough with maybe a hidden clamp if you’re like me and change design as the piece comes together. The same goes for fitting doors on a stand alone cabinet with inset plywood doors with  a hardwood edge.......I routinely do several dry fits on my pieces. My approach is measure twice cut once and dry fit ten times......it’s boring but keeps me out of trouble Having pocket screws and dominoes helps me
Best
 
Thanks for all the replies.

Cheese - noted on the LED front. I had planned on the little connectors, but I'll take your advice and solder. Not soldered for about 25 years, but I'll give it a go. What sort of iron / tip did you use? Anything to reccomend?

SRSemenza - Thanks - good to know you've used both successfully. I was wondering if you can tell me... You've probably had that experience when using just pocket holes, doing a 90 degree but joint, you can everything clamped nicely, but the strength of the screw pulls the panel in a tiny bit so the corner join is no longer flush. Have you found using dominos prevents that? For me, that would be worth the price alone as I find the kreg branded clamps don't quite hold as tight as needed to stop the 'drift' on tightening.

Chris - Ease of dry fitting is an advantage for sure. I'm going to need to do a dry fit or three, and without dominos I'd be messing about with quite a few clamps I reckon.

Thanks for all the advice!

 
jiffff said:
SRSemenza - Thanks - good to know you've used both successfully. I was wondering if you can tell me... You've probably had that experience when using just pocket holes, doing a 90 degree but joint, you can everything clamped nicely, but the strength of the screw pulls the panel in a tiny bit so the corner join is no longer flush. Have you found using dominos prevents that? For me, that would be worth the price alone as I find the kreg branded clamps don't quite hold as tight as needed to stop the 'drift' on tightening.

  Yes, most of the time. As long as the dominos are not too far apart and or the screws are not far from the dominos.  If the screw is in between two dominos that are say 12" apart then the plywood can be flexed enough by the force of the screw to cause the misalignment.  The dominos certainly help a lot in keeping the flush alignment.

  The ease of assembly when you can just stand the piece being attached on the dominos, leave it standing hands free, and put the screws in is really good.

Seth
 
SRSemenza said:
I love the combo of pocket  hole screws and Dominos.  The screws act as clamps and fasteners. The Dominos line things up and also make it easy to keep the pieces together while putting the screws in. 

Make the pocket holes in the tops and bottoms and drill them on the outside of the carcass. That way there are no holes to fill.  During assembly the Dominos will keep the piece standing vertically while you drive the screws.  Which is also made easy by placing them on the outside. Glue or no glue your choice. It can't hurt though.

It is a little more time consuming making both domino mortises and pocket holes. But the assembly is made so easy by using both.

Seth
This is the method I prefer.  Not the fastest but strong and stable.  I recommend putting the pocket holes close to the dominos as the geometry of the pocket hole will tend to pull the joint out of alignment.  Having the pocket hole near the domino means that the domino will prevent the drift.  Don't over tighten the pocket hold screws!
 
I agree that dominos for alignment and strength and screws as clamps and to add strength is a good approach.  Pocket holes in the top and bottom would be OK but i prefer to use through screws.  I assume the pieces will be painted and, if so, you can even use screws where they would show by recessing them and puttying the hole.  I use pocket screws but I use more through screws.  I would through screw the shelves to the sides and back.  I worry about installation after carcase assembly, I think it will be hard to get them in without clearance and if you put clearance the sides will be wavy.  I would glue/screw the shelves to one side and back and then install the other side.  Without pocket screws in the shelves you don't need dominos although they will still help align the shelves.
 
jiffff said:
Cheese - noted on the LED front. I had planned on the little connectors, but I'll take your advice and solder. Not soldered for about 25 years, but I'll give it a go. What sort of iron / tip did you use? Anything to reccomend?

You want to use a small soldering iron with a narrow tip. You also don't want to put much heat into the connection, just enough to melt the solder and bond the tinned wire.

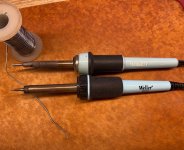
Here's a shot of my favorites. They're both made by the same company.
On the top is an Ungar 7400, 33 watt with a chisel point tip, this thing puts out enough heat for soldering wires/cables up to 10 awg.
On the bottom is a Weller WP25, 25 watts with a needle point. I use this for soldering 22 awg and smaller wires and for LED connections.

Also shown is a spool of .050" diameter rosin core solder. Acid core solder will attack the joint.

Tin the connection wires first, they will attach to the LED solder connection a lot easier.

[attachimg=1]
 

Attachments

  • 8923.jpg
    8923.jpg
    520.6 KB · Views: 966
Thanks, I'll have a look at that Weller model.

I pulled together a carcass today using the domino and pocket hole method. 2000mm tall sides, 6 dominos and about 12 pocket screws. I also use a couple of Kreg 90 degree clamps. I did a dry fit with dominos first. Then took out each panel and drilled the pocket holes, then re-insterted and attached the screws. The end result seems pretty good - most of it is completely flush with maybe 1/4mm drift in a couple of areas.

Measuring corner to corner was only 1mm difference, so the whole thing is pretty square.
.
Notably, I didn't use any glue. The thing feels rock solid, but I'm half wondering whether a light bead of glue might be even better. I really want to avoid squeeze out though
 
I would add the glue.  Extra strength for almost no cost.  If you don't know exactly how much to use, you can err on the low side and still gain strength. 

Congrats on getting something made that is made accurately. 
 
Cheese said:
Also shown is a spool of .050" diameter rosin core solder. Acid core solder will attack the joint.

[member=44099]Cheese[/member] is right on target!  Acid core solder is for plumbing ONLY!  The acid core is very corrosive to anything it touches, including clothing, skin, etc.
 
Back
Top