Bought a third MFT/3

mattbyington

Member
Joined
Mar 11, 2018
Messages
797
I was really tired of the limited rip capacity on the MFT.

So I wanted to turn it 90 degrees to increase that.

The LS positioner can’t really be used in the gap between the tables. Oh well.

But - more space ![attachimg=1]
 

Attachments

  • EB955108-7576-4B09-8E81-70041070AD88.jpeg
    EB955108-7576-4B09-8E81-70041070AD88.jpeg
    3.6 MB · Views: 2,557
I use that MW1000 extension on my MFT/3 and it leaves room for stuff you want to clamp on the MFT-side where it goes. Moving it around is easy. IMO this is an excellent and fairly cheap solution for anybody who needs more real estate on/around the MFT.
 
Anyone have any tips for the LS positioner not sliding down/off the table when positioned right over the gap?

I wonder if I can remove the extrusions where the tables meet so it’s a solid surface?

Maybe I’ll plane some MDF down to stick in there.

Matt
 
I knew you'd get a third one hehehehehe . Im thinking about getting another Kapex MFT to go along with my 3 MFT3s and Kapex MFT..
 
Hallo Matt
My solution[attachimg=1]

or any other L-shaped solution

Hope this helps

Bernd
 

Attachments

  • IMG_0114.jpeg
    IMG_0114.jpeg
    624.5 KB · Views: 1,744
mattbyington said:
Anyone have any tips for the LS positioner not sliding down/off the table when positioned right over the gap?

I wonder if I can remove the extrusions where the tables meet so it’s a solid surface?

Maybe I’ll plane some MDF down to stick in there.

Matt
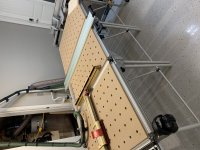
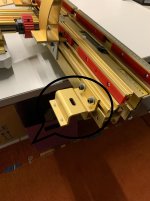
Have you considered making a fixture to mount the positioner to the aluminum profile off to the side of the table instead of the top? I think I've seen one on here before. That would let you pretty much use the whole table and avoid the gap all together.
 
mattbyington said:
I wonder if I can remove the extrusions where the tables meet so it’s a solid surface?
You don't want to do that, they hold the MFT together.

Maybe I’ll plane some MDF down to stick in there.
This.

You could also use a wider strip (over a certain distance add some supports along below so it won't bow), just add a triangle strip (that fits into the v-grove) and a small lever (to clamp it to the MFTs, similar to how the protractor bases work) on both ends.
 
box185 said:
You could replace it with a flat bar, but probably not allowed to discuss it here as it involves a modification to the Festool product.

The new extension tables are an inexpensive solution to expanding the MFT.

Pretty sure the restriction only applies to power tools.
 
Everyone thank you so so much for the replies!!!

[member=10147]jobsworth[/member] you know me well by now ;)

[member=61882]Bvps[/member] BEAUTIFUL I love it and I can't believe I didn't think of that. Thank you!! I am going to do just that!

PS if anyone is in the market for a 25" LS positioner... I treat my stuff very, very well. I want to upgrade to the 32 ;)
http://festoolownersgroup.com/classifieds/possible-ls-positioner-25-for-sale/

Matt
 
1 thing to remember is that the rails may align the wood and the therefore the hole pattern will not. I have may of these tables and the smaller ones as well and have them on wheels so they can be moved around as needed. This is how I figured out that the wood table top is not a precision fit to the aluminum top. I use a long piece of 80/20 as an alignment tool. I register the the table tops and then secure them to the frames and then align the frames. Just a thought.
 
oops. I mean, I align the mdf tops to the aluminium frames, after the aluminium frames are aligned. I have also market a registration mark in one corner, that allows me to know the relative alignment of the tops and the aluminium frames. it is a time saver. So I can quickly join them together. I press the mdf top so that the upper left part of the mdf is in total contact with the upper left corner of the aluminium frame. I then mark that corner as the "index" . this works well as long as the table configuration supports the desired configuration. Otherwise manual alignment may be necessary. Horse is now beaten. :)
 
Hahaha thanks man.

Here's my plan based on your earlier comment:

Loosen the 4 screws holding each MDF top to the aluminum frame for the 3 MFTs.

Align the holes (maybe using a guide rail, or the aluminum fence etc.

Then carefully tighten the 4 screws on each MFT.

Although right now, everything is square. So maybe I just won't mess with it too much.

Matt
 
Welcome to the 3 MFT/3 club. I think that's what Festool really meant when they came up with the name. . .you're supposed to buy 3 of them.

i-TCDhC7K-X3.jpg
 
DynaGlide said:
Welcome to the 3 MFT/3 club. I think that's what Festool really meant when they came up with the name. . .you're supposed to buy 3 of them.

i-TCDhC7K-X3.jpg

That flooring and workcenter vac setup look very nice.....How you like the workcenter?
 
Back
Top