Building 3 sets of custom built doors for exterior shelving unit

Joined
Apr 25, 2014
Messages
1,086
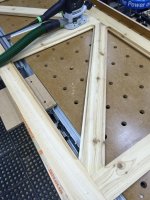
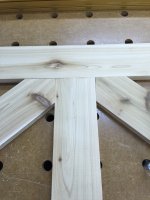
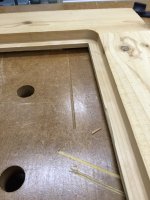
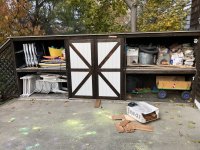
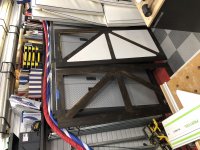
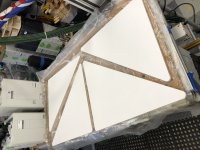
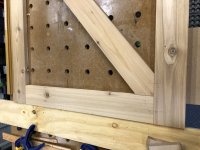
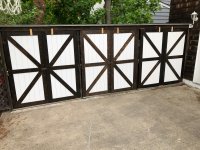
Decided to finally get some Domino action going...

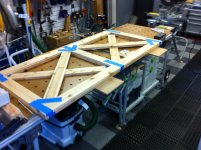
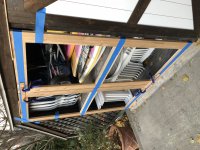
Used my Dewalt CSM saw to cut the pieces.

[attachimg=1]

[attachimg=2]

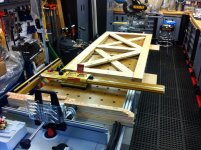
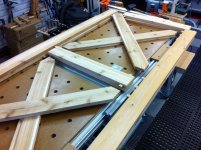
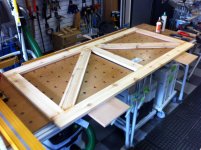
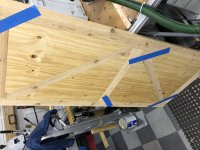
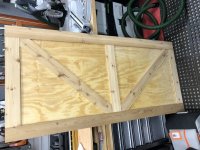
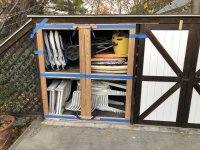
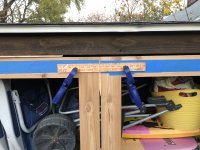
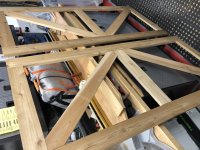
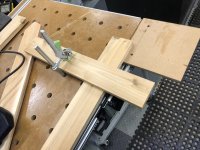
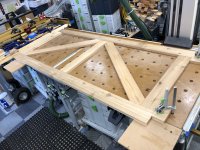
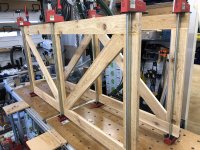
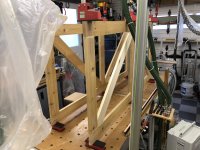
Assembly on MFT/3s.....

[attachimg=3]

[attachimg=4]

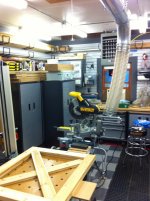
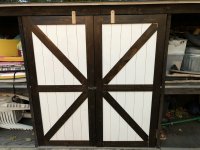
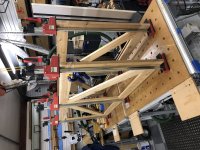
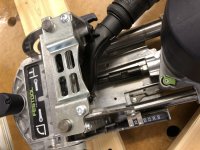
Used the 500 adapter for the 700 to use the 500 bits. Worked perfectly... Just had to shim the wood pieces to get the correct height as the the wood was smaller than the minimum height of the 700.

[attachimg=5]

[attachimg=6]
 

Attachments

  • image.jpg
    image.jpg
    332.3 KB · Views: 3,728
  • image.jpg
    image.jpg
    358.4 KB · Views: 3,665
  • image.jpg
    image.jpg
    314.5 KB · Views: 3,691
  • image.jpg
    image.jpg
    392.5 KB · Views: 3,684
  • image.jpg
    image.jpg
    337.3 KB · Views: 3,606
  • image.jpg
    image.jpg
    334.5 KB · Views: 3,612
Glued in the DOMINOS before final assembly.

[attachimg=1]

Bought some pressure treated ply which I will cut to size to fit into the opening(s) after I routed a recess on the back side of the door frames.

[attachimg=2]
 

Attachments

  • image.jpg
    image.jpg
    396.6 KB · Views: 3,473
  • image.jpg
    image.jpg
    263.5 KB · Views: 3,419
Nice work! 

That dust collection tube on the Dewalt CMS is HUGE! 

Question...did you coat your MFT table with something?  How's it hold up ? What did you use?  thanks!
 
I like the little anvil. Did you use it on this job?
 
GOT8SPD, Yes I coated the MFT/3(s) with shellac. Not very resistant to scratches but I did this more for moisture/glue control. Easy to brush/patch and dries quickly.

Wayne, I use the anvil mostly for metal shaping purposes, like when I make a coin ring...
 
Almost embarrassed but its been a year since I started this project.

A driveway repair, resetting stones that got loose thru the last winter and a lot of business travel does this to you.....

Winter is approaching and no garden work opens up time for the workshop....

Today i finished sanding both sides with to RO150. A monster to use. Had to turn down to slow speed and less than half vac power to manage....

[attachimg=1]

[attachimg=3]

Used the OF1400 and a rabbet bit to route a groove on the back side to fill with panels (next stage). Gotta wortk on my technique....

[attachimg=2]

[attachimg=4]
 

Attachments

  • image.jpeg
    image.jpeg
    1.1 MB · Views: 2,455
  • image.jpeg
    image.jpeg
    409.1 KB · Views: 2,405
  • image.jpeg
    image.jpeg
    947.6 KB · Views: 2,445
  • image.jpeg
    image.jpeg
    971.5 KB · Views: 2,388
I know it’s been 3 years since I started this project. But sometimes you get sidetracked with life......and sailing....

Continued today finishing routing the rabbets on the second door and cut the triangle infil pieces to size...

[attachimg=1]
 

Attachments

  • F73937B8-A8D7-45F7-B62D-501F85E18707.jpeg
    F73937B8-A8D7-45F7-B62D-501F85E18707.jpeg
    2.9 MB · Views: 2,246
  • FEB3A58B-821B-4848-9652-329D43557D68.jpeg
    FEB3A58B-821B-4848-9652-329D43557D68.jpeg
    2.9 MB · Views: 351
Finished doors and install today. 2 more set of doors to go....

[attachimg=1]

[attachimg=3]
 

Attachments

  • E07642C0-DACC-4973-BE50-DA62156CCF8B.jpeg
    E07642C0-DACC-4973-BE50-DA62156CCF8B.jpeg
    2.9 MB · Views: 532
  • 3855412C-BFC0-4D3D-89DB-10ACF8403830.jpeg
    3855412C-BFC0-4D3D-89DB-10ACF8403830.jpeg
    4.5 MB · Views: 428
  • 4E1FC9AF-2090-4BD0-A9FD-759988F8D241.jpeg
    4E1FC9AF-2090-4BD0-A9FD-759988F8D241.jpeg
    3.1 MB · Views: 2,113
  • 344B1913-E75C-487D-96CB-750BB47A804A.jpeg
    344B1913-E75C-487D-96CB-750BB47A804A.jpeg
    3.1 MB · Views: 429
  • 44640F79-5E5D-4EC9-9807-30DFBF3D0D04.jpeg
    44640F79-5E5D-4EC9-9807-30DFBF3D0D04.jpeg
    2.7 MB · Views: 2,093
Nice work.  Thanks for taking a little extra time to take the pictures and share with all of us on FOG. 
 
Working on second set. Hopefully does not take 3 years to finish......

Overall I still have to take off another 1/2 inch each in width from the doors to make ‘em fit properly in the opening and give enough clearance for hinges.....

View attachment 1

View attachment 2

View attachment 3
 

Attachments

  • DFD024C4-C280-4617-A2B8-E1B05B1ED000.jpeg
    DFD024C4-C280-4617-A2B8-E1B05B1ED000.jpeg
    3.6 MB · Views: 219
  • F33FE457-B396-48AE-9E88-51D4EB9E2E60.jpeg
    F33FE457-B396-48AE-9E88-51D4EB9E2E60.jpeg
    3.4 MB · Views: 173
  • 5E61FCDD-75E7-4203-AF18-3D34DCB04862.jpeg
    5E61FCDD-75E7-4203-AF18-3D34DCB04862.jpeg
    3.2 MB · Views: 201
Cut the width of the new set of doors to the correct size, cut the diagonal cross braces, dominoed everything (still feels like cheating using the Domino....) and glued everything together....

[attachimg=1]

[attachimg=2]

[attachimg=3]

[attachimg=4]

[attachimg=5]

[attachimg=6]

[attachimg=7]

[attachimg=8]

[attachimg=9]
 

Attachments

  • D1C5CF99-45CE-4347-B86F-F781FFCB55B6.jpeg
    D1C5CF99-45CE-4347-B86F-F781FFCB55B6.jpeg
    3.3 MB · Views: 1,642
  • 1CEDB762-8C4A-4413-A586-5D87D76E067A.jpeg
    1CEDB762-8C4A-4413-A586-5D87D76E067A.jpeg
    3.3 MB · Views: 1,671
  • 38D0BF83-BB54-47EC-B9DB-641D7977265A.jpeg
    38D0BF83-BB54-47EC-B9DB-641D7977265A.jpeg
    3.2 MB · Views: 1,685
  • B35C79B1-B7FD-40D3-A03D-0157B021702A.jpeg
    B35C79B1-B7FD-40D3-A03D-0157B021702A.jpeg
    3 MB · Views: 1,705
  • 9FF7C681-A0C0-478A-A7CA-C628D9C7C5B8.jpeg
    9FF7C681-A0C0-478A-A7CA-C628D9C7C5B8.jpeg
    2.7 MB · Views: 1,798
  • 4151578D-5DC5-4ED9-BE8F-0506ADFBD5F8.jpeg
    4151578D-5DC5-4ED9-BE8F-0506ADFBD5F8.jpeg
    3.3 MB · Views: 1,739
  • 9D932E09-3575-42C0-AF94-64E4CF9DB3F2.jpeg
    9D932E09-3575-42C0-AF94-64E4CF9DB3F2.jpeg
    4 MB · Views: 1,855
  • 4517468E-47AD-4D89-86A4-F592D11E86A1.jpeg
    4517468E-47AD-4D89-86A4-F592D11E86A1.jpeg
    3 MB · Views: 1,789
  • 2D9FD452-1746-46E3-BC14-87623BF1B020.jpeg
    2D9FD452-1746-46E3-BC14-87623BF1B020.jpeg
    3.5 MB · Views: 1,762
Second door set done. Still need to hang properly....

[attachimg=1]
 

Attachments

  • IMG_0807.jpg
    IMG_0807.jpg
    4.2 MB · Views: 1,572
Glue up of last set of doors:

[attachimg=1]

[attachimg=2]
 

Attachments

  • 0CAA6658-12BB-4110-B0ED-80528053EBFC.jpeg
    0CAA6658-12BB-4110-B0ED-80528053EBFC.jpeg
    3.7 MB · Views: 1,255
  • 0676D840-B4B6-4426-8F72-74E2B4223F11.jpeg
    0676D840-B4B6-4426-8F72-74E2B4223F11.jpeg
    2.8 MB · Views: 1,204
So ya started those in Feb this year. Maybe we should get a pool going to see how long it will take ya to finish :>D

Your shop looks about as crowded as mine.
 
After 3-3/4 years the doors are (almost) done...(in-laws are arriving soon...).

Still need to install hinges....

[attachimg=1]
 

Attachments

  • IMG_1071.jpg
    IMG_1071.jpg
    3.4 MB · Views: 1,017
Back
Top