Butcher block repair

Len Kuffert

Member
Joined
Nov 3, 2013
Messages
16
Hi folks,

This is my first post on the FOG, having just bought a TS55 and MFT/3 about a month ago. I'm amazed by both, and already thinking of projects to justify getting the next couple of items on the wish list (OF 1400 and CT 26, if Santa's lurking).

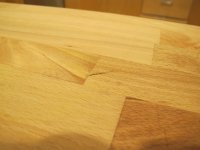
One of the things I've done so far is installing a beech butcher block countertop. It came from Ikea, and the TS55 ripped it to the right width without a problem, super smooth. However, there's a gouge that has showed up as we've been using the surface, and I'd like any advice on how to tackle it. Should I pare it away with a chisel, and then sand? It's on the end of one of the finger-jointed pieces. Any ideas would be welcome.

I've attached a picture.

thanks in advance,

Len
 

Attachments

  • IMG_6644.JPG
    IMG_6644.JPG
    1.2 MB · Views: 634
Hi Len,  [welcome] to the FOG!!  I see shakes like that often in my oak floors.  You can try gluing it with Titebond and then putting some weight on it, it may work.  If that fails, i would chisel off the loose material, then fill with a wood filler and sand... Good luck
 
[size=12pt]

I would leave it alone, there will be more and in time they all will contribute to the aged Patina.

It is a butcher block top, not Laminex.    [smile]
 
I'm inclined to follow Untidy's advice here, as we already have a Boos block (~30cm thick end grain) right next to this counter, and it's got loads of "patina". However, this little nick has been lifting up over the past week or so, and I'm not sure how deep it will go. I'll watch it, and post any experimentation/results.

Len
 
I have a very similar split in my workbench. It can actually go quite deep so chiselling it out may go deeper than you think. I wouldn't leave it, as it can cause some nasty splinters, or sand it.

I would chisel or route out a rectangular piece around it, and inlay a new piece of a similar colour and matching grain direction. Then plane or sand flush. Slightly bevel the new piece's edges to ensure a tight fit. This is a little more work but the result will be worth it.

 
All good advice, so far.  I would first see if the wood on the counter top is all dry. If so, I would rub in pure tung oil cut 2/1 with citrus solvent. Sometimes, this will shrink down a crack, over a few days. You could patch it if it bothers you, you could just leave it and further apply some more wax...or, I usually keep little plasic bags on file of different woods that I've used...I could take some dust that blends mixed with Titebond Extend and fill the crack, then clamp with my Bessey K's.
 
I fixed a similar problem area with 2 part clear epoxy. After sanding it is rock solid and virtually invisible. I learned the technique at a Canadian woodworking show from Ryan Shervill.
 
Be careful what you use and make sure you are letting things cure long enough as this is obviously something designed to come into contact with food...

Cure time on some of those products could be months or years.
 
That is most definitely a shake, apply glue, use compressed air with low pressure to inject the glue into the gap and clamp...them sand and finish.
 
If you have a router I'd be tempted to rout out a pocket - say 6mm or 1/4" deep - and cut a plug to fit.  If you make it the same size as the offending stave no one will ever know there was a problem.

If you have an MFS-400 and 24mm & 40mm guide bushes, and an 8mm cutter you can make a plug that will fit perfectly - all you need to do is trim the corners of the aperture.

Glue the plug in with good waterproof creep-resistant glue, such as Cascamite, and then sand it flush.

Andrew
 
I'd use either mitre bond or super glue to stick the shard back down, then sand & refinish.  [cool]
 
Back
Top