Changing the Brushes on a Festool Rotex 150 Sander

Frank Pellow

Member
Joined
Jan 16, 2007
Messages
2,743
(part 1 of 6)

note: I only seem to be able to include one picture per post and I want to include 6 pictures, so this will be divided into 6 parts.


Three days ago my Festool 150 Rotex E sander stopped working right in the middle of a job.  I could not find anything wrong with it and I had no internet access at the job site, so I had to work for two days with an inferior sander (a Makita 5 inch random orbital). 

Yesterday afternoon, I contacted Bob Marino and he suggested that it was probably due to the fact that the carbon on the brushes had worn down and that they would need to be replaced.  I have never worked on motors and had no idea what a brush even looked like.  Nowhere on any Festool manual, or at their web site, or on the three forums that I checked could I find a description of the brush changing operation or even a picture of the brushes.  There was one article entitled ?Dual mode sander Rotex RO 150 E: Maintaining ? at the Festool USA WEB site that mentioned brushes but gave no information about them.

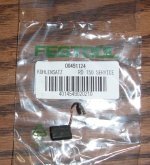
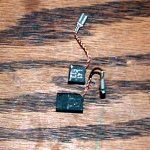
I was in the middle of trying to figure out how to order brushes when I remembered that a small maintenance kit had come with the sander.  So, I checked it and, sure enough, it contained a couple of small chunks of carbon with wires dangling from them.  ?These must be brushes?, I happily said to myself.  Now, I had to take the sander apart and locate the worn brushes.  I managed to do the job and the sander now works, but I sure would have liked some instructions.

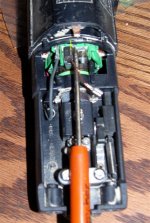
I expect that I am not the only one who would be intimidated by the task of changing motor brushes, so I am showing just what I did.  The good news is that the task is actually quite simple.  The pictures below show the procedure.

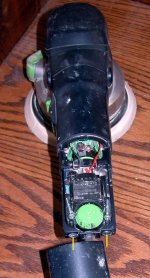
(1) Remove the two screws at the end of the handle, then slide back the motor housing.  The two (very) small yellow arrows point to the locations of the screws.

[attachimg=#1]


Attachments

  • Changing 150 Rotex sander brushes -1 -remove screws then slide back motor housing.JPG
    Changing 150 Rotex sander brushes -1 -remove screws then slide back motor housing.JPG
    98.3 KB · Views: 1,448
(part 2 of 6)

(2) You can find one of the brushes on the top then, flipping the sander over, find the other on the bottom.  Pull aside small clip/spring that holds a brush in place (pointed to by the small yellow arrow in the picture below), then pull the carbon out of the slot.

[attachimg=#1]
 

Attachments

  • Changing 150 Rotex sander brushes -2 -extract carbon from under spring.JPG
    Changing 150 Rotex sander brushes -2 -extract carbon from under spring.JPG
    95.2 KB · Views: 1,614
(part 3 of 6)

(3) Pull the connecting wire out of the connection on the sander, in order to completely remove the brush:

[attachimg=#1]
 

Attachments

  • Changing 150 Rotex sander brushes -3 -pull out wire .JPG
    Changing 150 Rotex sander brushes -3 -pull out wire .JPG
    92.2 KB · Views: 1,030
(part 4 of 6)

(4) Flip the sander over and remove the other brush.

(5) Locate your replacement brushes.  Here is the parts bag with one new brush shown on top:

[attachimg=#1]


Attachments

  • Changing 150 Rotex sander brushes -4 -one new brush sitting on parts bag.JPG
    Changing 150 Rotex sander brushes -4 -one new brush sitting on parts bag.JPG
    92.6 KB · Views: 989
(part 5 of 6)

And, here is a photo of a worn brush and a new brush side by side:

[attachimg=#1]
 

Attachments

  • Changing 150 Rotex sander brushes -5 -old and new brushes side by side.JPG
    Changing 150 Rotex sander brushes -5 -old and new brushes side by side.JPG
    106.7 KB · Views: 1,113
(part 6 of 6)

(6) Holding aside the clip insert the carbon of one new brush into the slot.  Then place the clip over the carbon in order to hold it in place (again see the small yellow arrow in the picture below).

[attachimg=#1]

(7) Attach the wire to the connector on the sander, replace the other brush in the same way, then re-install the motor housing.


Attachments

  • Changing 150 Rotex sander brushes -6 -hold aside spring and instert carbon from new brush.JPG
    Changing 150 Rotex sander brushes -6 -hold aside spring and instert carbon from new brush.JPG
    107.3 KB · Views: 1,165
Frank,
Thanks for documenting this procedure.  This is something that most Rotex owners will have to do at some point, and it's nice to know we can look here for help!

Frank Pellow said:
note: I only seem to be able to include one picture per post and I want to include 6 pictures, so this will be divided into 6 parts.[/i]

Let's figure this out.  What happens when you open "Additional Options" and go to the "Attach:" area?  You should see the following options:
[attachimg=1]

To attach more than one photo, click the "(more attachments)" option.  You should be able to do this to create a list of 10 attachments.  What happens when you do this?

Matthew
 
Frank,

Making lemonade out of lemons...

The way this worked out, with each message the caption for one photo, I think improved the clarity overall.

It's not a bug, it's a feature!

And thanks for documenting the process.

Ned
 
Ned,
I agree in this case that separate posts may be better.  Of course, that should be up to the person creating the post.  But for future reference, I'd like to know if there were any problems with getting multiple photos into one post.
Matthew
 
Matthew Schenker said:
I'd like to know if there were any problems with getting multiple photos into one post.
Matthew
No problems now Mathew!

I was unaware of the new "Insert Inline Image" feature when I started this thread.  Now I know about it, and I have tried it, and I LIKE IT.  Thanks for enabling it on this forum.  Most of what I write has pictures associated with it, so this feature will come in very handy for me.
 
Frank,
Frank Pellow said:
No problems now Mathew!
I was unaware of the new "Insert Inline Image" feature when I started this thread.  Now I know about it, and I have tried it, and I LIKE IT.  Thanks for enabling it on this forum.  Most of what I write has pictures associated with it, so this feature will come in very handy for me.

No problem!  It's my pleasure to keep making this forum as friendly and versatile as possible.  I had a feeling the "Insert Inline Image..." feature would be a winner!  I hope more members take advantage of it.

Matthew
 
For some reason that I don't understand and at some time that I don't know, all the pictures in this thread were converted to very small thumbnails that could not be expanded.  I have modified my posts so that decent size pictures are again present.
 
Today, I had to change the brushes again on the same sander.

I am happy to report that I made use of the photos and instructions that I posted a few years ago the last time that I did the job and everything went very well. 

I did a good job in documenting this procedure, even if I do say so myself.  [thumbs up]
 
Peter Halle said:
Frank, our friend, you are a sanding machine!

Boy -- is that ever true.  How many hours did you get on this set of brushes, Frank? 

Scot
 
Frank Pellow said:
ScotF said:
Peter Halle said:
Frank, our friend, you are a sanding machine!

Boy -- is that ever true.  How many hours did you get on this set of brushes, Frank? 

Scot
I would guess about 1,000 hours.

That's a lot of sanding to be sure.  Amazing...that is also about two to three times the brush life of other non-Festool power tools I have seen.  I guess that correlates with Festool extreme testing that they do too where the tools run for over 800 hours non-stop.  I assume that you have not had any issues with bearing or anything yet either?  A true testament to Festool quality.  BTW, thanks for the pics and documentation you did...I have bookmarked this in the event that I ever need to change my brushes.

Scot
 
Dear Frank Pellow,

Just read a long article about recent studies into what makes people "happy". Nowhere did it mention the experience I had this morning when I found your excellent piece about the brush replacement. I had suspected brushes were my problem, but looking at Festool's parts diagram did absolutely nothing toward finding them. Also I thought I was going to have to send off for new ones, but following your tip, looked under the plastic tray in the box and YES! there they were. I was finishing a piece that was due today when the thing shut down, it took me exactly 20 minutes to get back to the job after finding your post.

Can't thank you enough, if you're ever in Oakland, look me up and I'll buy you several beers,

Peter Smalley
Allied Wood Products
Oakland, CA
 
WOW! [eek]

Just goes to show that 7-year old archived posts are still relevant! [big grin]
 
Back
Top