Neil/Tim, here are some followup items to your questions:
Blotch control: I found video #73 on the Wood Whisperer website (I believe it was linked to another thread on the FOG) where it listed the following steps: 1) grain raise and sand; 2) mix denatured alcohol and Bullseye Sealcoat 1/2 & 1/2 and apply 1 coat and sand; 3) apply gel stain. This was the first time for me applying a dark color on cherry- the results this time were good so I'll be using this recipe again.
Dentil Molding: I was not able to find the dentil molding my customer wanted so I searched Youtube and found a video by John Shorba on how to make it instead. I liked the end product and especially liked how he used a Festool OF 1400 (since that is what I have). The jig I made is similar to his and it worked very well. Only issue was it was time consuming to apply the gel stain consistently in all the grooves.
Flutes: These are actually embossed moldings I purchased from Artistic Woodworking in Imperial, NE. They are detailed moldings you glue to the surface and provide nice accents. Next time I'll apply the stain first before glueing them to the project as I found that would be much easier.
Back of top section is solid cherry resawed to approx 1/2" thick and lapped to allow for expansion.
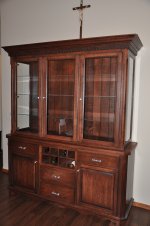
Top and bottom sections are transported separately and attached on site.
Yes- this was my design. The customer stated they wanted 3 glass doors in the top section, angled corners and wine rack in the base. I did a couple sketches and this is the option the customer chose. They trusted me with the rest of the details and some of them I thought of as I was building it so it seemed like it was always evolving. I was glad they liked it in the end.
Thanks for the kind words!
Gerald