In April of 2013 I went to the Marc Adams School of Woodworking to attend a week-long Jointmaker Pro (JMP) lass taught by John Economaki of Bridge City Tool Works. We set about to make a chess set. Little did I know what I was getting into!
No ordinary chess set, this was a a derivative of a design that John had done and is now on tour, first in Portland, then to Seattle and coming to Boston in 2015 as a part of his 'Quality is Contagious Tour' being done by sponsoring museums.
I was fortunate to learn from the master and the class was a lot of fun. Unfortunately, after three days I had to leave to deal with a flooding problem in my basement (another story.)
The set was put aside for awhile and resurrected this past summer to work to finish it up. 19 months later, I finished the set this week.
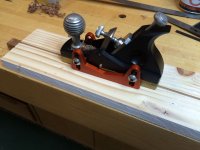
The set is made to .005 tolerances... yes 5/1000 of an inch in wood - on the board and grid. All the board grid is thickness planed with hand planes that have depth skids, which is an amazing way to get accuracy, and then cut and fitted on the JMP to the various angles of the lattice work. The small grids and the large grid are press-fit tight with these tolerances. There are small drops of glue at the intersections of the cross lap on the large grid, but no glue on the small grids except for gluing them in place to the supporting strips below.
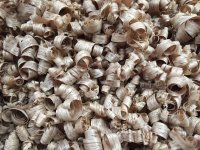
I had a trashcan full of plane shavings by the time I was done. And sore hands from all the planing. Hours of planing to thickness over 600 pieces in the grid itself.
The chess pieces are cut on the JMP with various jigs and then many of the angles are sanded on a disc sander and finally planed to final finish. The only finish on the pieces and board is paste wax lightly buffed. To plane pieces this small, the small block plane is clamped in the vise and the pieces are pulled across it, watching fingers as you go!
In total, I have somewhere around 250 hours into the set. And it's nearly 700 pieces of walnut and maple between the board, the lattice inserts and the pieces.
Attached are a few photos of work in process and the finished set.
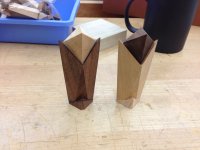
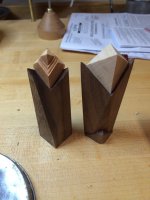
Bishops:
[attachimg=1]
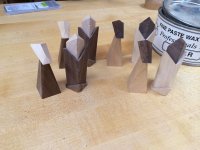
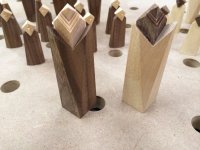
Knights and Bishops:
[attachimg=2]
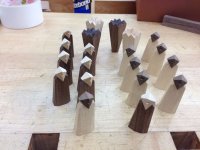
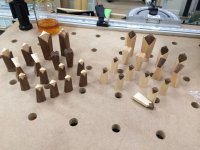
Pawns & Rooks:
[attachimg=3]
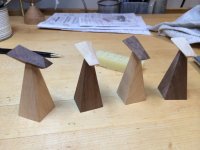
Knights:
[attachimg=4]
King & Queen:
[attachimg=5]
Queens:
[attachimg=6]
Full Set:
[attachimg=7]
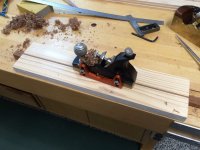
Edge Planing Strips for Thickness:
[attachimg=8]
Edge Planing Strips for Thickness 2:
[attachimg=9]
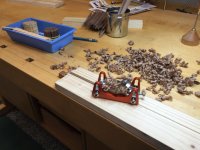
Planing Strips for Width:
[attachimg=10]
Shavings and Shavings:
[attachimg=11]
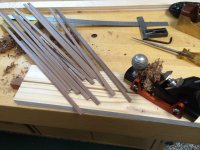
A few strips planed:
[attachimg=12]
Strips cut to length on the JMP
[attachimg=13]
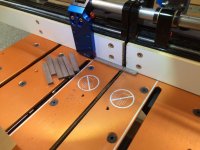
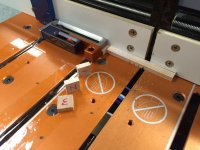
Half laps cut on the JMP using the Kerfmaker for accuracy and spacers to keep them consistent
[attachimg=21]
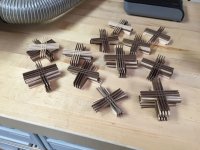
Small grids press fit together:
[attachimg=14]
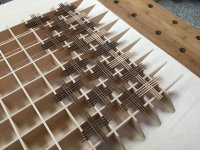
Grids laying out to explore patterns:
[attachimg=15]
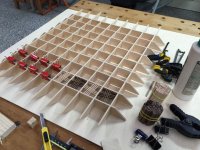
Gluing the supports in place:
[attachimg=16]
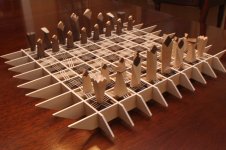
Full set completed:
[attachimg=17]
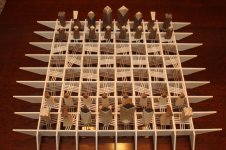
Full Set:
[attachimg=18]
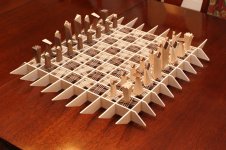
Another View:
[attachimg=20]
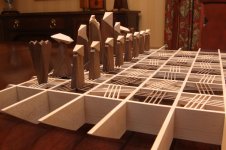
All pieces at attention:
[attachimg=19]
If you want to take precision to another level, check out the Jointmaker Pro and John's hand planes with depth skids. Oh, and a digital caliper.
As for Festools used, the original rough strips were ripped from walnut and maple with parallel guides and a TS55 saw.
They were laid out on the bench and thickness sanded with a Rotex to clean up saw marks and then a Performax drum sander before going to the hand planes to finalize the thickness within .005 inch on each strip of wood.
All in all, a fun and challenging project - now I need to bring my came up to the level of precision in the board!
neil
No ordinary chess set, this was a a derivative of a design that John had done and is now on tour, first in Portland, then to Seattle and coming to Boston in 2015 as a part of his 'Quality is Contagious Tour' being done by sponsoring museums.
I was fortunate to learn from the master and the class was a lot of fun. Unfortunately, after three days I had to leave to deal with a flooding problem in my basement (another story.)
The set was put aside for awhile and resurrected this past summer to work to finish it up. 19 months later, I finished the set this week.
The set is made to .005 tolerances... yes 5/1000 of an inch in wood - on the board and grid. All the board grid is thickness planed with hand planes that have depth skids, which is an amazing way to get accuracy, and then cut and fitted on the JMP to the various angles of the lattice work. The small grids and the large grid are press-fit tight with these tolerances. There are small drops of glue at the intersections of the cross lap on the large grid, but no glue on the small grids except for gluing them in place to the supporting strips below.
I had a trashcan full of plane shavings by the time I was done. And sore hands from all the planing. Hours of planing to thickness over 600 pieces in the grid itself.
The chess pieces are cut on the JMP with various jigs and then many of the angles are sanded on a disc sander and finally planed to final finish. The only finish on the pieces and board is paste wax lightly buffed. To plane pieces this small, the small block plane is clamped in the vise and the pieces are pulled across it, watching fingers as you go!
In total, I have somewhere around 250 hours into the set. And it's nearly 700 pieces of walnut and maple between the board, the lattice inserts and the pieces.
Attached are a few photos of work in process and the finished set.
Bishops:
[attachimg=1]
Knights and Bishops:
[attachimg=2]
Pawns & Rooks:
[attachimg=3]
Knights:
[attachimg=4]
King & Queen:
[attachimg=5]
Queens:
[attachimg=6]
Full Set:
[attachimg=7]
Edge Planing Strips for Thickness:
[attachimg=8]
Edge Planing Strips for Thickness 2:
[attachimg=9]
Planing Strips for Width:
[attachimg=10]
Shavings and Shavings:
[attachimg=11]
A few strips planed:
[attachimg=12]
Strips cut to length on the JMP
[attachimg=13]
Half laps cut on the JMP using the Kerfmaker for accuracy and spacers to keep them consistent
[attachimg=21]
Small grids press fit together:
[attachimg=14]
Grids laying out to explore patterns:
[attachimg=15]
Gluing the supports in place:
[attachimg=16]
Full set completed:
[attachimg=17]
Full Set:
[attachimg=18]
Another View:
[attachimg=20]
All pieces at attention:
[attachimg=19]
If you want to take precision to another level, check out the Jointmaker Pro and John's hand planes with depth skids. Oh, and a digital caliper.
As for Festools used, the original rough strips were ripped from walnut and maple with parallel guides and a TS55 saw.
They were laid out on the bench and thickness sanded with a Rotex to clean up saw marks and then a Performax drum sander before going to the hand planes to finalize the thickness within .005 inch on each strip of wood.
All in all, a fun and challenging project - now I need to bring my came up to the level of precision in the board!
neil
Attachments
-
 a bishops.jpg131.1 KB · Views: 3,552
 -
 b knights and bishops.jpg129.9 KB · Views: 3,544
 -
 c pawns and rooks.jpg132.4 KB · Views: 3,674
 -
 d knights.jpg124.9 KB · Views: 3,588
 -
 e king and queen.jpg112 KB · Views: 3,609
 -
 f queens.jpg132.2 KB · Views: 3,508
 -
 g full set.jpg144.6 KB · Views: 3,467
 -
 h planing thickness 1.jpg122.7 KB · Views: 3,467
 -
 h planing thickness 2.jpg136.3 KB · Views: 3,435
 -
 i planing width.jpg135.3 KB · Views: 3,522
 -
 j shavings.jpg272 KB · Views: 3,306
 -
 k strips planed.jpg158.8 KB · Views: 3,511
 -
 l strips cut.jpg140.8 KB · Views: 3,604
 -
 n small grids.jpg156.5 KB · Views: 3,535
 -
 p grid layout.jpg185.1 KB · Views: 3,495
 -
 q gluing up inserts.jpg178.6 KB · Views: 3,392
 -
 r full set 2.jpg143.1 KB · Views: 3,955
 -
 s full set angle.jpg172.8 KB · Views: 3,445
 -
 t at attention.jpg128.1 KB · Views: 3,803
 -
 u full set top view.jpg159.9 KB · Views: 3,591
 -
 m cutting dados.jpg139.1 KB · Views: 3,504