Clamping pressure vs glue strength

jaguar36

Member
Joined
Jul 19, 2011
Messages
288
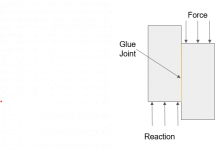
I wanted to test to see if you can over-clamp a joint, as well as how much clamping pressure you need to get a reasonable joint strength.  So I went and built a ASTM D905 compression shear tester.  This tester measures the shear strength of a joint (as opposed to the tensile strength).  Most woodworking joints are usually primarily loaded in shear, think like a domino or a box joint.  I like this test as it usually fails the glue, rather than the wood.
[attachimg=1]

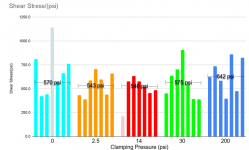
I made up a bunch of wood blocks and glued them together such that they have a 1"x1" glue surface, and clamped them at different levels.  Some I just squeezed together with my fingers and let sit, some with spring clamps, and some I put screw clamps on and tighten the junk out of them.  Surprisingly, I found that even with no clamps at all I still got good joint strength.  Clamping at a crazy high level (200psi/1.37Mpa) didn't show any drop off in joint strength either (and maybe a bit of benefit).  Finally I put together a pair that I clamped down so hard as to squash the wood, and those did show a ~20% reduction in strength.  However that may have been from damage to the wood.
Here's a pretty graph of the results.
[attachimg=2]

I made a video on it as well, if you'd like some more info or to watch the failures.
 

Attachments

  • Screenshot 2023-04-17 093100.png
    Screenshot 2023-04-17 093100.png
    7.8 KB · Views: 1,258
  • Screenshot 2023-04-17 093602.png
    Screenshot 2023-04-17 093602.png
    46.4 KB · Views: 1,341
Thanks for sharing that! Very informative!

I'd love to see comparisons of:

- different glue types
- different surface preparations (fresh off a planer, sawn, routed, chiseled, sanded)

and of course, different types of joinery --- normalizing the joint for glue surface area might be an interesting way to more objectively compare them.
 
Lots of work on your part, and interesting results.

Except with the use of thin CA glue, I have never had a glue failure in my woodworking life, and so I'll stick to whatever/however I've been doing when it comes to furniture making, and let those who insist on less glue, more glue, less clamping, more clamping, dominoes over dowels (or vice versa), etc. enjoy their discussions.  [tongue]
 
jaguar36 said:
Clamping at a crazy high level (200psi/1.37Mpa) didn't show any drop off in joint strength either (and maybe a bit of benefit). 

Actually, Titebond recommends these clamping pressures:

Required Clamping Pressure: Use only enough pressure to bring joints tightly together (generally, 100-150 psi for softwoods, 125-175 psi for medium woods and 175-250 psi for hardwoods).
http://www.titebond.com/print/product/1f1dafb3-eec8-4f9a-87fe-06f40d4c47df
 
Honestly, other than when pumping my tires, I never pay attention to pressure, clamping or not. In clamping, I use glue squeeze-out or its absence as a guideline.
 
ChuckS said:
Honestly, other than when pumping my tires, I never pay attention to pressure, clamping or not. In clamping, I use glue squeeze-out or its absence as a guideline.

Same here, I monitor glue squeeze-out or wood distortion. What number is that, I don't know, although it would be interesting to use a transducer to get the actual number. It may surprise you in either direction.  [smile]

It's like cooking steak, some look at the color, some use their finger to determine the firmness, some cook by time, some stab it with a fork or a knife...I learned about 5 years ago to use and rely on a high speed temperature probe...you'll nail it every time.
 
Cheese said:
Snip.

It's like cooking steak, some look at the color, some use their finger to determine the firmness, some cook by time, some stab it with a fork or a knife...I learned about 5 years ago to use and rely on a high speed temperature probe...you'll nail it every time.
Haha. The most scientific way of checking your steak (assuming the probe is accurate).

When I was allowed to learn cooking (after I finished my dish washing duties as a part-timer after school), the chef told me touching the steak with my finger (any!) was a no no, except when he was teaching me so I could get a feel of the tenderness. I was taught to use the tongs to check how well it was done. Something I still do today in BBQ cooking. Yes, visitors and guests are impressed when they find their med. rare and med. orders cooked to perfection (rare and well-done steaks are easy; blue rare the easiest).

Over the years, I've perfected my BBQ skills like this meal done yesterday (the secret is the same as doing woodworking: be patient, and don't turn up the heat too much):
[attachimg=1]

I prefer med. to med. well chicken.


Attachments

  • BBQ.JPG
    BBQ.JPG
    44.1 KB · Views: 1,167
I think the different clamping pressures Titebond gives for softwood and hardwood is because it takes a little more pressure to bend slightly imperfectly fitting hardwood to conform to the joint.
They've never explained to my knowledge.

It takes more pressure than that to get an invisible glue line.

It takes a lot more pressure to push enough glue out of the joint to make it weak.
 
Also, surface smoothness.  Does it mean less clamping pressure?  Does it improve the joint strength?

In the picture framing business, miters are either sawn (most framers saw) or chopped.  Chopping involves a razor sharp guillotine and significant pressure. 

The down side of the guillotine is that you can only chop wood molding.  Aluminum requires a saw.

the up side of the guillotine is there is no dust.  Dust is anathema to picture framing as it can get trapped between the glass and the art work.

And while a good saw will yield a very smooth surface, the guillotine leaves surfaces that give the appearance of being glass like and glossy.

I’ve asked in the past if that perfect 45 degree cut and those perfect and glassy smooth surfaces yield a stronger joint?  Do they need less clamping pressure?  No one has ever given me an authoritative answer.

The perfectly smooth and perfect 45 degree miters require less pressure to completely close up the joint.  Stronger?  Weaker?  No difference?

In my mind, the slightly rough miters allow the wood fibers to absorb some glue and allows clamping pressure the ability to close up the joint. 

The chopped joint leaves no loose fibers to absorb the glue and get soft.  The joint mates up as if it were machined steel. 

In any case, I don’t think you can isolate “clamping pressure” as a single component in joint strength.  It has to be in relationship to the fibers being compressed.

If you dress the edges of face grain to face grain glue ups, it does not require much pressure to make a tight joint, and the glued joint is going to be stronger than the wood itself. 

I wanted to run some tests, but tests with valid results are very time consuming and basically my miter joints were “strong enough”. 

When I did testing on glues, I only tested three samples.  I think I needed to sample at least a dozen to get a valid result.

In any case, I think you will get a lot of opinions and no solid data in this thread.  I will be reading along in case some gem of information appears.

This is a Morso chopper:
 
The glue connects with the wood fibers on a cellular level and the pressure drives some of it in, only the "excess" squeezes out. In that vein, I don't think it's possible to exert too much pressure on the joint, as far as the glue. You can definitely damage the wood itself by over clamping.
 
I’ve seen demonstrations of crazy glue joining two precisely machined steel plate that would subsequently hold hundreds of pounds. 

Does a wood joint benefit from precisely flat surfaces?  I’ve never seen any data for or against that proposition.

My gut says make the joint surfaces to mate up as precisely as possible.  But perhaps torn wood fibers absorb glue better and maybe a less precisely flat surface will fare better.
 
Great test, thanks for sharing!

Once you noticed that you were getting wood, not glue, failures at the no clamping pressure samples the only reason to continue testing was to see if one could overclamp and reduce strength.

Not many of us here work in pine. I would think testing in hard maple or perhaps walnut/cherry might be more appropriate. I also think attention to surface flatness and condition matter. Even after throwing out the outliers, you still had large variation in results per type - I wonder what the standard deviation number would be. If you do run another test batch, I would also consider using a jig to align the pieces for clamping.
 
smorgasbord said:
Once you noticed that you were getting wood, not glue, failures at the no clamping pressure samples the only reason to continue testing was to see if one could overclamp and reduce strength.
There were only a couple of wood failures, and then only a small portion of the failure was wood, in the vast majority of the joints, the glue, or the bond between the glue and the wood failed.

smorgasbord said:
Not many of us here work in pine. I would think testing in hard maple or perhaps walnut/cherry might be more appropriate. I also think attention to surface flatness and condition matter. Even after throwing out the outliers, you still had large variation in results per type - I wonder what the standard deviation number would be. If you do run another test batch, I would also consider using a jig to align the pieces for clamping.
I'll probably due some testing in other wood later.    As I mentioned the ASTM standard recommends maple.  For some reason when I was deciding what wood to use I thought it was going to take alot more wood than it did.  I thought about making a jig, but I'd need alot of them, and I figured they'd get covered in glue quickly.

I'll also try to do different surface finishes (sanded to different grits vs planed) as well as different glues.
 
Anything I glue I always apply to both faces leaning towards a bit generous, and then using F and/or bar clamps I clamp evenly hard enough to get a decent squeeze out and eliminate any visible glue line. I've never yet had a joint fail on me, and even when I've done testing with hardwoods and glues, the timber itself always broke, not the joint.

I've got the Frontline panel clamps for doing doors and panels, and the amount of pressure these things can apply is astounding, I actually have to hold myself back when using them, but I am clamping at pretty high pressures, but never had a problem with a joint in the last 20 or so years in using them either.
 
I sometimes do veneering, and use the Titebond Cold Press Glue.

I was always confused by their instructions on the bottle, which states to clamp with 100 to 250 psi.  I use a vacuum bag, so I can get maybe 13 - 14 psi.  Theoretically, I can't use their adhesive because I can't achieve anywhere near the specified clamp pressure.

Finally, I wrote to Titebond to enquire about this.  They responded promptly.  I suspect I was not the first to ask.  He replied that my vacuum bag is fully satisfactory for clamping the veneer using Titebond Cold Press adhesive.
He wrote the 100-250 psi spec is for users that use a bunch of clamps.  This really makes no sense, since one could have 10 clamps on a 12"x12" workpiece, or 4 clamps on  12" x 30" workpiece. 
 
Titebond is confusing people with their clamping pressure suggestions. I think they’re just trying to get people to force less than straight wood to make full contact. Nothing to do with getting glue to cure. As jaguar36’s tests show no pressure at all is sufficient for a strong joint using nothing but the glue.

 
Steve1 said:
He wrote the 100-250 psi spec is for users that use a bunch of clamps.  This really makes no sense, since one could have 10 clamps on a 12"x12" workpiece, or 4 clamps on  12" x 30" workpiece.

Cauls dissipate the 'psi' over a 45-deg fan, more or less.  Edge gluing, the distance from the clamp face to the glue line acts the same way. 

Vac press applies the pressure evenly regardless of point of clamping.... so yes - kinda works out to be the same-ish.  Boiling it down to '100 to 250' psi is just them forcing people to at least use the proper clamp grade, because that's how it's sorted on that side.
 
Packard said:
I’ve seen demonstrations of crazy glue joining two precisely machined steel plate that would subsequently hold hundreds of pounds. 

Sufficiently flat machined metal surfaces will actually stick together due to phenomena that are still not yet fully understood but are a combination of: air pressure (no air can get in between the plates to allow them to release); Van der Waals force (molecular entanglement) and surface tension (liquid between the plates).  This is also sometimes referred to by machinists (especially of gauge blocks) as "wringing".  Adding glue to the equation will definitely supplement the connectivity.
 
Packard said:
I’ve seen demonstrations of crazy glue joining two precisely machined steel plate that would subsequently hold hundreds of pounds. 

Does a wood joint benefit from precisely flat surfaces?  I’ve never seen any data for or against that proposition.

My gut says make the joint surfaces to mate up as precisely as possible.  But perhaps torn wood fibers absorb glue better and maybe a less precisely flat surface will fare better.

That's not unlike wringing gauge blocks together.  [smile]  When wrung properly, I find it almost impossible to simply pull them apart, to separate them I need to "slide" them apart.

That could be an interesting experiment with finely finished wood surfaces and glue.

With gauge blocks, the 2 most important items to control is the FLATNESS of the surface and the SMOOTHNESS of the surface. Starrett tool room grade gauge blocks start at a flatness of .000004" and the next 2 grades are flatter than that.
 
Cheese said:
Packard said:
I’ve seen demonstrations of crazy glue joining two precisely machined steel plate that would subsequently hold hundreds of pounds. 

Does a wood joint benefit from precisely flat surfaces?  I’ve never seen any data for or against that proposition.

My gut says make the joint surfaces to mate up as precisely as possible.  But perhaps torn wood fibers absorb glue better and maybe a less precisely flat surface will fare better.

That's not unlike wringing gauge blocks together.  [smile]  When wrung properly, I find it almost impossible to simply pull them apart, to separate them I need to "slide" them apart.

That could be an interesting experiment with finely finished wood surfaces and glue.

With gauge blocks, the 2 most important items to control is the FLATNESS of the surface and the SMOOTHNESS of the surface. Starrett tool room grade gauge blocks start at a flatness of .000004" and the next 2 grades are flatter than that.

You would have to test (probably) 12 joints with a mirror-smooth surface at varying clamping forces and compare those results with a regular sawn joint.

So 12 joints @ 3 pressures = 36 tests for th sawn joints and another 36 tests with the edges dressed smooth as glass.  So 72 tests.  And some accurate measuring devices.

All of which is to say, “It ain’t gonna get done”.

I find the tests done by various woodworking magazines to be laughable. They typically test one example of each joint.  Not real testing I’m my opinion.

So we are left with opinions.

I bought a very pricey saw blade for my dedicated 45 degree sliding table miter saw back in the early 1980s, not to make smoother cuts, but rather not to damage the pre-finished moldings at the beginning and end of each cut.

I spent a painful $200.00 back then for a 12” blade.  According to the consumer price index about $693.88 in today’s dollars.  I humored myself by assuring myself that the joints were probably stronger as well as cleaner.  But a wishful guess on my part.
 
Back
Top