CNC cabinetry question: Pilot holes to position drawer fronts on drawer box?

Jasmin

Member
Joined
May 9, 2022
Messages
13
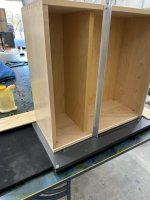
I am starting with CNC cabinetry using a mortise and tenon design with pilot holes for the cabinet boxes. Boxes are working well so far!  [smile]

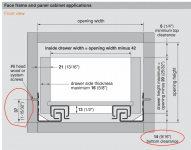
Now I would like to cut the drawers boxes and fronts on the CNC as well. Is anyone using pilot holes to get the right mounting position for the drawers fronts? I am using Tandem 563H runners mounted on 32mm system holes. So I have the exact mounting position of the drawers slides and the location of the fronts with desired reveals in CAD. Based on the tandem instructions (https://go.rockler.com/tech/Tandem-Plus-563-Installation-Instructions.pdf), the bottom edge of the drawer box should start 23 mm below the 5mm hole used to mount the slides (37mm from mounting hole to bottom of slide - 14 mm bottom clearance).

Anything I am missing here? Is anyone successfully doing that?


Attachments

  • Screenshot 2023-10-24 at 11.35.07 AM.png
    Screenshot 2023-10-24 at 11.35.07 AM.png
    176.7 KB · Views: 85
I use metal drawers boxes now but they require multiple holes for brackets that need to be pretty precise. I dill everything on the cnc. FWIW some undermount locking devices offer more adjustment than others.  really no harm in trying.  You say you are using M&T on the boxes, can you elaborate on that?
 
We don’t CNC the drawer faces, we made fixtures to set the faces.

I’ll get some pictures tomorrow but the gist is;

3/4” thick L shaped stops (primary stops) over a felt covered base, over the 3/4” pieces are placed 1/4 thick stops to set the needed distances be them inset or overlay.

Place the face in the fixture show side down butting against the 3/4” tall stops, place drawer box on face with the bottom of the box to the 1/4” stop, slide box to side stop. Install screws. You will have to size the fixture stops to the overlay or inset gap you use. If you use a face thicker than 3/4, that thickness will be the thickness of the primary stop.

Tom
 
tjbnwi said:
We don’t CNC the drawer faces, we made fixtures to set the faces.

Tom

Same here, we use jigs/shims to set the drawer fronts on the boxes
 
Until we made the fixtures we used jigs and playing cards as shims. With the fixtures the faces go on the drawer boxes before the assembly goes into the carcass.

The fixtures have saved a lot of time. 

Tom
 
Revisiting because I finally remembered to take some pictures. We have 2 drawer face setting fixtures, red for inset, black for 3/4 overlay. These are the 2 most common looks we use.

The fixture is very simple, felt covered 1/2” ply, some 3/4 MDF on the 3/4 overlay we used 1/4” for the stop. On the inset, due to the clip we use we use 1/8” MDF for the stop.
You must be perfectly square for these to work properly.

[attachimg=1]

The tongue is to limit contact area. The face goes in the fixture, show side to the felt contacting the tongue on both legs.

[attachimg=2]

Face against the tongues, box against the bottom and right side stops. The open box face the operator.

[attachimg=3]

Box secured to the face. This drawer was already installed, I had to remove it from the case to take the picture, thus the bumper.

[attachimg=4]

The 2 fixtures.

[attachimg=5]

It took about 30 minutes to make each fixture, they save hours on each job.

Tom


Attachments

  • IMG_0203.jpeg
    IMG_0203.jpeg
    107.5 KB · Views: 1,895
  • IMG_0204.jpeg
    IMG_0204.jpeg
    139.2 KB · Views: 1,887
  • IMG_0205.jpeg
    IMG_0205.jpeg
    82.1 KB · Views: 1,886
  • IMG_0207.jpeg
    IMG_0207.jpeg
    92.7 KB · Views: 1,863
  • IMG_0208.jpeg
    IMG_0208.jpeg
    79 KB · Views: 1,856
I do have a CNC machine, I feel this process is faster.

[attachimg=1]

Tom
 

Attachments

  • IMG_0209.jpeg
    IMG_0209.jpeg
    121.6 KB · Views: 1,842
Back
Top