iamnothim
Member
- Joined
- Feb 5, 2014
- Messages
- 1,435
The next project is a follow-on to the speaker build. I put some of the following info in a post on that thread.
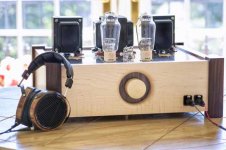
As I posted in the speaker thread I will build a coffee table with a rear shelf for the ugly components that don’t need to be seen or accessed. I am also building a Neurochrome "THAT" Preamp “THAT”. It was designed by Tom Christensen, the engineer that designed the DG300B amp I built.
A preamp boosts the input volume of source components like CD players and DACs. A preamp for a phonograph is a totally unique beast. That will be built down the road.
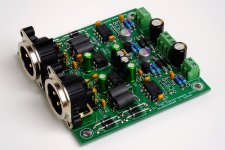
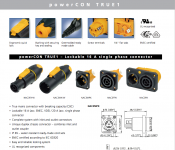
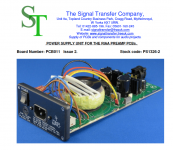
The preamp is small and simple. There will be two 3” x 3” boards, one is the preamp the other is for differential/balanced/XLR inputs. Like the round three pin connector used on microphones. There is also a transformer for 120VAC and a power circuit. I don’t want two volume controls, so I will orphan the volume pot on the amp and use it in the preamp. I’m fine with that because the way the front knob on the amp connects to the pot is with a flexible shaft. The tactile feel is very poor.
Right now the plan is to stack the boards in a wood cube on a plinth. I will attempt to inlay dark wood for the volume graduation marks into the top. That will be a first. My fallback is to cut plugs for "dots". (I know someone will say use dominos, so Ill say it first) [smile]
I will use quarter sawn white oak for the table.
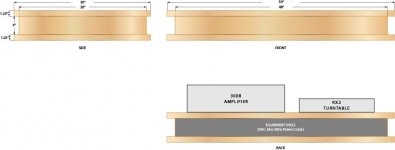
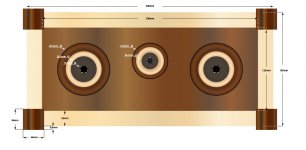
It will definitely be contemporary / mid century. All hard angles and just ease the edges, not chamfered. I have decided on planks without a border for the top. Below is an illustration of the top. A hidden 4" equipment shelf sandwiched between a 5/4 (or thinner) hardwood top and bottom. Probably 4" wide planks. The legs will be steel “hoops. I and found a guy, 10 min away, that makes them. Perfect for the weight and minimalistic in style. I could experiment with a patina.
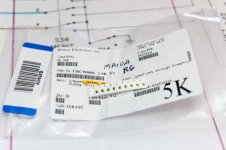
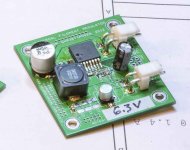
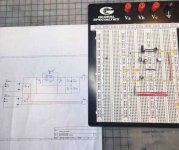
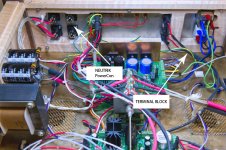
The components have been ordered and I’ll pick out the stock very soon.. I will put up a few posts on building the electronics. It’s a great complimentary hobby to woodworking. I know very little about electronics. I’m pretty much a solder monkey. If you haven’t soldered, or have a hard time with it, watch the three part comprehensive soldering tutorial by Dave Jones of the “EEVblog” on Youtube. After watching it, you will be able to solder ANY component, even tiny surface mount components and processors. I had never done this before building the amp and with very little practice I can solder components the size of half a grain of rice. It’s pretty cool. Pictured is my very first attempt. Not pretty but it worked.
[attachimg=1]
[attachimg=2]
[attachimg=3]
[attachimg=4]
[attachimg=5]
[attachimg=6]
Someday I will finish the "Blue Pine Garage" [big grin]
As I posted in the speaker thread I will build a coffee table with a rear shelf for the ugly components that don’t need to be seen or accessed. I am also building a Neurochrome "THAT" Preamp “THAT”. It was designed by Tom Christensen, the engineer that designed the DG300B amp I built.
A preamp boosts the input volume of source components like CD players and DACs. A preamp for a phonograph is a totally unique beast. That will be built down the road.
The preamp is small and simple. There will be two 3” x 3” boards, one is the preamp the other is for differential/balanced/XLR inputs. Like the round three pin connector used on microphones. There is also a transformer for 120VAC and a power circuit. I don’t want two volume controls, so I will orphan the volume pot on the amp and use it in the preamp. I’m fine with that because the way the front knob on the amp connects to the pot is with a flexible shaft. The tactile feel is very poor.
Right now the plan is to stack the boards in a wood cube on a plinth. I will attempt to inlay dark wood for the volume graduation marks into the top. That will be a first. My fallback is to cut plugs for "dots". (I know someone will say use dominos, so Ill say it first) [smile]
I will use quarter sawn white oak for the table.
It will definitely be contemporary / mid century. All hard angles and just ease the edges, not chamfered. I have decided on planks without a border for the top. Below is an illustration of the top. A hidden 4" equipment shelf sandwiched between a 5/4 (or thinner) hardwood top and bottom. Probably 4" wide planks. The legs will be steel “hoops. I and found a guy, 10 min away, that makes them. Perfect for the weight and minimalistic in style. I could experiment with a patina.
The components have been ordered and I’ll pick out the stock very soon.. I will put up a few posts on building the electronics. It’s a great complimentary hobby to woodworking. I know very little about electronics. I’m pretty much a solder monkey. If you haven’t soldered, or have a hard time with it, watch the three part comprehensive soldering tutorial by Dave Jones of the “EEVblog” on Youtube. After watching it, you will be able to solder ANY component, even tiny surface mount components and processors. I had never done this before building the amp and with very little practice I can solder components the size of half a grain of rice. It’s pretty cool. Pictured is my very first attempt. Not pretty but it worked.
[attachimg=1]
[attachimg=2]
[attachimg=3]
[attachimg=4]
[attachimg=5]
[attachimg=6]
Someday I will finish the "Blue Pine Garage" [big grin]