CONTEST! Win a Festool Blade Bag for helping me with esthetics!

SittingElf

Member
Joined
May 28, 2013
Messages
1,371
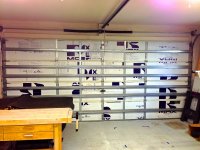
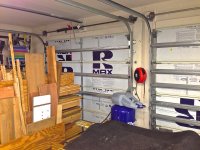
OK.... so I spent two days cutting, fitting, wrestling, and installing RMAX Insulation panels in my garage doors.  Job finally done thanks to my new 18V PSC420 Jigsaw.
The problem is that the closed doors are not very esthetically pleasing, and somewhat distracting.  Kinda takes away from artistic inspirations!

I can't really figure out what a good way to make the doors look more pleasing. No room to slide even a micromillimeter of something else into the panels...they are TIGHT!

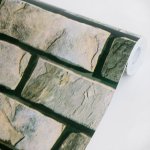
So, I'm up for suggestions, and I'm willing to put up a NAINA Festool Prize to whomever comes up with the best solution that will bring pleasing esthetics to my workshop without breaking the bank.
This will run until the 30th of September and I will send a brand new Festool Blade Bag (see pics below) to the person who's suggested solution the judges (errr...me) pick! [big grin]

Give it a go!

Here's the doors: [unsure] [huh] [crying] [scratch chin]

[attachimg=#1]
[attachimg=#2]

Here's the prize: [big grin] [tongue]

[attachimg=#3][attachimg=#4]

[popcorn]


Attachments

  • g-door1.jpg
    g-door1.jpg
    286.7 KB · Views: 947
  • g-door2.jpg
    g-door2.jpg
    265.3 KB · Views: 967
  • Blade Storage Bag Closed.jpg
    Blade Storage Bag Closed.jpg
    15.7 KB · Views: 856
  • Blade Storage Bag.jpg
    Blade Storage Bag.jpg
    17.7 KB · Views: 841
This sounds too simple but, if it were my place, I would paint the background a light colour (maybe white), and metal supports another colour (maybe black).  Then I would draw/paint /paste/glue various tool pictures onto the light background.
 
I would take a nice neutral colored fabric and use some 3/4 dowels. Take one end of the fabric and roll a Dowel up in it.  Drill several pilot holes through the Dowel and fabric. You self tapping screws to attach it to the bottom rail on the garage door.  Stretch the fabric to the top and roll another dowel tightly in it and repeat the pilot holes and self tappers to the very top rail of the garage door. Repeat as necessary and tell the entire door is covered in the fabric. The fabric seems can now be pinned or stitched to prevent them from coming apart and making one solid panel on the door.  The end result will be two giant design walls where you can pin plans or pictures or designs or anything you want. And the garage doors will still be fully functional. As the door opens the fabric will just sag down a little bit and then as it reaches the top position it'll pull back tight and vice versa.
 
Where I live the building codes specify that any type of foam insulation has to be covered by a fire-resistant/thermal barrier.  This would mean drywall or thermal/fire resistant paint.  Just something to consider.
 
Not enough information. Is this going to be a garage or a workshop. Can we see what the rest of it looks like?. If it is a shop I can see the smaller garage door fitted as a black board, you can use plastic sheets and magic marker so you can design projects. The larger doors I see storage for track rails long level etc.. I would break up the surface and make it funner to look at then a wall of bricks. Install small picture frames, alternate mirrors and picture. Make a false window with some of your favorite views?

Bruce
 
That's any easy remedy if needed, which I'm not sure it is, because I believe that this insulation is a fire-retardant.

http://www.rmax.com/wall-eco-maxci.asp

But, if it is a problem, then I would just give a quick coat of the fire-resistant paint before applying the vinyl wallpaper. Hope this helps.
 
BMH said:
Not enough information. Is this going to be a garage or a workshop. Can we see what the rest of it looks like?. If it is a shop I can see the smaller garage door fitted as a black board, you can use plastic sheets and magic marker so you can design projects. The larger doors I see storage for track rails long level etc.. I would break up the surface and make it funner to look at then a wall of bricks. Install small picture frames, alternate mirrors and picture. Make a false window with some of your favorite views?

Bruce

It's a 960SF garage that is primarily a workshop.  The tools I'm adding will all have mobility capability, but the only time we will put a car in the garage is for Hurricanes. In that case, there is a lot more involved, including boarding up all windows etc...  The mobility kits for the machines coming in during my upgrade will all have the capability of being moved tightly to one side of the garage to allow for a vehicle. The other vehicle will be long gone, as we will evacuate during a storm.

Please see my  "Gravitating to LifeLong tools" thread for more info. Click HERE

The doors have to remain functional. Can't keep them statically closed, even though the primary purpose of the garage is for the workshop.
 
looks good to me.  you just need to learn to love abstract modern art.  these type of installations sell for mega dollars in some of the biggest galleries! on second thought you do need to invert the second panel over fourth row down from the left.  THEN, it would be perfect--because it would resolve and balance the visual tension created by the right side of the composition.
And thanks, but I won't need the bag--just send it to the runner-up.  I don't see the reason to keep my blades anywhere but in their original casings--with all the specs at hand and easy to hang up individually or thrown into a job tote without all the extra handling.
 
Paul G said:
Google "inkjet wall mural", there are places that have lots of stock murals like http://pixersize.com/wallmurals?gclid=CPPOwsXi3LkCFS_ZQgod7jIA6g or turn your own image into a mural like http://www.muralsyourway.com/?mmwaf=gpc&_vsrefdom=gawbrand&wkp=more30&gclid=CPqugYjj3LkCFS9dQgodc2QAtg . Vehicle wrap vendors may also be a way to go.

Michael and Paul,

I like your ideas too!  Pretty pricey for the African Plains group though!! [eek]

If I go that route, I have to figure out how to manage the steel bracings without taking away from the scene.  What would be kinda cool, though a little bland, would be to paint all white, and then use FESTOOL's Logo diagonally from bottom to top!  (Sawstop and Laguna on the other door!). Hmmm....maybe not. [blink]
 
I hate to say this and I hope you don't take it wrong - but How about tearing it out and starting over?

There is a better product to use instead of those 4 x 8 sheets of styrofoam.

Insulfoam makes a "kit" that uses a similar type foam, but it also has a nice laminated 'facer'

You can buy it at Lowes, Home Depot or online

Also, the panels have striations running the length which makes it easier to install because your able to 'arch' the panel outward to get it to fit under the edges at the top and bottom
http://www.insulfoam.com/index.php?option=com_content&view=category&layout=blog&id=99&Itemid=99

Also to do it properly, I would think you need to remove the hurricane "braces", install the foam and then reinstall (I assume they are just screwed on)

Here is one of my doors.  It was a lot of work - all the edges were caulked and I then painted the doors
[attachimg=#]
 

Attachments

  • Garage Door.jpg
    Garage Door.jpg
    136.2 KB · Views: 849
Vehicle wraps will accommodate the bars going right over them. A green koolaide image might be a hi res photo of a stack of systainers, maybe someone at a Festool training center could get you a good photo. As for budget concerns, I've seen that shopping list of your and I ain't buyin' it lol.
 
while everyone is suggesting themes , art work , patterns ,
from a practical workroom usefulness wall surface , I myself would use a white thick vinyl or plastic type adhesive film , why I say white ?
1 maximum  light reliability reflected back into the room
2 minimum distraction from a having a neutral surface color  
3 the vinyl /plastic would be a simple wipe off surface for easy cleaning
the 1 & 2 would be important as having the workshop  area    bright & well lighted is a prime importance due to being able to see at your best makes your work better, easier AND most important Safer .
Mistakes are costly in time & materials  & injuries to yourself would/could  end how you use the workshop making all that investment in time & money for nothing .
My take in any set-up of anything in a wood working shop 2 fold
 that the 1st consideration is always Safety , Safety is Always 1st , distractions are not Safe , poorly consistent lighting is not Safe .
 2nd is how I make the room more efficient for using those precious precision tools  .
a well lighted room is both safe & efficient , that garage door is the only wall surface that will not have tools, cabinets , machines ,shelves on the wall or in front of the wall so making it as light reflective as possible would be a high priority to me .  
{EDIT}
I also Do Not wish to win any prize , So Frank PLZ take my name outta the contest
I just call it as I see it , I'm not one for any contest , I take good advice & I feel If I can give advice that's just me giving back something that was passed on to me
 
Paul G said:
Vehicle wraps will accommodate the bars going right over them. A green koolaide image might be a hi res photo of a stack of systainers, maybe someone at a Festool training center could get you a good photo. As for budget concerns, I've seen that shopping list of your and I ain't buyin' it lol.

[thumbs up] [tongue]

Hey....c'mon!  I wanna spend my $$ for stuff I use...not just look at! [big grin]
 
Like Frank said...paint it with some water based paint and forget about it.
Everything else takes too much time, and money which could be used to make something...
 
If you want something simple, inexpensive, and increases the effectiveness of your available lighting, consider aluminum foil. I believe it will also improve the insulation value by reflecting IR waves back in.

You would need to use a good quality spray adhesive. Not the typical art-quality you'll find at Wlamart (although I suspect I also found this locktite 200 at Walmart). I used this to re-secure a bubble in the head liner in my old truck before selling it. It was so strong that I accidentally tore the headliner trying to reposition it.

As for any sort of contest, I disqualify myself from any sort of prize.

adhesives-loc-1408028-loctite-spray-adhesive-loc1408028-46971big.jpg
 
Back
Top