Converting a built-in w/ the right tool

maction17

Member
Joined
Mar 23, 2016
Messages
19
Hey FOG-folk,

Been on for less than a week now, and already visiting this site (sometimes for hours) has become part of my morning routine. Love it.

I just want some advice on choosing the right tool for two small projects.
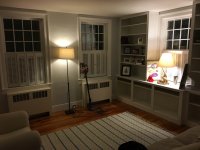
  Project #1: Built-in bookshelf to become (in part) an office desk.
[attachimg=1]
  The front room has a wall-to-wall open shelving system, built in from back when that room was a clockmaker's shop. The lower half is basically standard counter depth, so to avoid adding a free standing desk, I want to cut out a section that leaves the bottom open for leg room. It seems that with some tight corners and angles and the necessity to make plunge cuts, the Vecturo should really be the next tool buy for my budding Festool quiver. Yes or no?

  Project #2: Squaring off trim.
[attachimg=2]
Another bookshelf, but this one contains some antiquated scalloped trimthat the wifey wants gone. Vecturo again? At first, I thought maybe I could run my new ts 55 flush to the outer trim, but the Vecturo would be much cleaner. I think if I tack a strip of 1x4 or something as a guide (I can't figure out a way to clamp a small guide rail), then I can run the tool along that and take out the scalloped trim.

Seems logical to me, but then again, I'm just a middle school English teacher with a growing obsession for Festool. And here's the good part- my wife will actually buy the Vecturo set for me if it gets the job done.
 

Attachments

  • IMG_0086.JPG
    IMG_0086.JPG
    1.9 MB · Views: 1,084
  • IMG_0585.JPG
    IMG_0585.JPG
    1.6 MB · Views: 1,084
Vecturo would work, most likely not my first choice, but it does get you a new tool.

I'd secure a board to the bottom of the cabinet between the first stile on the right and back of the cabinet, this would be the guide for the edge of the TS-55. How do you secure the board without damaging the cabinet, you ask. A piece of tape on the bottom of the cabinet, a few dabs of hot glue on the tape, place the board in the proper location. When you're finished remove the board, the tape was a barrier that protected the surface. The back and left side create the other guides. Clean up the corners with a small pill saw. The final cuts on the toe kick can be done with a pull saw also. Sand, prime, paint raw edge.

The second one----did you look behind it to see if there are pocket screws holding the trim piece in place? No screws, again I'd use the TS-55.

Tom
 
You'll need a RAS115 and a RO90 to refine the edges after you've trimmed back with the Vecturo.

 
Kev said:
You'll need a RAS115 and a RO90 to refine the edges after you've trimmed back with the Vecturo.

Don't think he'll strictly NEED both a RAS115 and an RO90!! Just the RO90 would do the job.
 
Thanks, guys. I recently got the ETS 125 and Rotex 125, and the 90 was the next on the list anyway. Thanks for justifying TWO new tools. I have a Trion which may come in handy for one or both of these operations.

No pocket screws. These built-ins are at least 60 years old, which I suppose is pretty recent for a 1795 house.
 
tjbnwi said:
...A piece of tape on the bottom of the cabinet, a few dabs of hot glue on the tape, place the board in the proper location. When you're finished remove the board, the tape was a barrier that protected the surface...

Terrific!  I'll use that method on my shelf notching project with a template and a bearing-guided router bit.

In regards to the Vecturo, whether you need it or not, ask for it as "payment" for however you solve the problem.
 
tjbnwi said:
Clean up the corners with a small pill saw.

When I read this I was thought that maybe this was a type of saw I hadn't heard of...then I read on.
Tim
 
Tim Raleigh said:
tjbnwi said:
Clean up the corners with a small pill saw.

When I read this I was thought that maybe this was a type of saw I hadn't heard of...then I read on.
Tim

Old and feeble, both mind and body. ;D

Tom
 
tjbnwi said:
Tim Raleigh said:
tjbnwi said:
Clean up the corners with a small pill saw.

When I read this I was thought that maybe this was a type of saw I hadn't heard of...then I read on.
Tim

Old and feeble, both mind and body. ;D

Tom

Had to ask - is this the saw you use on your senility meds?  [big grin] 
 
Sparktrician said:
tjbnwi said:
Tim Raleigh said:
tjbnwi said:
Clean up the corners with a small pill saw.

When I read this I was thought that maybe this was a type of saw I hadn't heard of...then I read on.
Tim

Old and feeble, both mind and body. ;D

Tom

Had to ask - is this the saw you use on your senility meds?  [big grin]

Yes, no longer strong enough to use a mortar and pestle.

Tom
 
Maybe its the circumstances where I work (in construction, often in areas where setting up a powercable just to do a couple of cuts with a multitool would be a right faff) but I feel they kind of missed the boat a bit when they didn't make a cordless multitool.
 
From what I can see this house has  lot of character. Just a thought perhaps you should convince your wife that the valence should remain. I hate to be this frank but cutting it out as you propose leaves a lot to b desired. 
  I would suggest that you not rush into this.   
  That said the piece is probably nailed in from the top and sides possibly with finishing nails. I suspect the cabinet was built then slid into the space and trimmed. You could run a magnet around the edge to locate the nails. Then cut accordingly.
 
chris s said:
From what I can see this house has  lot of character. Just a thought perhaps you should convince your wife that the valence should remain. I hate to be this frank but cutting it out as you propose leaves a lot to b desired. 
  I would suggest that you not rush into this.   
  That said the piece is probably nailed in from the top and sides possibly with finishing nails. I suspect the cabinet was built then slid into the space and trimmed. You could run a magnet around the edge to locate the nails. Then cut accordingly.

When a room looks good already, ^this advice^ makes sense.
 
chris s said:
From what I can see this house has  lot of character. Just a thought perhaps you should convince your wife that the valence should remain. I hate to be this frank but cutting it out as you propose leaves a lot to b desired. 
I would suggest that you not rush into this.   

Bit late, but I agree. I keep looking at both pictures and think this needs a total redesign, but that's probably just me...carry on.
Tim
 
Thanks, fellas. No decision made yet- as suggested, I'm going to think about this one for a bit.

The same type of valance existed on a larger scale in the kitchen (over teh sink area), and I squared that off. It looks much better now, but that was also part of a larger kitchen remodel.
 
As has been mention it is most likely add on trim, either glued or nailed on. So if you can work that out you may find you can break the join and remove without need for a tool (other than a hammer) - sorry to be a killjoy on the tool buying front... you might need a sander though to finish off any residue!

If it isn't add on I'd go with the TS, you can get a much cleaner cut with a rail saw even vertically than you can with a multitool so long as you are careful in setting up and finish your cut early then finish of the corner by hand.
 
I agree with Larry, this molding was most likely tacked on. Since the shelves are just put in with cove, someone build these onsite. A nice sharp stanley knife, then a very thin putty knife should loosen this applied scallop.  For the desk convert, the vectro is the way to go.  Tack on a scrap to guide you. If you cannot clamp a straight edge then 2 face tape.  The bottom shelf will be the fun part.  Remember when you remove the shelf you probably do not have finished flooring under there.
 
Back
Top