I just had some success with a trick I've never attempted before and thought I would share it.
This week I was gluing up some veneer for a gift I'm making. The veneer is Louro Preto, and I'm using a vacuum bag and cold press glue (Better Bond Xpress) to adhere it. In total, there are 6 panels. Each panel is a bookmatch on both sides.
For the most part, things went very well and the veneer came out flat, well adhered, and positioned where I wanted it.
However, one of the panels had substantial ripples close to the seam and on both sides. These ripples were big - almost 1/2" tall and 1" wide on one side, and around 3/8" tall on the other side, running nearly the length of the panel. I'm guessing that there must have been some kind of issues with the veneer in that spot, as everything else seemed very well bonded.
Paul Schurch has a trick where he uses Polyurethane glue to do repairs on delaminated veneer but I had only read of it. Never seen it or even the results of it. Basically, you flood your panel w/ water to raise any trouble spots and let it dry. Once you have identified one, brush gorilla glue (or other polyurethane glue) directly on to the surface of the trouble area. Cover it with wax paper, and then clamp or press for a few hours. Technically, you don't need to even slit the veneer, as the glue penetrates through it and bonds the trouble spot down.
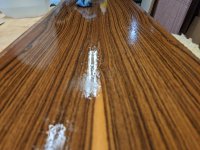
I gave it a shot and sure enough, a few hours later the ripples were gone entirely and I had a flat panel. However, gorilla glue does leave some residue. See photo:
View attachment 1
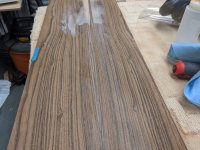
At this point, I had been going after it with a cabinet scraper to reduce the superficial layer of gorilla residue. I did a little checking w/ some Shellac and could still see a fair bit of 'ghosting' where the gorilla glue was. So, I broke out my Pro-5 and worked it over with 180 for a bit, checking occasionally with Naptha to see how 'invisible' the repair was. I was surprised I didn't have a sand-through - the veneer is 1/42", so not exactly thick. Once it looked okay, I moved up the grits to 320. At this point, I raised the grain and it looks pretty good :
View attachment 4
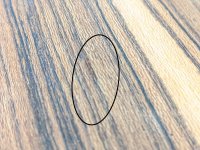
Unfortunately, I may have flooded a little too hard as there are some tiny ripples now (1/16" tall, maybe..). hard to see unless you get the right light on it and I'm sure they will flatten out once the veneer dries again.
See this photo : you see a little bump in the circled area.
View attachment 5
Lastly, i wanted to see how the repair would handle dye, as I plan to lightly dye the final piece to shift the color a little more orange:
[attachimg=2]
Looks good to me!!
This week I was gluing up some veneer for a gift I'm making. The veneer is Louro Preto, and I'm using a vacuum bag and cold press glue (Better Bond Xpress) to adhere it. In total, there are 6 panels. Each panel is a bookmatch on both sides.
For the most part, things went very well and the veneer came out flat, well adhered, and positioned where I wanted it.
However, one of the panels had substantial ripples close to the seam and on both sides. These ripples were big - almost 1/2" tall and 1" wide on one side, and around 3/8" tall on the other side, running nearly the length of the panel. I'm guessing that there must have been some kind of issues with the veneer in that spot, as everything else seemed very well bonded.
Paul Schurch has a trick where he uses Polyurethane glue to do repairs on delaminated veneer but I had only read of it. Never seen it or even the results of it. Basically, you flood your panel w/ water to raise any trouble spots and let it dry. Once you have identified one, brush gorilla glue (or other polyurethane glue) directly on to the surface of the trouble area. Cover it with wax paper, and then clamp or press for a few hours. Technically, you don't need to even slit the veneer, as the glue penetrates through it and bonds the trouble spot down.
I gave it a shot and sure enough, a few hours later the ripples were gone entirely and I had a flat panel. However, gorilla glue does leave some residue. See photo:
View attachment 1
At this point, I had been going after it with a cabinet scraper to reduce the superficial layer of gorilla residue. I did a little checking w/ some Shellac and could still see a fair bit of 'ghosting' where the gorilla glue was. So, I broke out my Pro-5 and worked it over with 180 for a bit, checking occasionally with Naptha to see how 'invisible' the repair was. I was surprised I didn't have a sand-through - the veneer is 1/42", so not exactly thick. Once it looked okay, I moved up the grits to 320. At this point, I raised the grain and it looks pretty good :
View attachment 4
Unfortunately, I may have flooded a little too hard as there are some tiny ripples now (1/16" tall, maybe..). hard to see unless you get the right light on it and I'm sure they will flatten out once the veneer dries again.
See this photo : you see a little bump in the circled area.
View attachment 5
Lastly, i wanted to see how the repair would handle dye, as I plan to lightly dye the final piece to shift the color a little more orange:
[attachimg=2]
Looks good to me!!