- Joined
- Nov 14, 2013
- Messages
- 3,574
I think I have posted a half a dozen (or so) projects, but none of them have been typical woodworking-type projects. Let's fix that...
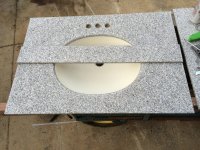
I while back my wife picked up some Corian vanity tops with sinks that were removed from a commercial installation. They were in decent shape, but not useable as they were. Each countertop is about 5 feet long, 24 inches deep. and contains two underhung sinks.
Our daughter is remodeling her bathroom and needed a vanity top that is 31" wide by 22" deep, with the sink centered in it. Time to dig out the green goodies and go to work.
The basic plan:
• Remove front drop-edge (about a 4" valence) from sink, since it will block the drawers in her vanity. I decided to remove exactly an inch, which left a 3-1/2" setback from the front edge of the top to the front edge of the sink bowl. This operation was a breeze with the TS-75 and the Festool xxx382 solid surface blade. And it left an edge that was smooth as a baby's bottom!
• Cut top to depth. This involved removing an inch from the back edge of the top. Again, TS75 to the rescue!
• Find center of sink and establish location of the first edge. This particular part of the project was more difficult than it should have been because my carpenters square is not a precision one. I ended up having to mark the line, flip the square over and mark from the other side (which I knew was precisely parallel due to my earlier cut) and then bisect the difference between the lines to get an edge that was actually square. I am now, more than ever, looking for a large precision square. Possibly the Woodpeckers one if they will ever build them again - but I'm not holding my breath so I would like other recommendations if you have any?
And while an MFT would certainly have made the crosscuts on the top easier *IF* I could have used it, the bowl of the sink wouldn't have allowed me to use an MFT - even if I had one! [big grin] All cuts had to be made from the top in order to let the track fit and sit flat. I just used a few of pieces of 2x to make a quick 'stand' that the vanity could sit on while I made my cuts.
• After cutting one (left) edge, cut other (right) edge precisely 31" parallel to that one. With sink now dimensioned, I set it aside and
• Used the TS75 to rip the glued-up strip off the valence. The old valence will be re-used as a backsplash.
• Used my Kapex to clean up one end of the new backsplash, then carefully transferred the width measurement from the sink to the backsplash. I cut it a tiny bit long on purpose, so that I could position it on the sink and fine tune the length. I used the 'push it gently up against the (stopped) Kapex blade to deflect it, then lift the blade and start the Kapex and make the cut' method. It only took me three 'trims' to get it perfect.
• Found out that the smallest round-over bit I have was 1/4". Ran (actually Mrs. WOW drove me [smile]) to Woodcraft and picked up a Whiteside 1/8" round-over bit. Used my PC 7309 trim router (purchased on sale for $39 from Menards!) to soften most of the edges and corners. I left the back of the sink, bottom of the backsplash, and 1/2" on each side of the top at the back straight so that they would look and work better when the top was set and the backsplash installed.
• Used my ETS 150/3 to remove the old surface 'polish' treatment that was in bad shape, and to clean up around the area where the faucets sit. I 'touched' most of it with 180 grit, concentrating on the faucet area and a spot that used to be between the sinks where it had gotten cloudy. I wiped it down completely with paint thinner to pick up any stray dust or particles. then moved to 240 grit - again just 'touching' the surface. I wiped it down one more time, then did a final sanding/polishing/finishing with 320 grit. It turned out BEAUTIFULLY!
BTW, I had no problem holding the ETS150 flat on the 1/2" edges. The weight was a perfect balance of not being too heavy but being substantial enough that it 'floated' on the edge and really worked well. This is the first time I've used the ETS, and I was quite frankly amazed at how smooth it is! I could NEVER have accomplished that with my old PC or Dewalt random orbit sanders - they would have jumped all over the place.
• Used my RO 90 with a soft pad and 800 'grit' Vlies pad from the sample pack that I bought on the Woodcraft sale to clean up the sink bowl. It worked well on the flatter surfaces, but the length of the RO 90 body made it difficult to use in the bowl. I really need an ETS90/3, but those are NAOTP (Not Available On This Planet). I finally ditched the RO 90 and used an attachment on my drill to buff and polish the sink. It worked fine.
As i was setting the 'offcut' bowl aside, it slipped a tiny amount and ended up putting a nice slice in my thumb. A bandage and some triple antibiotic ointment from the First Aid Systainer fixed me right up. And I didn't even have to get into the systainer - just opened the attic lid and everything I needed was right there! Somebody thought that thing through!
[wink]
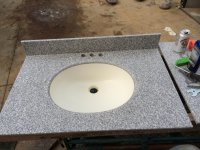
So, here's the picture proof;
[attachimg=4]
The backsplash is just sitting on the sink for effect.
Sink and backsplash:
[attachthumb=2]
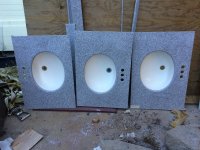
The 'offcuts' that are going on Craigslist:
[attachthumb=3]
Festools used:
TS75
95" rail
Quick Clamp x2
Kapex
ETS150/3
RO90
CT36AC
First Aid Systainer
That's the most Festool tools that I've used on a project yet! [thumbs up]
Daughter is pleased, which is the important thing. She's taking it home with her today.
I while back my wife picked up some Corian vanity tops with sinks that were removed from a commercial installation. They were in decent shape, but not useable as they were. Each countertop is about 5 feet long, 24 inches deep. and contains two underhung sinks.
Our daughter is remodeling her bathroom and needed a vanity top that is 31" wide by 22" deep, with the sink centered in it. Time to dig out the green goodies and go to work.
The basic plan:
• Remove front drop-edge (about a 4" valence) from sink, since it will block the drawers in her vanity. I decided to remove exactly an inch, which left a 3-1/2" setback from the front edge of the top to the front edge of the sink bowl. This operation was a breeze with the TS-75 and the Festool xxx382 solid surface blade. And it left an edge that was smooth as a baby's bottom!
• Cut top to depth. This involved removing an inch from the back edge of the top. Again, TS75 to the rescue!
• Find center of sink and establish location of the first edge. This particular part of the project was more difficult than it should have been because my carpenters square is not a precision one. I ended up having to mark the line, flip the square over and mark from the other side (which I knew was precisely parallel due to my earlier cut) and then bisect the difference between the lines to get an edge that was actually square. I am now, more than ever, looking for a large precision square. Possibly the Woodpeckers one if they will ever build them again - but I'm not holding my breath so I would like other recommendations if you have any?
And while an MFT would certainly have made the crosscuts on the top easier *IF* I could have used it, the bowl of the sink wouldn't have allowed me to use an MFT - even if I had one! [big grin] All cuts had to be made from the top in order to let the track fit and sit flat. I just used a few of pieces of 2x to make a quick 'stand' that the vanity could sit on while I made my cuts.
• After cutting one (left) edge, cut other (right) edge precisely 31" parallel to that one. With sink now dimensioned, I set it aside and
• Used the TS75 to rip the glued-up strip off the valence. The old valence will be re-used as a backsplash.
• Used my Kapex to clean up one end of the new backsplash, then carefully transferred the width measurement from the sink to the backsplash. I cut it a tiny bit long on purpose, so that I could position it on the sink and fine tune the length. I used the 'push it gently up against the (stopped) Kapex blade to deflect it, then lift the blade and start the Kapex and make the cut' method. It only took me three 'trims' to get it perfect.
• Found out that the smallest round-over bit I have was 1/4". Ran (actually Mrs. WOW drove me [smile]) to Woodcraft and picked up a Whiteside 1/8" round-over bit. Used my PC 7309 trim router (purchased on sale for $39 from Menards!) to soften most of the edges and corners. I left the back of the sink, bottom of the backsplash, and 1/2" on each side of the top at the back straight so that they would look and work better when the top was set and the backsplash installed.
• Used my ETS 150/3 to remove the old surface 'polish' treatment that was in bad shape, and to clean up around the area where the faucets sit. I 'touched' most of it with 180 grit, concentrating on the faucet area and a spot that used to be between the sinks where it had gotten cloudy. I wiped it down completely with paint thinner to pick up any stray dust or particles. then moved to 240 grit - again just 'touching' the surface. I wiped it down one more time, then did a final sanding/polishing/finishing with 320 grit. It turned out BEAUTIFULLY!
BTW, I had no problem holding the ETS150 flat on the 1/2" edges. The weight was a perfect balance of not being too heavy but being substantial enough that it 'floated' on the edge and really worked well. This is the first time I've used the ETS, and I was quite frankly amazed at how smooth it is! I could NEVER have accomplished that with my old PC or Dewalt random orbit sanders - they would have jumped all over the place.
• Used my RO 90 with a soft pad and 800 'grit' Vlies pad from the sample pack that I bought on the Woodcraft sale to clean up the sink bowl. It worked well on the flatter surfaces, but the length of the RO 90 body made it difficult to use in the bowl. I really need an ETS90/3, but those are NAOTP (Not Available On This Planet). I finally ditched the RO 90 and used an attachment on my drill to buff and polish the sink. It worked fine.
As i was setting the 'offcut' bowl aside, it slipped a tiny amount and ended up putting a nice slice in my thumb. A bandage and some triple antibiotic ointment from the First Aid Systainer fixed me right up. And I didn't even have to get into the systainer - just opened the attic lid and everything I needed was right there! Somebody thought that thing through!
[wink]
So, here's the picture proof;
[attachimg=4]
The backsplash is just sitting on the sink for effect.
Sink and backsplash:
[attachthumb=2]
The 'offcuts' that are going on Craigslist:
[attachthumb=3]
Festools used:
TS75
95" rail
Quick Clamp x2
Kapex
ETS150/3
RO90
CT36AC
First Aid Systainer
That's the most Festool tools that I've used on a project yet! [thumbs up]
Daughter is pleased, which is the important thing. She's taking it home with her today.