You are using an out of date browser. It may not display this or other websites correctly.
You should upgrade or use an alternative browser.
You should upgrade or use an alternative browser.
Crosscut capacity for MFT/3 Multifunction Table - 495315?
- Thread starter captjeff
- Start date
- Joined
- Jan 22, 2007
- Messages
- 9,692
[member=62768]captjeff[/member], welcome to the forum.
With the guide rail in the position set using the factory stops and moving the fence out to its further position, you can get about 46".
It's possible to move the default rail position to gain more capacity.
Shane
With the guide rail in the position set using the factory stops and moving the fence out to its further position, you can get about 46".
It's possible to move the default rail position to gain more capacity.
Shane
DrD
Member
- Joined
- Mar 29, 2013
- Messages
- 390
[member=48572]Shane Holland[/member]
Hey Shane! How are you setting up your MFT/3 table and 1080 rail to get a cross-cut width of 46"? I would very much like to be able to cross-cut 40" widths, but keep running out of rail and/or table. A picture or diagram would be appreciated.
Thanks, Don
Hey Shane! How are you setting up your MFT/3 table and 1080 rail to get a cross-cut width of 46"? I would very much like to be able to cross-cut 40" widths, but keep running out of rail and/or table. A picture or diagram would be appreciated.
Thanks, Don
- Joined
- Jan 22, 2007
- Messages
- 9,692
[member=19075]DrD[/member], just loosen the knob for the fence and slide it as far to the left as you can. The channel on the fence extrusion will let you move it several inches. With it to its furthest point to the left, it will give you that capacity. Your workpiece will hang off the edge of the table, but that should present a problem since the table will support enough of it.
Then, I moved the flag stop to its furthest point as well. You can actually move it out beyond the end of the fence by an inch or so for a little extra capacity.
The protractor component of the fence can also be slid forward and backward on the table. That can help give more capacity in that direction, or help get shorter piece closer to the front edge of the table so you don't have to reach as far to make the cut.
Shane
CarolinaNomad
Member
- Joined
- Sep 17, 2010
- Messages
- 306
I read the question differently. To get 46" cross cut capacity, you have to orient the rail long ways on the table (90 degrees from what you normally see it configured) and use a 1400 rail, preferably a 1900 (1900 so that the saw can sit on the rail beyond the work piece). The table is too narrow to support bigger pieces. So I've used the Kapex wings on either side of the cut to support the work.
If you need more capacity, Steve, Qwas dog inventor, expanded his table using his rail dogs. I can't seem to find the pics of his workbench.
If you need more capacity, Steve, Qwas dog inventor, expanded his table using his rail dogs. I can't seem to find the pics of his workbench.
DrD
Member
- Joined
- Mar 29, 2013
- Messages
- 390
[member=48572]Shane Holland[/member] - thanks for the reply. If I follow your suggestions correctly, I still cannot get close to 46". Using 18mm ply, the Off-side (non-pivot) rail support is raised just enough above the MFT/3 surface to limit the workable width of the piece to be slid under the rail to far less than 46" wide. Moreover, the 1080 rail is only 42 1/2" long, less space to mount to the pivot support, again limiting cross cut ability to something less than 42". The useable work-surface of the MFT/3, without fence or rail supports is approx. 28 1/4" wide by 43 3/8" long. Perhaps a sketch would help see what I am missing.
[member=9136]CarolinaNomad[/member] - you are approaching the issue the as I have found to be the more "do-able." Using a 1900 rail, mounted across the length of the MFT/3, with all adjustments made to ensure there is NO flex in the fence, rail is properly supported, etc., get me to my earlier post of approx. 40" cross cut capacity, BUT, practically, that is not a set-up which I find suitable for precise work - which means my cross-cut capacity is max'ed out at about 36".
Thus, my real issue now becomes using the 1900 rail. Given the MFT/3 is about 3' off the floor, the rail is, when mounted to the pivot support, approx. 6' long, means I hit my shop lights when trying to get the rail up and out of the way - my shop ceiling is 9' less the shop lights which drop down some 9".
In spite of the obvious math and dimensional limitations, I always hope there are ways that work outside my limited approach.
Thanks Shane, thanks Carolina Nomad for your time and suggestions, I'm back in the shop trying to rearrange things.
Don
- Joined
- Jan 22, 2007
- Messages
- 9,692
I think we're talking about different dimensions.
The OP asked repeatable capacity using the flag stop. Which is left to right, not front to back.
Maybe I read the question wrong, but that was my interpretation.
The OP asked repeatable capacity using the flag stop. Which is left to right, not front to back.
Maybe I read the question wrong, but that was my interpretation.
CarolinaNomad
Member
- Joined
- Sep 17, 2010
- Messages
- 306
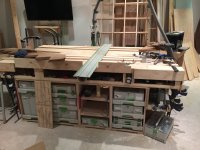
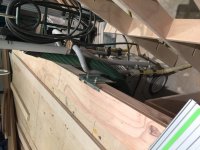
I hope this gives u some ideas. The fence I attached is from Ron paulk video series of his workbench. I removed the flip top for a couple reasons. Having a 1900 rail balancing in the air was asking for trouble around me. Secondly, at 48" cross cut capacity, it is far away from lifting it completely out of the way. I do find myself using the 1900 free handed at times. So keeping it attached to the table doesn't work for me. And when I'm swapping material.l, I lift the rail up and rest it on the fence which requires me to twist the flip setup. Some of these ideas also came from Holzwerkentv utube channel. Do a search of fog, great mft style workbench ideas. Just a guess, u can use the aluminum extrusion of the mft to attach a fence on one end and the other end extend it out beyond the mft to get 48"+ cross cut.
The great thing about the fence, the stops are on my side of the table, which allows me to easily see the measurements and verify placement. It does get in the way and I do have to set it up each time, but I only have one big workbench.
Paul marcel posted a video of setting up the mft using the dogs to gain a couple inches but u lose the protractor.
Also, check out woodwork wizard post titled, cms feather boards, twin angle stop fence, table extensions. In the background of his pics shows his mft setup. Very nicely done and really shows how u can add to the jigs to aluminum extrusion.
Attachments

Hi Shane. Thank you for your information. You DID read my question the way I intended. I was looking for that "left to right" capacity using the flag stop on the left. In either case, 40" or 46" should be enough to do the type of cuts I do most. Thanks for the quick response. Looks like I might buy one of these when the Festool Truck comes to Clearwater Woodcraft next week!Shane Holland said:[member=62768]captjeff[/member], welcome to the forum.
With the guide rail in the position set using the factory stops and moving the fence out to its further position, you can get about 46".
It's possible to move the default rail position to gain more capacity.
Shane
Corwin
Member
- Joined
- Jan 22, 2007
- Messages
- 2,612
DrD said:...
Thus, my real issue now becomes using the 1900 rail. Given the MFT/3 is about 3' off the floor, the rail is, when mounted to the pivot support, approx. 6' long, means I hit my shop lights when trying to get the rail up and out of the way - my shop ceiling is 9' less the shop lights which drop down some 9".
...
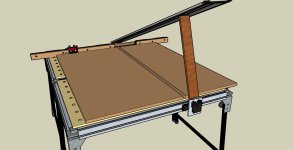
I use a board to support my rails when using my longer 1900 and 3000 mm rails on combined MFT setups. I've placed pieces of weather stripping on the end that the rail will sit on when in use, and I have another piece of weather stripping on the side of the support board as it can also be used on its side to raise the rail just a little off your workpiece.
Here's a graphic illustrating what I mean:
[attachimg=1]
On Edit: Sorry, I was posting this when you made you last reply.
Attachments
DrD
Member
- Joined
- Mar 29, 2013
- Messages
- 390
[member=182]Corwin[/member]
Thanks for the input and the graphic. You have your MFT/3s set up the way I'm doing mine now. If you don't mind, 1)How do you like that setup; 2) how do you connect your tables together, and 3) after the tornadoes last night, I'm a little slower than normal and I missed the purpose of the weather stripping.
Thanks,
Don
Corwin
Member
- Joined
- Jan 22, 2007
- Messages
- 2,612
DrD said:[member=182]Corwin[/member]
Thanks for the input and the graphic. You have your MFT/3s set up the way I'm doing mine now. If you don't mind, 1)How do you like that setup; 2) how do you connect your tables together, and 3) after the tornadoes last night, I'm a little slower than normal and I missed the purpose of the weather stripping.
Thanks,
Don
You're welcome, Don.
1) At one time I had two MFT 1080s, a MFT 800 and the a custom made square table using the longer side extrusions from the 1080. I could join them in various combinations. The twin 1080s configured as illustrated was my favorite configuration as it would handle most operations that I needed. Well, actually, the configuration I usually had was like this but with the addition of my MFT 800 attached to the right of the back MFT to support my fence that extended to the right of the cutline. I have considered getting new MFT/3s to have this configuration again, so, I do like the setup rather very much.
2) I connect my table with the Festool MFT Table Connectors as usual. I also have some situations, like when combining the smaller MFT 800, where I need a 90 degree connection. In those instances I use some fence brackets from an older Woodpecker's router fence.
3) Well, the weather stripping is likely no match for those tornados. But, I've placed weather stripping on the board where it will be in contact with the underside of the Guide Rail in an effort to prevent the Rail from slipping off the support. I keep this board handy atop a stack of Systainers just underneath the MFT. You can see what I mean in the animation I made by going to my thread here; MFT Zero-Clearance Fence & Fenced Sled
Similar threads
- Replies
- 7
- Views
- 2K
- Replies
- 1
- Views
- 706