CT Brush replacement help please

Steve1

Member
Joined
Jul 5, 2017
Messages
488
Location
Southwestern Ontario
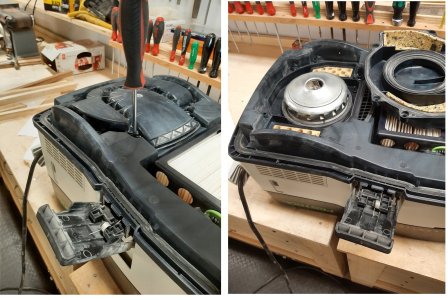
My CT36 has been having difficulty starting up. Hopefully it is just the brushes.

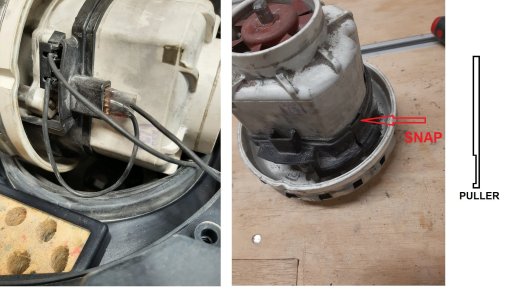
How is the black ring around the motor intended to be removed? I watched a couple of Youtube videos and both guys broke the ring while getting it out.

It almost looks like a couple of snap features on it, but prying the ring out while pulling on the ring wasn't working. Maybe simply because there is not much to grab onto to pull the ring off.
Anybody know ?

CT-36.jpg
 
Solved.

Indeed, that is a snap feature.
I made a puller for the black ring out of a Pau Ferro offcut.

So I held the motor down with one hand, pulled up on the ring using the puller, with the other hand, and pried the block ring back with a thin screwdriver with my other hand.

And indeed, the brushes were toast.

Hope this helps somebody else in the future.

Puller.jpg
 
Last edited:
Just to be complete, here is the whole sequence. My dust collector is a 2016 CT-36 HEPA Cleantex.

1) Take the upper part of the dust collector, turn it over and put it on your workbench. Remove 6 torx screws and the motor cover. The motor pulls straight out, but there are two electrical connectors on it. You may wish to note that the electrical connectors are facing the rear of the dust collector, putting the motor back in the same orientation might avoid cable routing issues.

2) There are 2 electrical connectors on the motor. Unplug both. There is no snap feature on them, they just pull straight out, but may be rather tight. Then you need to pull the black ring off. There is a snap feature (x 2) on this ring. Use procedure per previous post.

3) See how the arm of the torsion spring is at the 11 o'clock position ? On a new brush it will be a the 7 o'clock position. This brush is worn out. Pull the torsion spring back and temporarily park it against the plastic, below the brush (I stuck my finger in there to pull it back). Pull the brush holder radially out with needle nose pliers or similar. Be a bit gentle until the brush holder clears the electrical contact. Install new brush and lift the torsion spring to contact with the carbon brush. Look at the old brush on the other side and check that you have pushed the new brush holder all the way in, like the brass holder is positioned on the other side.

4) Reassemble.
 

Attachments

  • 1 - Remove Cover.jpg
    1 - Remove Cover.jpg
    346.2 KB · Views: 7
  • 2 - Motor Connections.jpg
    2 - Motor Connections.jpg
    292.8 KB · Views: 7
  • 3 - Brushes.jpg
    3 - Brushes.jpg
    366.3 KB · Views: 7
Back
Top