Custom MFT/Table Saw Extension Table

guyswoodshop

Member
Joined
Apr 29, 2013
Messages
29
Hey Everyone! This is my first post the FOG. I guess I waited to post something until I had something that I felt could really contribute to the community. Anyhow, I started using Festool a little while ago, and always wanted an MFT/3 for working with sheet goods and also the clamping options as a general work surface. The problem was I didn’t want to have another work area taking up more valuable floor space when working. I know it’s been done before, but here is my take on the combination MFT/Table Saw Extension that I have seen a few others here make. The video explains quite a bit, however if you have any questions, please feel to ask.

 
Thanks Alan. I have yet to use the fence for a project, however in testing it seems to appear solid and stable enough.
 
Guy,  Welcome!

I watched your video earlier today, before you posted it and was going to share it on the FOG. 

I'm glad you posted it.  A lot of guys still use a table saw and I'm sure this will get some ideas flowing in some of those table saw users heads.

Nicely done.  I like the fact that the MFT can be used as a out feed table for you.  If I still had my table saw I would try to copy what you have done.

Please post more great ideas that you have!

Eric

 
Eric,

  I don't think I could ever give up my table saw. Other than the cabinet projects, I do build fine furniture. So I still feel I have a need for traditional power and hand tools. However I am finding ways with every project to use the TS 55 and guide rail systems in every project. And it will only get better for me with the MFT in my arsenal.

  Cleveland, Oh. Huh? I grew up there and moved to Indianapolis about 13 years ago. There are some things I really miss about that city.
 
Guy, First off let me say  [welcome] to FOG

Glad you became a member!  with ideas like that you will be no doubt be able to contribute a lot and help many people.

Your MFT is great!!! It is obvious that you took your time and thought through all the details. Your reward, a very functional and durable workbench that you will get a lot of great use out of.

Thanks for posting!

John
 
Welcome to the FOG, Guy.  That's several good ideas in how you adapted an 'MFT-like' table to your saw with the guiderail and flexibility.

Is the frame open under the top for clamping, or did you do any kind of supports beyond the legs?

Thanks for sharing!

neil
 
Neil,

  The frame underneath the MFT top is almost completely open. The top sits on a frame, and then the rail attaches to the frame. The legs have pivot points all the way in the corners so they fold up underneath the table for storage. So I guess while not 100% clear underneath, only the outermost corners have a little restriction.
 
guyswoodshop said:
Eric,

  I don't think I could ever give up my table saw. Other than the cabinet projects, I do build fine furniture. So I still feel I have a need for traditional power and hand tools. However I am finding ways with every project to use the TS 55 and guide rail systems in every project. And it will only get better for me with the MFT in my arsenal.

  Cleveland, Oh. Huh? I grew up there and moved to Indianapolis about 13 years ago. There are some things I really miss about that city.

HAHAHA!  I'm so glad you didn't have a Cleveland Browns shirt on when you made the video.....or else I would have sent you hate mail for days!

[tongue]   [big grin]   [smile]   [tongue]

Eric
 
I’ve gotten some emails asking for the specifics and dimensions of the rail for my extension table. The T track is Incra, and can be used with the Festool clamps. The aluminum stock is ¾” by 1/8” thick. To make the stops for the rail positioning mechanisms, I used a slide from Incra that slides into the track, and then it tightens down using a cap screw. The pictures below show the assembled rail, and also the dimensions that everything fits in/on to.

[attachimg=#]

[attachimg=#]
 
Guy and this thread inspired me to make one of my own, and I shamelessly took his ideas:

[attachthumb=#]

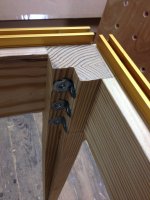
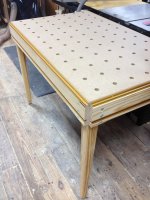
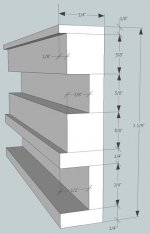
The sides are 2-bys, with grooves routed in the sides for Incra tracks, and the tracks mounted on the top perimeter to hold the top in place.  The top is a 1080 replacement, which is cheaper than an MFT/3 and about the same size.  The legs are 2-bys, ripped and glued up in an L-section to maximize the corner space underneath.  I fastened the legs to the sides with flat-head 5/16" machine screws in tee nuts.  I tapered the legs and chamfered the edges.  The levelers are 5/16" carriage bolts in tee nuts, which I find are easy to adjust with a small wrench. The frame seems to be plenty stiff and stable.  No braces under the top, yet.

[attachthumb=#]

I have the table next to my table saw for use as an outfeed support. I decided not to groove it for the miter gage in order to preserve its strength.  I don't expect to use a cross-cut track, so I didn't provide for it.

Mistakes I confess:  (1) I didn't wait to have the top in hand before I made the table--I was too eager to get it done. I found out that the 1080 isn't exactly 28" x 43" or whatever the literature says.  As a result, I had to trim a bit in order to make it fit. Good news: clamps in the holes near the edge still have plenty of range of motion. (2) I didn't allow enough space for the countersunk screw heads. They come too close to the side tracks. (3) I didn't allow enough space for the tee nuts on the inside of the legs. They fit, but just barely.

Quas dogs are on the way from Bob Marino.  Can't wait!

What a difference between this and the holey homemade rig I've been using.  Thanks, Guy!

Crox
 

Attachments

  • 2013-08-01 19.34.29.jpg
    2013-08-01 19.34.29.jpg
    2.3 MB · Views: 7,881
  • 2013-08-01 18.31.22.jpg
    2013-08-01 18.31.22.jpg
    2.6 MB · Views: 11,974
Looks great Crox! I thought about attaching mine horizontally also. It just worked out better for me and my needs doing mine the way I did.
 
guyswoodshop said:
I’ve gotten some emails asking for the specifics and dimensions of the rail for my extension table. The T track is Incra, and can be used with the Festool clamps. The aluminum stock is ¾” by 1/8” thick. To make the stops for the rail positioning mechanisms, I used a slide from Incra that slides into the track, and then it tightens down using a cap screw. The pictures below show the assembled rail, and also the dimensions that everything fits in/on to.

[attachimg=#]

[attachimg=#]

The drawing for the rail is gone any chance you can upload the drawing again?
 
I don't know how that happened. Anyhow, here it is again. Let me know if you have any questions..

Guy

[attachimg=1]
 

Attachments

  • Rail_Profile.jpg
    Rail_Profile.jpg
    30.7 KB · Views: 16,718
I'm impressed with your DIY MFT design.  My intention is to copy your idea for my shop.  Now that you've had it for a few years, how is it working?  Anything that you would do different?
 
Hi there. I've got no idea if this topic is still followed by people, or maybe I should better ask my question in a new topic?

I'm building a custom workbench, 1 x 2 meters wide by 90cm high. Half of the top will be solid wood, the other half will be in mft/3 style. I want rails on the sides of the mft/3 half, and I'm considering possibilities:

- buy original Festool mft/3 rails and cut them to desired length;
- make (or order) custom rails like Guy has done.

The design drawing that Guy has shown is in inches and I live in Netherlands where we use cm's, mm's, and so on. I am wondering how exact the measures need to be?

For example:

3/4 inch = 19mm sounds like something I can have made, but...
1/8 inch = 3,175 mm is probably too exact.

Is there a tolerance?

Cheers,
Willem
 
Back
Top