You are using an out of date browser. It may not display this or other websites correctly.
You should upgrade or use an alternative browser.
You should upgrade or use an alternative browser.
Custom router bit storage insert for SYS4 Systainer
- Thread starter ryanjg117
- Start date
ryanjg117
Member
- Joined
- May 18, 2015
- Messages
- 328
Chris Wong said:Your rack looks about 50% full. How much does it weigh?
Weight isn't too bad, actually. I'd say it's somewhere around 20 pounds right now. I could probably redesign it to fit into a SYS3 and eliminate one of the decks. I'm kicking around some ideas for an improved design and will include some of those thoughts in a follow-up post.
clark_fork
Member
- Joined
- Apr 7, 2015
- Messages
- 255
The general idea of central storage is good. However, in the design stage, you might consider a means to bring several bits to the work area which might focus on the MFT/3.
What would be handy would be a lift out rectangular tray with T-bolts that would slide onto the MFT/3 side rail.. This would be the place for the "working" router bits used in an operation. This tray would also have 20mm holes to hold dogs in one place This tray might also have a slot to hold the Domino bits.
Perhaps the bottom storage tray could be adapted to store Fortner bits.
On the overall design. Don't forget to accommodate the router wrench. In addition, I think I would rather deal with two SYS2 rather than one heavy multi-tiered SYS4. That way, the SYS2 would slide out of drawer, open and the bits would be right there to select.
PreferrablyWood
Member
- Joined
- Sep 8, 2013
- Messages
- 962
I too would not go for a mega collection in one systainer, a sys 1 and a sys 2 would be more manageable. Also theres plenty of space in the Router Sys for the OF 1010 for the few bits you might need for a specific job. Barring that a Sys combi 2 or 3 could be a workable situation.
I like the insert and the design of you SYS 4 systainer. Capacity is over my needs for the foreseeable future though.
I like the insert and the design of you SYS 4 systainer. Capacity is over my needs for the foreseeable future though.
Daver
Member
- Joined
- Sep 21, 2013
- Messages
- 187
I love the 'replacing' pic. ;D
What a great piece of kit. Thank you for doing the work and I look forward to seeing how your ideas on this evolve.
I use a 1400 and each time I open it, I have to pull out all the bits stored in there and all the accessories just to get to the router.
If anything, I might make a SYS one day for the router only and a smaller SYS for the accessories... and then a third one for the bits.
I work in different places rather than the same shop every day so the time saved packing and unpacking can add up.
I understand people's perspective about doing what you've done in fewer tiers (or in 2 smaller SYS's) but if I were building one I wouldn't be so quick to give up on one big box. As you've said, the larger bits eat real estate, and the weight of 20 lbs or so for all your bits is not bad.
The one thought that did occur to me in terms of removing layers while in the box- you could always drill a finger hole in the center. Maybe not the most elegant, but certainly efficient.
Thanks again. Very cool!
Dave
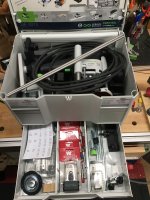
ryanjg117 said:Replacing...

Cheese
Member
Daver said:I use a 1400 and each time I open it, I have to pull out all the bits stored in there and all the accessories just to get to the router.
[member=23629]Daver[/member]
I had the same issue with my 1010 until I stuffed it into a SYS-Combi 3. [big grin]
Attachments
Daver
Member
- Joined
- Sep 21, 2013
- Messages
- 187
Cheese said:Daver said:I use a 1400 and each time I open it, I have to pull out all the bits stored in there and all the accessories just to get to the router.
[member=23629]Daver[/member]
I had the same issue with my 1010 until I stuffed it into a SYS-Combi 3. [big grin]
Very nice!
sigmatango
Member
- Joined
- May 25, 2015
- Messages
- 78
Do you have .dxf drawings or CNC compatible files for this? I suspect quite a few of us would be willing to throw down a few bucks for access to such info...
sigmatango said:Do you have .dxf drawings or CNC compatible files for this? I suspect quite a few of us would be willing to throw down a few bucks for access to such info...
I'd get in on this!!!
jmbfestool
Member
Nice design.
I noticed a few burn marks on the ply edges I assume they are where you are plunging the cutter into the plywood on the cnc. I would recommend 3D entry to increase cutter life dramatically and avoid burn marks.
I noticed a few burn marks on the ply edges I assume they are where you are plunging the cutter into the plywood on the cnc. I would recommend 3D entry to increase cutter life dramatically and avoid burn marks.
ryanjg117
Member
- Joined
- May 18, 2015
- Messages
- 328
I noticed a few burn marks on the ply edges I assume they are where you are plunging the cutter into the plywood on the cnc. I would recommend 3D entry to increase cutter life dramatically and avoid burn marks.
Duly noted. I was using a friend / professional woodworker's CNC machine, and he's using really outdated CAM software (MillRight) and I'm not sure if it's true 3-axis, so not sure if it would support 3D plunge. But I'll look into it.
The marks on the edges are actually from the plys. Even though this is true BB/B baltic birch, I've noticed there are the occasional voids or issues with the inside layers. Probably the most evident in the left-most cubbie in the picture -- you'll see a nice knot that never would have been kept on the outer ply (they would have plugged it).
ryanjg117
Member
- Joined
- May 18, 2015
- Messages
- 328
sigmatango said:Do you have .dxf drawings or CNC compatible files for this? I suspect quite a few of us would be willing to throw down a few bucks for access to such info...
I'm going to re-work the design a bit, before posting any files or offering to produce them for fellow FOGers. Here's what I want to tweak:
1) Make it built for a SYS2 instead of a SYS3 (or offer tiers such that people can put it into any size systainer they desire, just buy a new tier)
2) Alter the design to be stacked, with registration, rather than slid onto tall posts. Better ergonomics and easier to get in/out.
3) Use single 25mm baltic birch decks instead of the overly complicated double-12mm stacks with riser parts.
Stay tuned.
")
Peter-kenny
Member
- Joined
- Jan 23, 2013
- Messages
- 82
I have a interest in one of them if your making some to sell [big grin]
ben_r_
Member
- Joined
- Oct 13, 2015
- Messages
- 1,238
Agreed on all points.ryanjg117 said:sigmatango said:Do you have .dxf drawings or CNC compatible files for this? I suspect quite a few of us would be willing to throw down a few bucks for access to such info...
I'm going to re-work the design a bit, before posting any files or offering to produce them for fellow FOGers. Here's what I want to tweak:
1) Make it built for a SYS2 instead of a SYS3 (or offer tiers such that people can put it into any size systainer they desire, just buy a new tier)
2) Alter the design to be stacked, with registration, rather than slid onto tall posts. Better ergonomics and easier to get in/out.
3) Use single 25mm baltic birch decks instead of the overly complicated double-12mm stacks with riser parts.
Stay tuned.
ryanjg117 said:Bhend18 said:How much would you be selling them for?
How much are you willing to pay? [wink]
Maybe you can paint them red and sell the Idea to Woodpeckers. I smell a "one time tool" deal. I'm guessing you could get $239.95 ea if they are red or $29 if painted yellow
I probably spent about 20+ hours on this design. I'm not really planning on selling them en masse unless I see a lot of interest. But I also need to test the current design and I'm sure I'll have some ideas for improvements.
Peter_C said:Bring the side grips up higher into the Systainer lid. That way they will be above the side of the Systainer allowing them to be grabbed easier, without a major redesign. I made one of my inserts that way. It actually extends up into the ribs of the Systainer lid.
According to my SYS4 systainer model accurate down to ~1mm, the Festool lids only have about 12mm of additional headroom, which varies quite a bit due to the wild plastic ribbing around the perimeter, plus the large recess for the handle. After I get it machined and test it out, we'll see if I can pull them up any higher. Likely I'll be able to move them a smidge higher, but pulling them more inside is probably going to be the route I'll eventually take.
s1301950 said:omg... how is anyone going to have a collection that huge to fill that many holes! so far i only have two round bits, and one trim bits.. in their original packaging, thrown around inside the systainer with its router mate.
Once you get a router table, things change. I built my own Incra table and it's the most versatile tool in my shop, and probably the most accurate to boot. Sure, you'll probably never be able to fill up this entire insert, but in reality, you won't be able to fill all of these slots anyway, since many bits have large profiles that will take up multiple slots.
Cheese said:So...if the center handle didn't go all the way through the section, but stopped 1/8" below the top surface of the top tier, then you could mount a center handle on the top section and use that to remove the top tier. This same operation could be implemented on the middle tier. Only 1 item needs to be modified, the long center handle/post. Only 2 items need to be designed, the new center handle for the top tier and for the middle tier. The outside handles would be used to remove the entire structure, while the center handles would remove each tier/layer. The nesting function would be the same as it is now. Just a thought [popcorn]
I like your general idea. Having each tier be stackable such that people could use SYS2 through SYS5 would increase the versatility. This might be in store for a future design improvement.
Svar said:This is beautiful but hardly practical. Pull out drawer is an ergonomic way to organize bits. SYS2 with a simple one layer, easy to see and reach layout for on site use. With the proposed setup every time you need a bit you have to pull out and disassemble the stack.
I agree, it's not a perfect design. Ideally, you would have one extremely large drawer with enough headroom to hold even your longest bits--but that's going to be a very big drawer. I happened to have a couple spare systainers and was hunting for an excuse to fill them, plus I recently acquired a bit lot of router bits. However, I will note that you're free to put your most frequently used bits on the top shelf, and even your most commonly used longer bits could be tucked in the second shelf, but available through the pass-through so that you wouldn't have to remove any tiers. Only your seldom used bits could be stored on the deeper tiers. As an owner of a Freud glass panel router bit set, I know a thing or two about "seldom used bits." I think I'm probably speaking for others with big router bit collections, too.
sprior said:I was hoping that there is maybe a dxf or svg file around that follows the contours a bit. I didn't just want to model a rectangle. Any extra space around the sides just seems like a chance for the insert to rattle around.
There is--do a search for "systainer bottom insert" and you'll find a FOG'er who modeled both the floor and the lid. I used his work to double-check my own here. We'll see if it all fits later this week, when I go to assemble it.
ryanjg117 said:Bhend18 said:How much would you be selling them for?
How much are you willing to pay? [wink]
I probably spent about 20+ hours on this design. I'm not really planning on selling them en masse unless I see a lot of interest. But I also need to test the current design and I'm sure I'll have some ideas for improvements.
Peter_C said:Bring the side grips up higher into the Systainer lid. That way they will be above the side of the Systainer allowing them to be grabbed easier, without a major redesign. I made one of my inserts that way. It actually extends up into the ribs of the Systainer lid.
According to my SYS4 systainer model accurate down to ~1mm, the Festool lids only have about 12mm of additional headroom, which varies quite a bit due to the wild plastic ribbing around the perimeter, plus the large recess for the handle. After I get it machined and test it out, we'll see if I can pull them up any higher. Likely I'll be able to move them a smidge higher, but pulling them more inside is probably going to be the route I'll eventually take.
s1301950 said:omg... how is anyone going to have a collection that huge to fill that many holes! so far i only have two round bits, and one trim bits.. in their original packaging, thrown around inside the systainer with its router mate.
Once you get a router table, things change. I built my own Incra table and it's the most versatile tool in my shop, and probably the most accurate to boot. Sure, you'll probably never be able to fill up this entire insert, but in reality, you won't be able to fill all of these slots anyway, since many bits have large profiles that will take up multiple slots.
Cheese said:So...if the center handle didn't go all the way through the section, but stopped 1/8" below the top surface of the top tier, then you could mount a center handle on the top section and use that to remove the top tier. This same operation could be implemented on the middle tier. Only 1 item needs to be modified, the long center handle/post. Only 2 items need to be designed, the new center handle for the top tier and for the middle tier. The outside handles would be used to remove the entire structure, while the center handles would remove each tier/layer. The nesting function would be the same as it is now. Just a thought [popcorn]
I like your general idea. Having each tier be stackable such that people could use SYS2 through SYS5 would increase the versatility. This might be in store for a future design improvement.
Svar said:This is beautiful but hardly practical. Pull out drawer is an ergonomic way to organize bits. SYS2 with a simple one layer, easy to see and reach layout for on site use. With the proposed setup every time you need a bit you have to pull out and disassemble the stack.
I agree, it's not a perfect design. Ideally, you would have one extremely large drawer with enough headroom to hold even your longest bits--but that's going to be a very big drawer. I happened to have a couple spare systainers and was hunting for an excuse to fill them, plus I recently acquired a bit lot of router bits. However, I will note that you're free to put your most frequently used bits on the top shelf, and even your most commonly used longer bits could be tucked in the second shelf, but available through the pass-through so that you wouldn't have to remove any tiers. Only your seldom used bits could be stored on the deeper tiers. As an owner of a Freud glass panel router bit set, I know a thing or two about "seldom used bits." I think I'm probably speaking for others with big router bit collections, too.
sprior said:I was hoping that there is maybe a dxf or svg file around that follows the contours a bit. I didn't just want to model a rectangle. Any extra space around the sides just seems like a chance for the insert to rattle around.
There is--do a search for "systainer bottom insert" and you'll find a FOG'er who modeled both the floor and the lid. I used his work to double-check my own here. We'll see if it all fits later this week, when I go to assemble it.
VERY nice design Ryan! Would you be willing to sell the CAD plans for it? (I have my own CNC machine)
Another idea I had along these lines was an insert that would fit into the OF 1400 Systainer. There is a bunch of wasted space
in there on a corner, and I think an inverted cone shape of some sort would fit in nice and hold a collection of router bits. You'd need some sort of swing out leg so it would stand on it's own when removed from the sustainer, but that would be great way to recapture dead space.
ryanjg117
Member
- Joined
- May 18, 2015
- Messages
- 328
Just wanted to let you all know I've spent some time refining the design of the inserts and will be doing a one-time production run. I was able to make most of the changes outlined in this thread.
Check this out if you're interested:http://festoolownersgroup.com/festool-jigs-tool-enhancements/ryan's-sys-stacker-router-bit-storage-insert-for-t-loc-systainers/
Check this out if you're interested:http://festoolownersgroup.com/festool-jigs-tool-enhancements/ryan's-sys-stacker-router-bit-storage-insert-for-t-loc-systainers/
woodbutcherbower
Member
C41PEY said:Interested pm’d
In a 6-year-old thread?
Similar threads
- Replies
- 3
- Views
- 945
- Replies
- 22
- Views
- 3K