clark_fork
Member
- Joined
- Apr 7, 2015
- Messages
- 306
Review
Damstom Panel Clamps
One of the singular advantages of Domino process is the ease with which the dominos align the surfaces when gluing up panels. Woodworking catalogs are replete with many clamping systems that exert both horizontal and vertical clamping pressure to accomplish the panel clamping process. There are commercial systems such as the vertical Plano system but these come with a stiff price. Veritas has a system that depends on shop built parts that you can make yourself.
Recently Rockler introduced yet another clamping system that is less expensive than commercial models and one that does not require constructing your own components.
The system introduced by Rockler now retails for $59.99 for each set and two are required. Why spend money on a clamping system that costs over $120.00 when everyone already has a plethora of clamps and cauls lurking in every shop corner. The quick answer is with the Domino/Damstom system, clamping is a lot simpler and with a few tweaks, The Damstom process not only speeds up clamping and adjusting, the system offers more control over the entire clamping process allowing for quick cleanup of glue squeeze out The Damstom is designed to provide even clamping pressure with the vertical pressure that traditional cauls exert.
Damstom makes four models of its clamping system but at this time only one is available in the United States. Damstom introduced a new model and it is very likely that the current model available from Rockler will be replaced. The new model is selling for about $25.00US more.
If I ordered again, I would purchase the new model which is called the D300 BE, the BE standing for Black Edition. There are three basic models, the newer D300 BE 38” black powder coated model, the D300 38” Silver model and the D200 which is 24”. There is one model that is 38” and that is called the gray or silver model. The newer BE model has upgraded locking knobs and an Acme threaded rod for a faster feed rate. The larger handle makes for easier turning.
The system consists of four parts: There are two 42” rails, two steel bars with one bar having a threaded rod with a one inch clamping head. The second bar acts as stop similar to the fixed jaw on a parallel clamp.
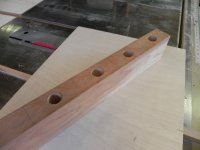
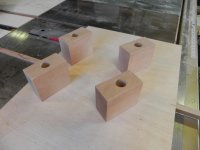
This is one tool where you have to throw out the instruction book. There are some obvious steps, call them tweaks to bring this tool to a workable level. Each set of rails flops around. The company video suggests laying out two parallel cross bars and in the video these seem to 2 x 4’s. That is fine but panel length varies and so you might need several different lengths of cross bars. The problem is simply solved by putting feet on the steel bars. I made mine in a strip with the holes at 1 inch diameter in which the rails seated perfectly. The feet keep the clamps upright and no longer is there a need for a cross bar.
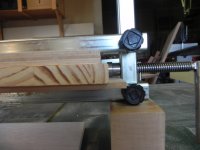
The literature claims the clamping thickness is limited to ¾ inch, the width of the clamping head. Thinner stock such as a cutting board is easily clamped by using a sandwich. I use wax paper when gluing up so with a sandwich, wax paper will protect the surface and the glue line.
The instructions don’t mention the possibility of denting the edge with the clamping head. Best incorporate a simple caul to protect the leading edge of the work surface.
The real advantage of this system is that you can leave the top rail off at the beginning of the process. This way glue up is simple and the clamps can be tightened, let up to tip the panel up to clean off the glue squeeze out, and then set the panel back down. Being able to tip the piece up and check the bottom glue lines is the real plus of this system. When the panel is finally firmed up, glue lines cleaned, the top rail can be dropped into place. Again, I have been using wax paper to protect the glue lines, a belt and suspender issue in my work habits
Clamping is up to 4 ½ inch stock and with some tweaking using a sandwich, you can clamp stock that is less than ¾ but the instructions claim is the limit. The holes in the rail are 1 ½ inch apart which makes adjustment very easy. The pressure is likely the same as a quick clamp or about 450 pounds according to one review.
Setting up is easy. I would estimate glue up from start to finish is less than five minutes. The glue-line clean up feature was the best feature. Try as I might, I can’t think of another use of this clamp other than panel clamping. That is enough, I think, and it does store easily.
I have only seen photos of the upgraded D300 BE. The better rod, more robust knobs and powder coat surface make I look appealing and depending on production quantity, I would hold out for the newer system. There may soon not be a choice. There is some talk that when current stocks of the regular D300 run out, The D300 BE will take its place at a higher cost.
I give Damstom Panel clamps the Clark Fork Four Domino rating.
Here are two links:
Rockler source
http://www.rockler.com/damstom-38-in-panel-clamp
Canadian
http://www.amazon.ca/DAMSTOM-Damstom-D300-Panel-Clamp/dp/B00A55YPYW
[attachimg=1]
Gang layout of feet
[attachimg=2]
Feet with 1 inch holes
[attachimg=3]
Sandwich system of stock less that 3/4 inch
[attachimg=4]
It is possible to leave the top off, tighten, let off, lift up and clean up glue lines, then set the top rail in place.
Damstom Panel Clamps
One of the singular advantages of Domino process is the ease with which the dominos align the surfaces when gluing up panels. Woodworking catalogs are replete with many clamping systems that exert both horizontal and vertical clamping pressure to accomplish the panel clamping process. There are commercial systems such as the vertical Plano system but these come with a stiff price. Veritas has a system that depends on shop built parts that you can make yourself.
Recently Rockler introduced yet another clamping system that is less expensive than commercial models and one that does not require constructing your own components.
The system introduced by Rockler now retails for $59.99 for each set and two are required. Why spend money on a clamping system that costs over $120.00 when everyone already has a plethora of clamps and cauls lurking in every shop corner. The quick answer is with the Domino/Damstom system, clamping is a lot simpler and with a few tweaks, The Damstom process not only speeds up clamping and adjusting, the system offers more control over the entire clamping process allowing for quick cleanup of glue squeeze out The Damstom is designed to provide even clamping pressure with the vertical pressure that traditional cauls exert.
Damstom makes four models of its clamping system but at this time only one is available in the United States. Damstom introduced a new model and it is very likely that the current model available from Rockler will be replaced. The new model is selling for about $25.00US more.
If I ordered again, I would purchase the new model which is called the D300 BE, the BE standing for Black Edition. There are three basic models, the newer D300 BE 38” black powder coated model, the D300 38” Silver model and the D200 which is 24”. There is one model that is 38” and that is called the gray or silver model. The newer BE model has upgraded locking knobs and an Acme threaded rod for a faster feed rate. The larger handle makes for easier turning.
The system consists of four parts: There are two 42” rails, two steel bars with one bar having a threaded rod with a one inch clamping head. The second bar acts as stop similar to the fixed jaw on a parallel clamp.
This is one tool where you have to throw out the instruction book. There are some obvious steps, call them tweaks to bring this tool to a workable level. Each set of rails flops around. The company video suggests laying out two parallel cross bars and in the video these seem to 2 x 4’s. That is fine but panel length varies and so you might need several different lengths of cross bars. The problem is simply solved by putting feet on the steel bars. I made mine in a strip with the holes at 1 inch diameter in which the rails seated perfectly. The feet keep the clamps upright and no longer is there a need for a cross bar.
The literature claims the clamping thickness is limited to ¾ inch, the width of the clamping head. Thinner stock such as a cutting board is easily clamped by using a sandwich. I use wax paper when gluing up so with a sandwich, wax paper will protect the surface and the glue line.
The instructions don’t mention the possibility of denting the edge with the clamping head. Best incorporate a simple caul to protect the leading edge of the work surface.
The real advantage of this system is that you can leave the top rail off at the beginning of the process. This way glue up is simple and the clamps can be tightened, let up to tip the panel up to clean off the glue squeeze out, and then set the panel back down. Being able to tip the piece up and check the bottom glue lines is the real plus of this system. When the panel is finally firmed up, glue lines cleaned, the top rail can be dropped into place. Again, I have been using wax paper to protect the glue lines, a belt and suspender issue in my work habits
Clamping is up to 4 ½ inch stock and with some tweaking using a sandwich, you can clamp stock that is less than ¾ but the instructions claim is the limit. The holes in the rail are 1 ½ inch apart which makes adjustment very easy. The pressure is likely the same as a quick clamp or about 450 pounds according to one review.
Setting up is easy. I would estimate glue up from start to finish is less than five minutes. The glue-line clean up feature was the best feature. Try as I might, I can’t think of another use of this clamp other than panel clamping. That is enough, I think, and it does store easily.
I have only seen photos of the upgraded D300 BE. The better rod, more robust knobs and powder coat surface make I look appealing and depending on production quantity, I would hold out for the newer system. There may soon not be a choice. There is some talk that when current stocks of the regular D300 run out, The D300 BE will take its place at a higher cost.
I give Damstom Panel clamps the Clark Fork Four Domino rating.
Here are two links:
Rockler source
http://www.rockler.com/damstom-38-in-panel-clamp
Canadian
http://www.amazon.ca/DAMSTOM-Damstom-D300-Panel-Clamp/dp/B00A55YPYW
[attachimg=1]
Gang layout of feet
[attachimg=2]
Feet with 1 inch holes
[attachimg=3]
Sandwich system of stock less that 3/4 inch
[attachimg=4]
It is possible to leave the top off, tighten, let off, lift up and clean up glue lines, then set the top rail in place.