Dash-Board Basic Bench crosscut setup

Joined
Jul 27, 2018
Messages
169
Whatever willpower I have keeping me from ordering the Dash-Board Basic Bench and one of the accessory kits has almost completely worn down.  I had promised myself I would be judicious with my tool purchases for a while, but that system just won't stop calling my name.

I do have a question for anyone that's used one.  In a typical setup with a fence and a pivoting guide rail bracket (including Festool's), part of the setup process is to align the rail perpendicular to the fence.  But in all of Dash-Board's videos they align the rail parallel to the dog holes on the work surface - this necessarily assumes that the fence (secured in the t-track on the side of the bench) is perpendicular to the dog holes. 

So my question is this: is there a step (reasonably omitted from the videos for length) that squares the fence to the holes? Or is it just always perpendicular, almost no matter what?

Thanks much.
 
Im assuming since the video shows the top screwed down it either comes this way or the buyer needs to attach the top parallel to the fence but once done it should stay consistent assuming the holes are spot on.  Im a big fan of the Dashboard hinge but the table is iffy.  Im not a fan of how the fence is attached since it looks like it cannot run under the rail without interfering with the hinge. This is a big deal for me. I have tried to cut with a fence that didnt extend under the rail and it is 500x better when it does.  Plus the bench looks a tad narrow (this might just be video) but in order to extend the fence under the rail the fence would need to be brought in more eating up even more valuable bench space on an already narrow'ish top.  I used a TSO MTR for all my squaring tasks of aligning the fence to the rail. Its pricy but fast and works well.  Thats my opinion.  Great hinge but would make my own bench. 
 
Thanks much for the thoughtful input. Excellent points, all.
afish said:
...assuming the holes are spot on. 
Yeah, I guess that's what I'm getting at - they would need to be. With the recent talk of out-of-alignment dog holes (not on this product, but others), I've started wondering.
afish said:
Im not a fan of how the fence is attached since it looks like it cannot run under the rail without interfering with the hinge. This is a big deal for me. I have tried to cut with a fence that didnt extend under the rail and it is 500x better when it does. 
This, I believe they have covered.  When used with their Basic Bench, the mounting plate for the bracket protrudes slightly above the table and is in-line with the fence, so the bracket/mounting plate itself serves as the fence under the rail.
=1s
afish said:
I used a TSO MTR for all my squaring tasks of aligning the fence to the rail. Its pricy but fast and works well.
Ditto, but the PTR. It's fantastic. And I'm happy to go through that process on this bench, but I would want to make sure that sort of alignment/adjustment is possible.
afish said:
Plus the bench looks a tad narrow (this might just be video)...
That's something I've wondered about also.  It's definitely narrower than an MFT/3 or my current self-made tops. It might take some getting used to, but I think I've made my peace with that.  Most of my repetitive crosscuts would be less than the standard 628mm crosscut capacity, plus the Track Stars can extend the capacity.
 
Ah yes, the mounting bracket doubles as a fence I see that now and that's cool, because it does make a huge difference.  I would not cut without it.  I never needed or used a fence to the right so that's wasted on me but I guess some might want it.  The only issue I see is the fence is now 3 pieces which will require those 3 pieces to be perfectly straight.  Im not saying they cant be made to be straight but it could get finicky.  However, it might not be either. It's just something to consider.  This would require the top be screwed down while making sure the extrusion is perfectly straight.  I dont know how rigid or straight their extrusions are. Can it be done? yes. Not trying to dog it, just playing devils advocate.  It actually looks like the best system out there but the width is a big deal for me.  If I still cut on an MFT and had no cnc a 4x8 table would be the smallest I would want.  I understand, this may not be possible for all.  One of my favorite features of having a MFT pre cnc was using it with my LR32 to eliminate the use of those bloody setback bars.  I doubt I could have used my method with the dashboard.  Its hard I always try to look 3 or 4 steps ahead of what I may need.  Everyone has their own needs and challenges for their work flow and what they make. 

I dont see any issue using the dashboard with the TSO MTR the front bracket on the rail can be adjusted or locked down to fine tune or adjust for any out of square issues to the fence.  I'm not sure if they make or offer a stop to insert into the T track to butt the bracket to incase you need or want to remove the bracket for transport or storage.  All in all I think its the best system I have seen if you can work with the width and any tuning issues could be made right if there are any.  I'm not saying the dog holes on the dashboard are or are not perfect but when you use a hinge and fence the dog hole perfection becomes irrelevant if you use or have a good square and the MTR would be just as fast as using those arrow/dog system they show. I would just attach the fence and rear bracket then adjust the rail to square via the MTR and lock down the front bracket. Done, and dog holes dont matter.  If you have the space or dont need to be portable nothing beats a full 4x8 MFT.  If you need either space, portability or both then the dashboard looks real nice to me.
 
afish said:
Its hard I always try to look 3 or 4 steps ahead of what I may need.
I'm compulsive about this, but I often take it to an unhelpful place and end up with paralysis by analysis.
afish said:
If you have the space or dont need to be portable nothing beats a full 4x8 MFT.  If you need either space, portability or both then the dashboard looks real nice to me.
I don't - for the foreseeable future, I'll need to be able to put it away (not daily, but often).  It'll be in a 3 car garage - I don't mind parking in the driveway for stretches of time, but I'm not going to kick my wife's car out, and the third bay is mostly the kids' stuff.

Thanks again.
 
Yea, we dont share the same philosophy on garage space... The garage is man space.  The wife can have the rest of the house as long as she keeps her junk out of my garage.  [tongue] I went through great pains to finish the small attic space above the garage and put in a motorized lift to store all the seasonal junk.  Im like a territorial grizzly when it comes to my garage/shop space.  I understand not all might not.  I started on 2 saw horses with a 2x4 grid.  Have you looked into the other system I have have been seeing posted about here.  Cant remember the name, something with aluminum tubes. Ill try and find it.  Found it called Track tubes looks pretty good for break down system I seen somewhere they have a way to mount the dashboard hinge.  I like the ability to expand if needed.   
 
When I built my workbench, I used the UJK Parf MKII Guide to cut the holes in the top.  I am satisfied, after dozens of checks along the length and width, that the hole pattern is accurate. 

The hole pattern became the basis for the fence and guide rail alignment instead of the side rails.  This does sacrifice a bit of the workbench one-meter width, but I haven't needed that extra bit of width yet.  Most of my crosscuts are with the fence a few holes towards the center of the table so I don't have to reach as far.

Item24-29-L.jpg


Item24-28-XL.jpg


When I set up the Dash-Board guide rail according to a variation of Rob's instructions, and then checked the squareness to the fence using the TSO MTR triangle, I could not put a 0.03mm feeler gauge (the thinnest I have) anywhere along the mating surface of the fence, guide rail or MTR.

Instead of using the dogs and setup arrows as Rob does, I used only the dogs and pushed the guide rail into the dogs for the alignment.  This put the splinter strip where I wanted it.
 
afish said:
Im like a territorial grizzly when it comes to my garage/shop space.

No chance here, which I’m fine with. We spent years at our old house with a 1 car detached garage that we couldn’t park in. Going to the car in the rain, heat, and cold, including loading in the kids (even as babies). Having to go out and start the car early in the extreme hot or cold, etc. When we moved 5 years ago, it took about 1 day of parking in the attached garage to know that I was never going to be able to use the garage as a dedicated shop.

I had more dedicated space in the 1 car garage than I do now in the 3 car. I lost my SawStop cabinet saw (which is still in storage and I need to get around to selling) in favor of a track saw and a contractor table saw.

I have seen the track tubes, and they’re definitely interesting. I’ve considered replacing my 2x4’s with them, but I haven’t invested enough time thinking about it to figure out how I would use the tracks. I have seen a couple of split-top setups that are pretty nice looking.

[member=70363]MikeGE[/member] Thats a terrific bench, and I would certainly aspire to something like that if I could dedicate the space to it.

My parf guide made tops have been great, but what I’m missing is the track on the apron to mount the Dash-Board bracket or a Vac-Sys or clamp something vertically. The dilemma has been whether to make something, buy something really nice like the Dash-Board, or go with a hybrid like the track tubes.
 
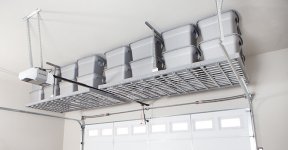
OK, what if you made a 4x8 mft top with sides (apron) so you could have the rail bracket but had a way to raise it up to the ceiling similar to a kayak hoist?  when you wanted to use it you lower it down to some saw horses.

like this
 
I measured this weekend, and I don't think there's room for a 4-foot wide object on a lift. There is just enough space on the ceiling (and clearance to go up and down), but the object being lifted would block some shelves and would be lowered onto the 4-inch concrete lip that runs around the room.  With something as heavy as a 4x8 workbench, I don't love the idea of lowering it onto ground that uneven. 

As much as I would love one, I don't think a 4x8 workbench is in the cards for me until I can put it on the floor (which might be possible in a few years, but not now).

Now, if I could get rid of the garage door tracks, I could do whatever I want...
 
Dr. P. Venkman said:
Now, if I could get rid of the garage door tracks, I could do whatever I want...
What about a side mount garage door opener? Just last Friday I was watching one of Jason Bent's videos of a workshop build in his new house. In that video he showed the garage door opener mod he had done. It deletes the center track, along with the motor (moves it to the side), plus it raises the side tracks. I'll see if I can find the video.
 
Chainring is referring to one of these

Im not sure if Dr P. is talking about the openers track or the doors track.  I have had one of these openers on my radar for awhile and as soon as my current opener stops working I will be getting one. If he has a traditional opener then you would think a torsion shaft opener would open enough ceiling space but who knows. 

Just keep in mind if you had a fairly simple top made from light weight MDF and either some 8020 or Russian birch it shouldn't be very heavy. I would just use some folding saw horses as legs.  But If there's no room there's no room. 
 
afish said:
Im not sure if Dr P. is talking about the openers track or the doors track. 
Both.  The door tracks take up a bunch of room, but the opener itself is (necessarily) past the end of the tracks and adds to the space the doors eat up. And there are three doors, so most of the ceiling is covered by some garage door component. Mine are also lower than they need to be (they're barely above the door opening).

I looked it up and found Jason Bent's video and the LiftMaster opener. That looks terrific.

Something like that LiftMaster (combined with raising the door almost all the way to the ceiling) would open things up a ton. It would shrink the overall footprint of the garage door system somewhat (the door tracks would have the same footprint, but the opener would be gone), and it would create lots of headroom. Anything hung from the ceiling would need to either be clear of or straddle the tracks, but it would be much more doable.
 
No idea of your door size combination. Or how much room you have between the top of the garage door (when open) and the ceiling above it.  Keep in mind as long as you have decent amount of headroom above the doors you should be able to suspend or raise an MFT top there.  You would have to shut the garage door then lower the MFT but once its down you could open the garage door again. There should be plenty of space up there unless you have really low headroom or have built some shelving above the doors.
 
There is about two feet of space above the rails.  Obviously, the opener blocks the area now, but if I were able to put the openers on the wall, the space between (and above) the rails would be available.

My preference, if I were to make changes, would probably be to try to raise and shorten the rails. That would free up enough space that not being able to lift something between the rails wouldn't matter.

Whether or not I'm up for that much work on/investment in the garage doors is another question, but it would be a really nice setup.
 
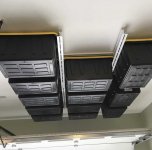
I dont understand why you want to raise the rails.  It does nothing to help storage if anything it ruins any storage options.  I have low headroom. When my door is open there is only about 6" between the top of the door and ceiling and it sucks big time.  If you have 2' I would have a field day with all that and be adding tons of storage up there. You can DIY something like the second pic pretty easy using 2x4 in the shape of an upside down T to create a track for totes to slide. The store bought version actually costs you some height since the track attaches to some unistrut type material.  I get why they do it that way but its going to lower everything 1.5" or so and that could make the difference in the next smaller tote.  You would need to do some figuring and check tote sizes.  It might not matter but it could. Even with the current 2x4 prices its cheap DIY storage. The biggest issue with this system is if you need the tote at the far end you have to remove all the others from that row first but still great to have all that clutter up and out of the way than down on the floor


Attachments

  • Overhead-GG-Menu.jpg
    Overhead-GG-Menu.jpg
    169.8 KB · Views: 300
  • Store-Totes-on-Garage-Ceiling-over-Garage-Door.jpg
    Store-Totes-on-Garage-Ceiling-over-Garage-Door.jpg
    36.4 KB · Views: 321
afish said:
I dont understand why you want to raise the rails.  It does nothing to help storage if anything it ruins any storage options.  I have low headroom. When my door is open there is only about 6" between the top of the door and ceiling and it sucks big time.  If you have 2' I would have a field day with all that and be adding tons of storage up there. You can DIY something like the second pic pretty easy using 2x4 in the shape of an upside down T to create a track for totes to slide. The store bought version actually costs you some height since the track attaches to some unistrut type material.  I get why they do it that way but its going to lower everything 1.5" or so and that could make the difference in the next smaller tote.  You would need to do some figuring and check tote sizes.  It might not matter but it could. Even with the current 2x4 prices its cheap DIY storage. The biggest issue with this system is if you need the tote at the far end you have to remove all the others from that row first but still great to have all that clutter up and out of the way than down on the floor

What are those neat "I-beams", and where do you get them?
 
garage tote storage

You can do the same thing with 2x4's Rip one 2x4 the depth of the lip of the tote plus a little extra for wiggle room then screw it to the trusses with some heavy duty screws then screw a 2x4 to the bottom to form an upside down T The 2x4 system works easier if the trusses are running perpendicular. Just space them as needed for the size totes you needed.  Not sure what 2x4's are costing these days it used to be cheap way to add storage if you have the space. 
 
I just found them on Amazon Its a bit more but they are free prime shipping so thats probably the difference in price.
 
afish said:
garage tote storage

You can do the same thing with 2x4's Rip one 2x4 the depth of the lip of the tote plus a little extra for wiggle room then screw it to the trusses with some heavy duty screws then screw a 2x4 to the bottom to form an upside down T The 2x4 system works easier if the trusses are running perpendicular. Just space them as needed for the size totes you needed.  Not sure what 2x4's are costing these days it used to be cheap way to add storage if you have the space.

[member=73094]afish[/member]  Thanks for this info (as well as your many other useful posts!). At those prices, I'll make my own per your instructions.
 
Back
Top