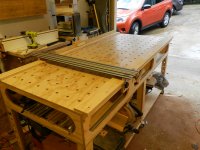
Design ideas needed for shop based 4x8 ft cutting / assembly table

Klemm said:
INCRA parts for home made parallel guide was a creative approach. I'll have to look into INCRA further for special fixture building projects.
SketchUp ability to do animations was news to me. Because of the woodworker oriented set-up in this CAD application I am attracted to using it rather than my full blown SolidWorks. But even though it is intuitive in mmany ways I quickly discovered the learning curve is not a short one. Your reaction serves as a further caution against an unplanned diversion of time into SketchUp when I really want to get going with several woodworking projects including the construction of a full set of wood biplane wings.

I am trying to figure out if there is a relatively simple way to arrive a functionality like the flip-up track hinge on the MFT to get "squar" for crosscuts. I.m thinking I would not need 100 plus dog holes. Just six shoul suffice to get square. I'm anxious to try my hand and find out what I still need and need to learn or know. Your critical comments regarding the  need for MFT hole pattern was helpful. I am thinking a Woodpecker square - is there any other Square more appropriate?

thanks again
Hans

Reading your reply, I feel I need to say that I didn't mean that SketchUp has a lengthy learning curve, but rather the process of creating an animation is what was taxing on my time. Sorry I wasn't more clear. Actually, I found SketchUp very quick to learn. And there are a ton of videos to answer most any question you have along the way. But, it is sometimes faster and easier to delete and redraw mistakes rather than correct them -- yet, the act of correcting things might just teach you more...  [big grin]
 
Klemm said:
as the newbie track saw fella on this forum I see the open collapsible "table" as a way of remining mobiloe on a job site. As the only cutting table in a smaller shop I can't see anything that does not have a surface - with or without benchdog hole pattern.

Let's hear from the open table users what they can tell us
Hans

In addition to being lighter, and therefor easier to transport, there is also a kind of 'need' for these open platforms IF you use the Festool Parallel Guide Extensions -- or, so I understand. See, these Extensions have a lower member that hangs down [almost] requiring cutouts in your cutting table.
 
Each to their own, and i'm not knocking it I just never really understood it
I personally just use folding horses and throw a sheet of what ever im using ontop as a surface
The parallel guides need space under the sheet if you use the narrow extensions but in that situation I just make sure my work suface is no longer that the sheets im cutting which is usually 8' anyway
 
thanks for the enlightening comments about "open" and fold-away tables. The series of pictures help a lot!
Really broadens my understanding as it relates to the different approach with portable FESTOOL equipment vs the traditional stationary power tools or even contractor saws.

And thanks to Corwin for the encouragement regarding SketchUp. I'll go search for more help on youtube in addtion to the study book sold by Taunton Publ.
 
depending on the weight I've seen and plan on using twin slot shelving metalwork to add space to my benches and act as shelves for saws and maybe a detachable router table, cheap and should be strong enough for my needs. another thing I thought of was basically two benches back to back with a slot in the middle to take your two piece cutting boards which can lay on top then stow away again until needed.  if your assembly table is permanent then another idea is to flip the sacrificial board over to present a good side for assembly.

my garage build is to have two mobile benches that I can fix together in good weather to work outside with or slot away under bench tops the rest of the time.
 
I'm following your last suggestion by adding sacrificial surface to the table int he form of 2ft x4 ft sections of 1" Styrofoam suggested earlier in this email string. Then I'll see how it goes with a minimum of additional effort to start with. With some experience I can the see which of the many helpful suggestion hee can be used for the next steps.

thank you much
Hans
 
update: I have used Styrofoam insulation panel quartered for easy handling and storage. Works great with the TS55 over an existing large assembly table variously used by everyone in the shop.
Now I'm working on a quick-and portable setup for square crosscutting.

stay tuned and thanks for the Styrofoam suggestion
 
Here's a couple pictures of my Ron Paulk inspired work surface and cross cutting jig.  It is 3 feet by 7 feet.  That fits my space better and I like a little overhang when cutting sheet goods for clamping.  The whole thing is made of 23/32 pine plywood from Home Depot that cost $30/sheet.  It's pretty nice for pine plywood, comes from Chile.  The top was bored using a Freud 20mm jig, a Woodrazer base form my PC690 and pegboard from HD.  It rolls on 6 totally locking casters I got off eBay.  I put the large electrical conduit tubes in it that Paulk has in his total workstation and workbench so I can hang my extra table saw off it if I want to.  I really like the 9 inch space below the top for tools you need close at hand and would clutter the work surface.  The bottom plywood shelf flexes as I expected it to but I had some tall tools I wanted to be able to put on it that wouldn't fit with supports under it.  It doesn't sag enough to affect function.  I put 3/4 plywood scraps on top when cutting on it.  Due to it's size and the extra space for tools, I think it is much more functional than a MFT.  I made it slightly lower than my table saw so it is an outfeed table too.  I will probably get a roll of 36 inch wide butcher paper to protect the surface when using it as an assembly table. 
 

Attachments

  • Paulk inspired workbench.JPG
    Paulk inspired workbench.JPG
    242.9 KB · Views: 5,146
  • Paulk cross cut jig.JPG
    Paulk cross cut jig.JPG
    237 KB · Views: 5,465
your post comes at a perfect time: just got back from the shop after using the table saw to  square up plywood panels for a pair of tool drawer boxes. Having tried to get satisfactory square and accurate parts with the TS-55 without the benefit of an MFT set of features I am convinced that I need to go that route.
As soon as other projects on my list allow, I plan to replace an existing very old 4x8 assembly table with a completely new table incorporating some of your suggestions along with other pointers.

I like the idea of less than 4 ft width for clamping overhang. I would like to be able to use conventional clamps along the table edge with a 3+inch overhang  unobstructed below. That means the sidepanels you used with the oval openings would need to be set back some.
Are the fence like pieces along both table edges removable?

I'll save your pictures for reference when I get going in earnest - meanwhile thanks for the input.
 
I'm not sure what you mean by "fence like pieces" but the second picture shows the crosscut jig which is removable, it just clamps to the workbench at each end.  The first picture is just the workbench and the only loose pieces are the tools sitting on and under it.

I don't think you really need an overhang for the top, however.  The vertical ribs are only about 1.25 inches wide where they are cut out so that plus the top means you have to clamp 2 inches plus what you are securing.  But in most instances, I do not clamp this way.  One of the big advantages of all the holes in the top is you can insert a clamp in them and clamp there.  I use a couple grizzly track clamps because I got them for $25 (for two) at Christmas time.  I also have a couple HF quick clamps that I modified and use (take the fixed jaw off, heat the bar to cherry red about 2-3 inches back from the tip and then twist it and turn it 90 degrees (to make a new fixed jaw).  Cost for those is really, maybe $5 each.  You can use Festool clamps but they are $30 or more each.  DeWalt track clamps won't work but Makita probably will.  Anyway, I mostly clamp to the workbench surface using the holes, not out along the edge.  But if I want to clamp along the edge I can.

The crosscut jig is an important extra.  It has a movable stop for repeat cuts and will reliably cut 3 feet pieces square.  Only takes a couple minutes to put on and off the bench.  The combination of the bench and crosscut jig really increase the usefulness of the track saw.  Much the same functionality of a MFT but much larger and cheaper. 
 
thanks for clarifying.
removable crosscut jig is clearly the way for me to go
 
I just came across the "Emily Adams Parallel Guide" design on Ron Paulk's site. That answers my question for a more accurate/reliable way of measuring from the cutting edge of my guide rail to the reference edge of the material on the opposite side of the guide rail. That is the most accurate design I have yet seen. Machining the needed parts will give me a durable tool. I'll find other uses for my Incra tracks I bought to go with my SENECA parallel guide tool.

Hans

PS: I changed my avatar to something reflecting more what I am involved in - but still the same guy :)
 
JimD said:
I'm not sure what you mean by "fence like pieces" but the second picture shows the crosscut jig which is removable, it just clamps to the workbench at each end.  The first picture is just the workbench and the only loose pieces are the tools sitting on and under it.

I don't think you really need an overhang for the top, however.  The vertical ribs are only about 1.25 inches wide where they are cut out so that plus the top means you have to clamp 2 inches plus what you are securing.  But in most instances, I do not clamp this way.  One of the big advantages of all the holes in the top is you can insert a clamp in them and clamp there.  I use a couple grizzly track clamps because I got them for $25 (for two) at Christmas time.  I also have a couple HF quick clamps that I modified and use (take the fixed jaw off, heat the bar to cherry red about 2-3 inches back from the tip and then twist it and turn it 90 degrees (to make a new fixed jaw).  Cost for those is really, maybe $5 each.  You can use Festool clamps but they are $30 or more each.  DeWalt track clamps won't work but Makita probably will.  Anyway, I mostly clamp to the workbench surface using the holes, not out along the edge.  But if I want to clamp along the edge I can.

The crosscut jig is an important extra.  It has a movable stop for repeat cuts and will reliably cut 3 feet pieces square.  Only takes a couple minutes to put on and off the bench.  The combination of the bench and crosscut jig really increase the usefulness of the track saw.  Much the same functionality of a MFT but much larger and cheaper.

Thanks for clarifying the crosscut arrangement! Together with some YouTube videos I can see this as a very good approach.
 
Back
Top