desk with radius

Crazyraceguy

Member
Joined
Oct 16, 2015
Messages
4,901
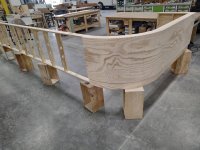
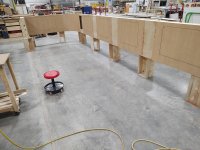
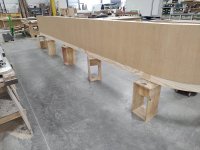
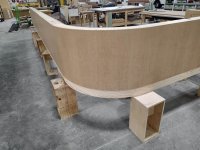
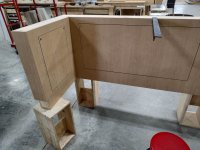
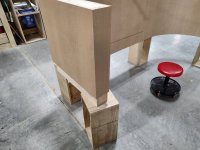
I haven't done one in a while, but this came up today. It's just the preliminary frame and one section of outer skin, but I didn't get started until nearly lunchtime.

[member=3513]PaulMarcel[/member] I did get some video of the actual kerfing process (I didn't forget you, it just wasn't needed until now) but I'm not sure if or how it can be shown here?

I'll try it with the rest of the pictures, if not more research is required...lol

Yeah, that's not going to work, it's way too big. Can anyone help?
 

Attachments

  • Hillnch.jpg
    Hillnch.jpg
    436.9 KB · Views: 261
  • Hillnch2.jpg
    Hillnch2.jpg
    314.8 KB · Views: 192
Ooh, special!

I'd love to see the video as I'm sure some others. Not sure either how to do it in this decidedly obtuse forum software.

Especially interesting after seeing that other thread about the Mafell saw that has a kerfing blade that does 3 cuts at once.
 
In order to share you would need to host it elsewhere and post a link here.  YouTube comes to mind.

Peter
 
PaulMarcel said:
Ooh, special!

I'd love to see the video as I'm sure some others. Not sure either how to do it in this decidedly obtuse forum software.

Especially interesting after seeing that other thread about the Mafell saw that has a kerfing blade that does 3 cuts at once.

Oh, I missed that one. Three kerfs at once would be cool, but how is the spacing determined and then indexed to repeat?

I have 2 videos. One is a narrow board for testing depth and the second is the actual 24" wide piece on the wall pictured above.
they are 13 and 18 mb respectively, so I guess I will need to figure out how to host them somewhere.
 
[member=297]Michael Kellough[/member] Not really, depending on how well it is supported. I always use more vertical studs around a radius than it straight sections and the curve itself kind of stiffens the panel. It is supported on top by the plate and at the bottom by the toe-kick in this case. Most of the time the toe-kick off-set is deeper than this one, so a bottom horizontal rail runs across there, supporting the bottom.
It is surprisingly stiff, once it's all glued up.
You can see on the inside pic, that I ran too many kerfs on the toe-kick piece. I think I did 48 and in only needed 36, so I reduced it for the main part.
Once I figure out how to host it, you will see how fast it happens.
 
Crazyraceguy said:
Oh, I missed that one. Three kerfs at once would be cool, but how is the spacing determined and then indexed to repeat?

I wondered the same. I'm sure the indexing is something that fits in the last kerf and acts as a fence for the guide placement or other similar thing. But spacing the blades seems like they'd need a Dial-a-Dado type mechanism to adjust them. I've only done kerf-bending a couple of times to experiment and did a spacing based on a calculation so the open ends would touch when bent at the correct radius since it seemed to provide the most support. I'm sure there are tables with that stuff somewhere.
 
I think I have it figured out. Well, apparently not? They are on Youtube and I copied the links, but nothing happens? Now I have the links showing, but no video? Ok, finally got it. Thanks to [member=70363]MikeGE[/member] tutorial
[member=3513]PaulMarcel[/member] here it is.

You can't really see much.....you know safety. That aluminum bar across the front is the trigger. It rides at the same height as the sheet being cut. If anything holds it up more than a couple of millimeters, ti shuts down.
The 5" depth test strip, cuts off at 10 total length. I am holding the protective screen up.

The 24" panel for the wall.
 
Crazyraceguy said:
I think I have it figured out. Well, apparently not? They are on Youtube and I copied the links, but nothing happens? Now I have the links showing, but no video? Ok, finally got it. Thanks to [member=70363]MikeGE[/member] tutorial
[member=3513]PaulMarcel[/member] here it is.

You can't really see much.....you know safety. That aluminum bar across the front is the trigger. It rides at the same height as the sheet being cut. If anything holds it up more than a couple of millimeters, ti shuts down.
The 5" depth test strip, cuts off at 10 total length. I am holding the protective screen up.

The 24" panel for the wall.


Change the "/video/" to "watch?v=" in the link:


and

 
That's a cool saw. I love seeing the full industrial tools in action. Even the big drawer manufacturer here around Queen Creek area doesn't seem to have as much big stuff like that. They did, however, have a very cool conveyor system that would slather UV-cure finish on in one booth, into a dryer, into the UV-curing booth and that stuff even a RAS couldn't mar.

Still would like to see how that Mafell 3-kerf cutter indexes. Might be something that could be McGyvered for the TS-55/60/75. I admit I didn't have time that day to dig for details. My wallet also stated that was prudent.
 
It appears that the multi-cutter "indexes" with a ruler and pencil.

The 54-55-ish second mark in the promo video:
=55s
 
LazyGretlWoodWorks said:
Goodness that looks... big. How are you going to transport that?

Usually in pieces, but not always, based on what CRG has posted in the past.
 
PaulMarcel said:
That's a cool saw. I love seeing the full industrial tools in action. Even the big drawer manufacturer here around Queen Creek area doesn't seem to have as much big stuff like that. They did, however, have a very cool conveyor system that would slather UV-cure finish on in one booth, into a dryer, into the UV-curing booth and that stuff even a RAS couldn't mar.

Still would like to see how that Mafell 3-kerf cutter indexes. Might be something that could be McGyvered for the TS-55/60/75. I admit I didn't have time that day to dig for details. My wallet also stated that was prudent.

Hey Paul, now that I have the video thing somewhat figured out, I think I will do one showing the gantry crane with the vacuum lift arm. It can deliver sheet as large as 5' x 12' to either the saw or the infeed rollers of the CNC machine. It's kind of mesmerizing to watch it go about it's business, like when I need a sheet that is part-way down a stack. It will pull everything off, spreading it around multiple other stacks, until it reaches the one you asked for. It tries to keep the "mixed" stacks at the same height, though there are dedicated stacks with only one type of item in them.
My RAS is capable of using 36 grit flap wheels.....challenge accepted.  [big grin]
We have a big spray booth, but no UV curing material. We generally use Pre-cat Lacquer or conversion varnish. Once in a while, someone will spec a water-based finish, but not as often as you would think.

I got most of the inside finished today. It will be an easy 1/2 day tomorrow, all that is left is the laminate on the outside. The solid surface guys got started on the top today too. It gets matching 16' wide file cabinets in those open areas between the access panels.
 

Attachments

  • Hillnch3.jpg
    Hillnch3.jpg
    436.6 KB · Views: 66
  • Hillnch4.jpg
    Hillnch4.jpg
    345.9 KB · Views: 56
  • Hillnch5.jpg
    Hillnch5.jpg
    387.2 KB · Views: 61
LazyGretlWoodWorks said:
Goodness that looks... big. How are you going to transport that?

It comes apart into 3 pieces. They are still going to be "big" though, by most people's definition.
The curved end separates right past the radius, and then there are 2 straight sections that are slightly under 9' each. I usually post pics of things like this when they get broken down.
 
Crazyraceguy said:
LazyGretlWoodWorks said:
Goodness that looks... big. How are you going to transport that?

It comes apart into 3 pieces. They are still going to be "big" though, by most people's definition.
The curved end separates right past the radius, and then there are 2 straight sections that are slightly under 9' each. I usually post pics of things like this when they get broken down.

Ah, gotcha!

[thumbs up] [thumbs up] [thumbs up]
 
squall_line said:
It appears that the multi-cutter "indexes" with a ruler and pencil.

The 54-55-ish second mark in the promo video:
=55s


That's very cool and very specialized, but if it could benefit your operation, I'm sure it would sell.
The whole turning a radius to inlay that tubing was cool, as well as the V-groove, plus the multi-kerf, fantastic. I bet they get a serious chunk of currency for it too, with all of those nifty accessories as extras. 
 
Done, but not taken apart yet. The solid surface guys might want to test fit the top, so I'll leave it until it gets in the way.
 

Attachments

  • Hillnch6.jpg
    Hillnch6.jpg
    419.8 KB · Views: 60
  • Hillnch7.jpg
    Hillnch7.jpg
    330.6 KB · Views: 67
  • Hillnch8.jpg
    Hillnch8.jpg
    275.6 KB · Views: 63
  • Hillnch9.jpg
    Hillnch9.jpg
    275 KB · Views: 63
Do the installers ever prank you with a phone call, "dude, you built it turning to the right, but it needs to turn to the left!"
 
Back
Top