DF 700 Domino question for conference table

Brian247028

Member
Joined
Feb 17, 2023
Messages
9
Hello,

First post and been doing basic woodworking for a couple years. I've been asked to make a 4' x 8' conference table that is 1.5" thick out of hard maple.

To help with the alignment of the boards I picked up the DF700 as everything I typically make is 1-2" thick.

I have 2 questions.

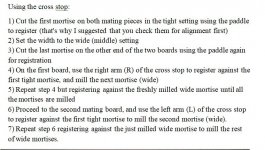
1) When testing out the machine I used the two width settings for how tight the hole will be for the domino. The normal setting was good but I was surprised at the amount of play with the wider setting. 

As I will be doing dominos the entire length of the board I was informed to do the first hole at the smallest setting for alignment and then use the wide setting for the remainder so that it's easier to get the boards glued together. Does this make sense? My concern is just how loose the dominos are at the wide setting.

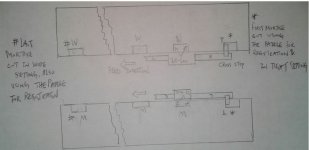
2) I was going to place dominos every 12" but that means I have to eyeball the mark. I may be better off using the black guides at the widest setting to go from there.

Any input would be greatly appreciated as I feel I am in over my head but we all need to learn at some point.

My main reason for getting the DF700 was to help keep the alignment on the top flat. I was told even when doing the wide setting while it will be loose the height doesn't change so the top will be flat.

Thanks
Brian
 
Welcome to the FOG!

I've used my DF700 on two projects that required joining two-meter long slabs of thick oak boards.  After jointing and planing the boards, I aligned the boards where I wanted them to match and made pencil marks about every 300mm along the length of each joint.  On one board, I used only the tight (narrow) setting for all of the holes.  On the other board, I used the tight setting for the first hole and the loose (wide) setting for the rest of the holes.  This ensured the boards would be aligned where I wanted them and any deviations in my work would not be an issue during glue up.

I was tempted to use the wide setting for all but the first holes in each slab, but decided to use narrow and wide.  The end result in each project was a great fit and easy assembly.  The lateral movement of the tenons does not affect (as far as I can tell) the vertical movement of the slabs.
 
As MikeGE said, mill one board with the narrow setting, and the mating board in wide setting EXCEPT the first mortise in narrow setting for alignment purposes. That means start with the narrow setting and only change it after cutting all the mortises on the first board and the first mortise on the mating board (remember that for the DF700, you switch off the machine before changing the width setting (for the DF500, it's the opposite)).

By "black guide," do you mean the cross stop?

It's an indispensable tool for me because it eliminates marking placement lines in larger work. However, no instructions come with the cross stop, and many people may find the mortises out of alignment in using it and give up as did this fellow:=240

If you follow the proper procedures, all the "problems" he suggested don't exist. This is how I do it with my DF500 (print it out and try it on some scraps if you want):

[attachimg=1]
[attachimg=2]

The Domino Joiner does a lot more things than aligning boards. You may buy the third party adapter to use the DF700 with the smaller cutters like a DF500 too. Once you've mastered the cross stop, you can use it on joinery work (e,g, butt joint in casework, etc.).

Remember this: When using the cross stop, only use the tight setting (with the paddles/spring stops) for the two "alignment mortises," the rest in the wide setting.
 

Attachments

  • Using the cross stop1.JPG
    Using the cross stop1.JPG
    89.3 KB · Views: 559
  • Using the cross stop2.JPG
    Using the cross stop2.JPG
    45 KB · Views: 547
I always use tight mortises on one board and wide on the other side. Leaves room to tap the two into perfect alignment.

I join the boards in twos first rather than try to get everything lined up in a rush. This allows me to run the two joined boards through the planer.

I add boards one at a time. I hate emergency pulling boards apart because of a mistake.

My biggest challenge on really wide glue-ups is flattening the assembly. Also, I often need a helper to move the assembled piece. I do the glue-up on a cheap door I get from Home Depot. It’s perfectly flat. Use waxed paper under the boards. 

If the ends don’t line up perfectly, you can trim them with a track saw. Just don’t put Dominos close the either end. About 1.5” back from the ends works for me. You do not want to expose a mortise by trimming the ends.
 
+1 for doing tight setting on one side and just the first on the second side, with the rest on the wide setting. I use the Frontline panel clamps so never have an issue with flattening the panels. As much as I absolutely love using the Dominos, I also really love my panel clamps!

The two combined make doing panels a trivial exercise with perfect results every time.
 
Thank you everyone for the feedback. I was thinking about doing the one board on tight setting and the other board on loose but I didn't know how that would work using the cross guide.

@ Chuck S - Yes my black guide is the cross guide. Still learning the terminology.. What I call holes are actually mortises... ha ha. It will come little by little.

[member=75933]luvmytoolz[/member] - Those clamps look nice and I can see how that would allow perfect alignment.

Appreciate all the help from everyone.
 
Birdhunter said:
snip.

My biggest challenge on really wide glue-ups is flattening the assembly. Snip.

Indeed, flat panel glue-ups (over 3 ft wide) need a lot of preparation and work.

Many people reported great success in the use of the Peachtree Woodworking Supply 2 Pack of 4 Way Pressure Clamps (well under $100 US on Amazon for two packs). One fellow even used steel tubes instead of 2x4s (lumber ripped in half) -https://m.media-amazon.com/images/I/71mthC+Hq5L._SY88.jpg

I don't have the 4 Way system, but have made my own system with 10-foot strut channels from Lowe's (something like this:https://www.lowes.ca/product/condui...916-in-x-1-18-in-slots-on-2-in-centers-957661).

In 2020, it cost me $35.50 Cdn (using a $10 coupon) to make four 5-ft long steel clamping cauls (two 10 ft channels cut in half), bolts and washers were extra:

[attachimg=1]

[attachimg=2]

I think I first saw the steel tube/channel clamping caul idea in a Fine Woodworking tip (but not this one:https://www.finewoodworking.com/2018/04/17/268-workshop-tip-angle-bars-tame-big-panel-glue-ups ).


Attachments

  • panel0.JPG
    panel0.JPG
    42.9 KB · Views: 482
  • panel1.JPG
    panel1.JPG
    27.3 KB · Views: 468
Brian247028 said:
Thank you everyone for the feedback. I was thinking about doing the one board on tight setting and the other board on loose but I didn't know how that would work using the cross guide.snip.

Just came across this Australian video (Start from 4:20):

 
Sounds like you’re concerned with getting the mortises to match (line up) across the joint between the boards.

The advice to make all mortises tight on one board and mostly wider on the other is good.

I hardly ever use the cross guides since following simple pencil marks is trivial when the wider mortises provide a comfortable amount of slack for fitting. Also, seeing the pencil marks assures me that I’m in the right location, eliminating any worry that I’ve made some mistakes positioning the cross guide.

Maybe you need some advice on making the marks?

To make the marks clamp the two boards together with the figure aligned the way you want and then make pencil marks about every 8 inches.
The finer, straighter, and squarer the line is to the joint the better.

On the tight mortise board try to get the machine’s cursor matched exactly with each line.
Then do the same for the first mortise on the second board, but make it the mortise that is opposite the last mortise you made on the first board, made after you’ve had some practice making the previous mortises.
That first mortise on the second board is the only one on that side that really has to really have to match the line.

After that, turn the machine on again and switch the mortise selector to the medium setting.

Then make the rest of the mortises in the second board. With these you can be more relaxed with the positioning (+/- 1mm) since the medium setting makes a mortise about 5mm wider than the Domino.

I’ve never used the widest setting for it’s intended purpose, which I suppose is for use with the cross stops when making a very long joint when spacing is likely to get increasingly off.
 
Michael Kellough said:
Snip.

I’ve never used the widest setting for it’s intended purpose, which I suppose if for use with the cross stops when making a very long joint when spacing is likely to get increasingly off.

As of today, due to the lack of instructions from Fesotol. it's still a mystery to me what the widest setting (which is 10mm wider than the narrow one) is really for. I have used it to cut slots (e.g. for the cabinetmaker's buttons). The DF700 doesn't have the widest setting, even though it shares the same cross stop.

The longest boards I've used the cross stop on are 6 feet long or so, employing the narrow and wide (middle) settings. Will the widest setting be needed for using the cross stop on, say, 10-foot boards? I have no idea, but maybe one day, I can at least try with some 1x8 scraps to see if the narrow/middle combination is good enough (my neighbor underwent a house renov. during the first pandemic year, and a huge lot of good quality 2x8 was thrown away. I still regret that I didn't take some of them at that time).
 
ChuckS said:
Indeed, flat panel glue-ups (over 3 ft wide) need a lot of preparation and work.

Many people reported great success in the use of the Peachtree Woodworking Supply 2 Pack of 4 Way Pressure Clamps (well under $100 US on Amazon for two packs). One fellow even used steel tubes instead of 2x4s (lumber ripped in half) -https://m.media-amazon.com/images/I/71mthC+Hq5L._SY88.jpg

I don't have the 4 Way system, but have made my own system with 10-foot strut channels from Lowe's (something like this:https://www.lowes.ca/product/condui...916-in-x-1-18-in-slots-on-2-in-centers-957661).

In 2020, it cost me $35.50 Cdn (using a $10 coupon) to make four 5-ft long steel clamping cauls (two 10 ft channels cut in half), bolts and washers were extra:

[attachimg=1]

[attachimg=2]

I think I first saw the steel tube/channel clamping caul idea in a Fine Woodworking tip (but not this one:https://www.finewoodworking.com/2018/04/17/268-workshop-tip-angle-bars-tame-big-panel-glue-ups ).

Most of those sets that claim to be a 4 way clamp really aren't. Over the years before I settled on the Frontline clamps I did a lot of testing with various panel clamps including Plano (which I grew to hate) and the ones like the Veritas style where you used timber.

Generally the issue was the more you tried to flatten the panel the more the frame bowed or twisted requiring further clamps for alignment, for smaller stuff that doesn't matter, but the bigger you go the more pronounced the issue. Similar to the way steel sash clamps bow when tightened. The pressure applied to the top and bottom I found was incidental to the edge pressure. And in the case of the Plano clamps which are supposedly the best available for the hobbyist market, they produced very sub par results, and when I did anything substantial, I still needed a bunch of clamps to keep it flat.

The Frontline clamps however are an absolutely ingenious design that first applies pressure on the faces due to the angled/slotted mechanisms, before any pressure is applied to the edges. That is a true 4 way clamp. Not real cheap by any means, but a fantastic investment and amazing time saver.

I see a lot of people making the wood clamps, or even using square steel tube, but still have to use a bunch of F-clamps to keep it all flat.

The one you made using the struts is definitely the better way to go about it with the higher side walls to counter bowing/flexing.
 
luvmytoolz said:
Snip.
I see a lot of people making the wood clamps, or even using square steel tube, but still have to use a bunch of F-clamps to keep it all flat.

The one you made using the struts is definitely the better way to go about it with the higher side walls to counter bowing/flexing.

Where did you get your Frontline system? The Amazon's price here seems to be out of reach for most amateurs who don't do that many large panels:https://www.amazon.com/Frontline-Wood-Clamp-System-Flatten/dp/B07CJKSLPV

I found this video about the Frontline system:

I went down to Lowe's to examine the struts to get the ones that were either dead straight over their length or, better, slightly convex in the center (flat side).
 
ChuckS said:
luvmytoolz said:
Snip.
I see a lot of people making the wood clamps, or even using square steel tube, but still have to use a bunch of F-clamps to keep it all flat.

The one you made using the struts is definitely the better way to go about it with the higher side walls to counter bowing/flexing.

Where did you get your Frontline system? The Amazon's price here seems to be out of reach for most amateurs who don't do that many large panels:https://www.amazon.com/Frontline-Wood-Clamp-System-Flatten/dp/B07CJKSLPV

I found this video about the Frontline system:

I went down to Lowe's to examine the struts to get the ones that were either dead straight over their length or, better, slightly convex in the center (flat side).


I actually bought them direct from the manufacturer (that's the inventor/owner Con Anton in the video you linked) who was only 30mins or so away here in OZ, and the owner himself delivered them and showed me how they work. I very unfortunately bought a set of Planos after using sash clamps for some years, but was pretty disgusted in the cost for the quality and results, and felt pretty ripped off, so bought the Frontlines after seeing several reviews. They are more expensive definitely, but in OZ pretty much anything decent is expensive. But the amount of engineering in these is just unreal. I actually wrote up a review, of particular note is the end shot of a Plano and a Frontline, illustrates the difference and value very well:
https://www.woodworkforums.com/f171/frontline-clamps-review-236095

I've used mine heaps over the years and couldn't even begin to imagine the amount of time they've saved me. That's why you very rarely ever see them for sale second hand, people tend to hang onto them once they've tried them. Given the Aussie dollar is so crap now it might possibly be economical to buy direct from Con? Don't know if the shipping would be prohibitive but I know he does sell world wide so it can't be too bad?

Having a bow to give a caul effect for the struts would be good.
 
As you suggested, I went over to the Frontline site, and found this:

1220mm capacity: AUD 360.00 + GST for one clamp

Based on this:  Box Size: 1550mm x 170mm x 90mm Weight: 11.7 kilos each. the shipping cost for one box was $355 AUD from one of the Google quotes.

It seems that the Amazon price of $949US is more or less what one in North America might expect to fork out for a pair of the clamps.
 
ChuckS said:
As you suggested, I went over to the Frontline site, and found this:

1220mm capacity: AUD 360.00 + GST for one clamp

Based on this:  Box Size: 1550mm x 170mm x 90mm Weight: 11.7 kilos each. the shipping cost for one box was $355 AUD from one of the Google quotes.

It seems that the Amazon price of $949US is more or less what one in North America might expect to fork out for a pair of the clamps.

Being outside OZ you wouldn't pay GST, but that shipping is way high even with the OZ dollar so bad now! Con must have cheaper methods though as he does ship world wide quite a bit. I think he also has a US distributor, which might be the Amazon seller you saw?
 
luvmytoolz said:
Snip.
I see a lot of people making the wood clamps, or even using square steel tube, but still have to use a bunch of F-clamps to keep it all flat.
Snip.
Most woodworkers don't have deep throat F-style clamps because they're expensive (a 10" deep reach Bessey clamp is $100 US or so). I'm lucky to have picked up half a dozen second-hand F-style clamps (14" deep reach) from a welder who was retiring:

[attachimg=1]

The red one in the photo has a 5" reach, the deepest kind I owned before I got the welder's ones (https://www.leevalley.com/en-ca/shop/tools/hand-tools/clamps/bar/31197-heavy-duty-deep-throat-fast-acting-clamps?item=03F0512)


Attachments

  • deep reach 14.JPG
    deep reach 14.JPG
    59.5 KB · Views: 424
Another tip on wide panels is to use only quarter sawn boards. They don’t cup and the seasonal shrink and expand movement is minimal. My favorite wood is quarter sawn white oak. Great honest wood.

If you can’t get quarter sawn boards, alternate the growth ring patterns. Look at the ends of the boards to see the patterns. Match one curving up to one curving down.

The panel width is likely to change with humidity. Plan for that.

Finish the bottom of the panel exactly as you do the top. This will minimize cupping.
 
[member=57948]ChuckS[/member]

Are you saying that the wide setting on the DF700 is the middle setting on the DF500? I know the DF500 has 3 settings to control the width where as the DF700 only has 2. I was wondering which one was missing. I assumed it was the middle setting however your statement makes me believe it's the widest setting on the DF500 that is missing.
 
Brian,

This is what I've written down, but it has been a long while since I last used a DF700:

DF500 - Tight (mortise width as per cutter used), middle: +6mm, widest: +10mm

DF700 - Tight,  wide: +3mm.

Please check your manual to verify that.
 
Thanks Chuck!

In my reply I was thinking of the 500 machine. Didn’t know the 700 is that different.
Seems like experience with the 500 informed the design of the 700, a good thing.

Since the wide setting on the 700 is only a little wider than the tight setting I’d advise you to aim for the mark even when using the wide setting.
 
Back
Top