- Joined
- Oct 23, 2018
- Messages
- 6
We’ve been asked to put together an article giving advice on our products and maybe diamond tooling products in general. Hopefully this will answer some of the more common questions and start a thread on which questions can be posed that I’ll do my best to answer.
About 4 years ago we were approached by a joinery company that explained they like to install their own granite work tops but using carpentry equipment. It was an odd request and we explained that in most cases there will be at least some requirement for wet processing but they were adamant it had to be all done dry. At this point we had no idea who this company were, they collected all the products from us, we never mailed anything out. We also found out at a later date we weren’t the only company they were contacting in this manner.
We were given specifications of tools that they wanted blades to fit, mainly the Festool TS55 along with some other items. So we put together tool packages for them to test and fitted reducing rings where required, we gave them technical advice when asked and solved problems where we could. Eventually they went ahead offering these products and they rolled out into 600 stores around the UK and some in Europe. They then did the same exercise with man made quartz. At the same time we were approached by two other manufacturers – Bushboard and Max-Top who had seen what we were doing for the first company so we also put together tooling for some of their products, blades, router bits and polishing pads etc.
So that’s a brief background of how we ended up offering these products and It’s still a work in progress. When we’re presented with a problem we figure out a way of making something or repurposing something to solve the problem.
Things to understand when using a Diamond blade in a track saw when cutting hard materials.
Before we go through an explanation of what blade to pick or how to use it, understand that a track saw is generally cutting a work piece in the wrong direction when it comes to stonemasonry or tiling work. Any track saw or circular saw is designed to be pushed and the blade rotates to cut up through the work piece as it’s pushed. Compared to most tiling or stone application where a grinder or wet table saw would be used with the blade cutting in a downward motion and the tool pulled backwards through the work piece or the work piece pushed flat along a bench into the blade itself. There is an exception to this, FLEX make a product called a CS60WET, it’s a powerful track saw with a water feed. It works the same way a TS55 would but wet and with much more power and a 170/180mm blade. The water helps reduce (but not eradicate) breakout/chipping. It is a very effective piece of equipment and is effectively a portable bridge saw with a 3200mm+ cutting capacity.
We currently offer three types of blade to fit a track saw.
150mm Laser Welded segmented – This blade is designed to cut reinforced concrete, it will also cut granite, quartz and 20mm thick external porcelain. It is aggressive and there will be breakout/chipping but it will pretty much cut anything that’s hard, dense or abrasive.
150mm Economy Blade – This is a general purpose turbo fine design blade that would be used for slate, marble, limestone, lighter weight concrete slab general building work but with a reasonably fine cut. It works great in thinner quartz material or as a blade to use for one job and throw away.
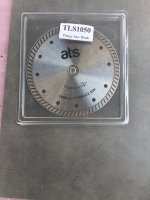
160mm Pro Blade – This is designed for Porcelain. We found that Thin porcelain blades produce by far the best quality cut in man made quartz engineered stone. It will work to a degree on granite but the segmented blade is much more effective.
Incidentally, when we were developing this product line we got in touch with Festool UK directly (also the head office in Germany) to find out what the warranty situation was on their machines. It was pretty non committal to be honest with the suggestion that all warranties are void if used in this manner. However, we were informed that TS55’s were actively marketed (along with other products) in Germany for the stonemasonry industry and that they are provided with full factory support. So it appears warranty issues could well be a regional thing.
I’m conscious this article is growing in size so I’ll leave it there to start with and open the thread for questions if anyone has any. I’ll do my best to answer.
About 4 years ago we were approached by a joinery company that explained they like to install their own granite work tops but using carpentry equipment. It was an odd request and we explained that in most cases there will be at least some requirement for wet processing but they were adamant it had to be all done dry. At this point we had no idea who this company were, they collected all the products from us, we never mailed anything out. We also found out at a later date we weren’t the only company they were contacting in this manner.
We were given specifications of tools that they wanted blades to fit, mainly the Festool TS55 along with some other items. So we put together tool packages for them to test and fitted reducing rings where required, we gave them technical advice when asked and solved problems where we could. Eventually they went ahead offering these products and they rolled out into 600 stores around the UK and some in Europe. They then did the same exercise with man made quartz. At the same time we were approached by two other manufacturers – Bushboard and Max-Top who had seen what we were doing for the first company so we also put together tooling for some of their products, blades, router bits and polishing pads etc.
So that’s a brief background of how we ended up offering these products and It’s still a work in progress. When we’re presented with a problem we figure out a way of making something or repurposing something to solve the problem.
Things to understand when using a Diamond blade in a track saw when cutting hard materials.
Before we go through an explanation of what blade to pick or how to use it, understand that a track saw is generally cutting a work piece in the wrong direction when it comes to stonemasonry or tiling work. Any track saw or circular saw is designed to be pushed and the blade rotates to cut up through the work piece as it’s pushed. Compared to most tiling or stone application where a grinder or wet table saw would be used with the blade cutting in a downward motion and the tool pulled backwards through the work piece or the work piece pushed flat along a bench into the blade itself. There is an exception to this, FLEX make a product called a CS60WET, it’s a powerful track saw with a water feed. It works the same way a TS55 would but wet and with much more power and a 170/180mm blade. The water helps reduce (but not eradicate) breakout/chipping. It is a very effective piece of equipment and is effectively a portable bridge saw with a 3200mm+ cutting capacity.
We currently offer three types of blade to fit a track saw.
150mm Laser Welded segmented – This blade is designed to cut reinforced concrete, it will also cut granite, quartz and 20mm thick external porcelain. It is aggressive and there will be breakout/chipping but it will pretty much cut anything that’s hard, dense or abrasive.
150mm Economy Blade – This is a general purpose turbo fine design blade that would be used for slate, marble, limestone, lighter weight concrete slab general building work but with a reasonably fine cut. It works great in thinner quartz material or as a blade to use for one job and throw away.
160mm Pro Blade – This is designed for Porcelain. We found that Thin porcelain blades produce by far the best quality cut in man made quartz engineered stone. It will work to a degree on granite but the segmented blade is much more effective.
Incidentally, when we were developing this product line we got in touch with Festool UK directly (also the head office in Germany) to find out what the warranty situation was on their machines. It was pretty non committal to be honest with the suggestion that all warranties are void if used in this manner. However, we were informed that TS55’s were actively marketed (along with other products) in Germany for the stonemasonry industry and that they are provided with full factory support. So it appears warranty issues could well be a regional thing.
I’m conscious this article is growing in size so I’ll leave it there to start with and open the thread for questions if anyone has any. I’ll do my best to answer.