You are using an out of date browser. It may not display this or other websites correctly.
You should upgrade or use an alternative browser.
You should upgrade or use an alternative browser.
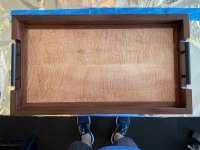
Display tray for the kitchen
- Thread starter mliebs
- Start date
Packard
Member
I really would like to see some additional shots from other angles.
I am having a hard time visualizing why this looks like.
Please post a few more shots.
I am having a hard time visualizing why this looks like.
Please post a few more shots.
kevinculle
Member
That looks like a very nice piece of work!
luvmytoolz
Member
Very nice work! Looks great!
Cheese
Member
Nice job  …what are the 2 woods? Walnut & curly maple?
…what are the 2 woods? Walnut & curly maple?- Joined
- Oct 16, 2015
- Messages
- 5,791
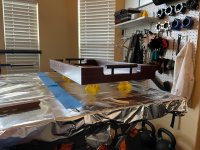
mliebs said:I made this for a friend of mine and he wanted it to match his kitchen (including the handles). Anyway, here's a couple more pictures.
That was my first thought, seeing the first pic. Those look like kitchen cabinet handles.
Nice project, looks good.
Packard
Member
It looks nice. I like the way you integrated the cabinet handles.
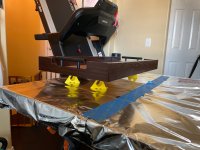
I’ve been using “press-in” rubber feet to protect surfaces and prevent slipping. They have a lower profile than the stick-on versions and seem to stay put better. I don’t remember where I got them. Very low profile so does not appear to have the items floating above the surface.
I drill a 5 mm hole and simply press in the feet. Highly recommended. I also use bump-on self-stick for situations where there is no horizontal movement to shear the bumpers off the surface. But for a tray bottom, press-in. Much lower profile than screw on and just as durable.
Lots to choose from:
https://www.google.com/search?clien...0939&sxsrf=AB5stBhiUfq-dKvhMnUP-c22rEsP0q6GVw:1692539122751&q=press+in+rubber+bumpers&tbm=isch&source=lnms&sa=X&ved=2ahUKEwj9-LfJr-uAAxVSk4kEHakaDCoQ0pQJegQIDhAB&biw=1151&bih=731&dpr=2#imgrc=AMxKEmsR31__kM
gunnyr
Member
Packard said:It looks nice. I like the way you integrated the cabinet handles.
I’ve been using “press-in” rubber feet to protect surfaces and prevent slipping. They have a lower profile than the stick-on versions and seem to stay put better. I don’t remember where I got them. Very low profile so does not appear to have the items floating above the surface.
I drill a 5 mm hole and simply press in the feet. Highly recommended. I also use bump-on self-stick for situations where there is no horizontal movement to shear the bumpers off the surface. But for a tray bottom, press-in. Much lower profile than screw on and just as durable.
Lots to choose from:
https://www.google.com/search?clien...0939&sxsrf=AB5stBhiUfq-dKvhMnUP-c22rEsP0q6GVw:1692539122751&q=press+in+rubber+bumpers&tbm=isch&source=lnms&sa=X&ved=2ahUKEwj9-LfJr-uAAxVSk4kEHakaDCoQ0pQJegQIDhAB&biw=1151&bih=731&dpr=2#imgrc=AMxKEmsR31__kM
Thanks for the tip! Very elegant and useful. I never thought to do it this way!
tjbnwi
Member
- Joined
- May 12, 2008
- Messages
- 7,381
Nice looking trays.
These are serving trays incorporated into some pantry/prep kitchen cabinets we did. Hand holes were cut with the Shaper Origin.
https://www.instagram.com/p/CocwfCRrRul/?img_index=1
Tom
These are serving trays incorporated into some pantry/prep kitchen cabinets we did. Hand holes were cut with the Shaper Origin.
https://www.instagram.com/p/CocwfCRrRul/?img_index=1
Tom
- Joined
- Oct 16, 2015
- Messages
- 5,791
tjbnwi said:Nice looking trays.
These are serving trays incorporated into some pantry/prep kitchen cabinets we did. Hand holes were cut with the Shaper Origin.
https://www.instagram.com/p/CocwfCRrRul/?img_index=1
Tom
I see a Castle pocket in there. Until a couple of years ago, when they came up with some miniaturized versions, that was pretty much a big cabinet shop exclusive. Most people have never seen them.
Similar threads
- Replies
- 18
- Views
- 924